grab our FREE
‘Do’s & Don’ts of what to add to your website’ Guide.
‘Do’s & Don’ts of what to add to your website’ Guide.
emails with additional helpful content.
Hi, we're so glad you found us.
We love helping creatives like you finally have the website you’ve always wanted.
few simple steps
Follow us
How to Update Images in Galleries & Canvas Views inside Showit
Are you thinking, what are Galleries & Canvas Views? Don’t worry we are going to demystify everything about them and show you (exactly) – How to Update Images in Galleries & Canvas Views inside Showit.
Wait, want to learn more? Check out our entire – How-to Use Showit Series below.
- 1. How to Create a Showit Subscription
- 2. How to Import Your Showit Template
- 3. How to Update Text in Showit
- 4. How to Import & Update your images in Showit
- 5. How to Update Images in Galleries & Canvas Views – (this is the blog you’re in)
- 6a. How to Update Master Fonts in Showit – Site Styles Part 1
- 6b. How to Update Master Colours in Showit – Site Styles Part 2
- 7. How to Update Site Canvases in Showit
- 8a. How to add my Instagram Feed to a Showit Website – Links Part 1
- 8b. How to Link to Email Addresses in Showit – Links Part 2
- 9. How to Link to your Social Media Accounts in Showit – Links Part 3
- 10. How Blogging works with Showit
- 11. How to get your Showit Website Ready for Launch
- 12. Countdown to Launching your Showit Website
- BONUS – After your 14-day free Showit trial – use our affiliate link to get your first paid month for free!

Our two Step-by-Step Sections
This blog is broken into two easy-to-follow step-by-step processes on how to update images in Showit Galleries & Canvas Views
Section 1. How to Update Images in Galleries – 12-Step Process
Section 2. How to Update Images in Canvas Views – 8-Step Process
SECTION 1
Step 1
How to Update Images in Galleries
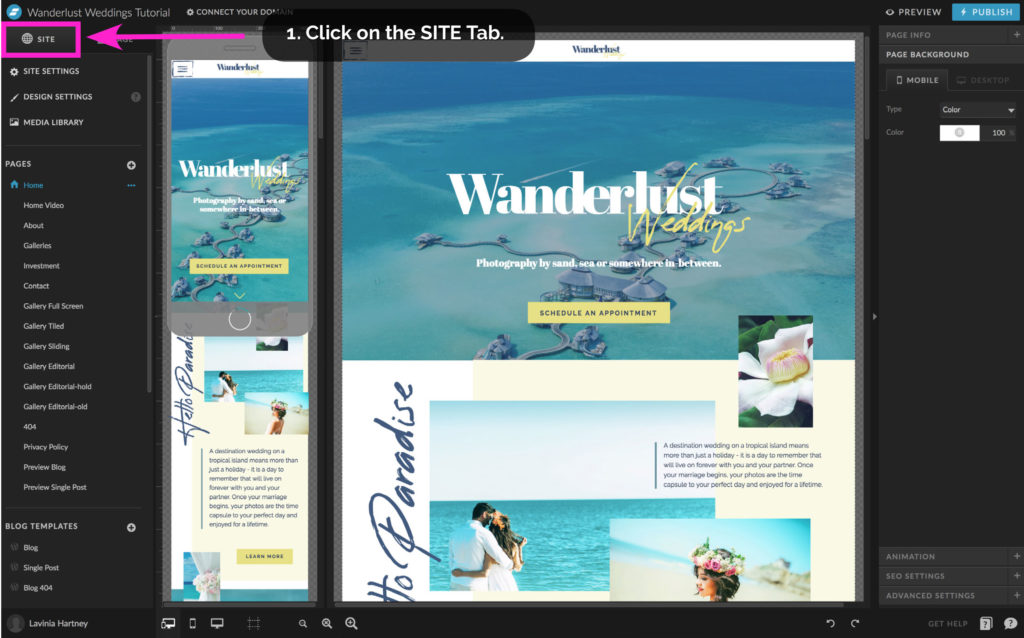
• Just like its real-world counterpart, a gallery is a collection of images.
Let’s take a closer look at galleries.
1. Click on the SITE tab to access your website pages.
Insider Tip:
Our Showit Template Emporium designs come with pre-made Galleries & Canvas Views allowing you to replace our images with your own.
Check out the pre-made Galleries here and here.
There are a variety of different template types.
– Full-Screen Gallery create the biggest impact as your beautiful photos take over the screen.
– Sliding Gallery – navigate through a selection of images.
– Tiled Gallery – this masonry, Pinterest-style layout gives your viewer an overview of your work
– Editorial Gallery – each frame creates a story, as you combine multiple images for a sleek magazine look.
Section 1 – Step 2
How to Update Images in Galleries
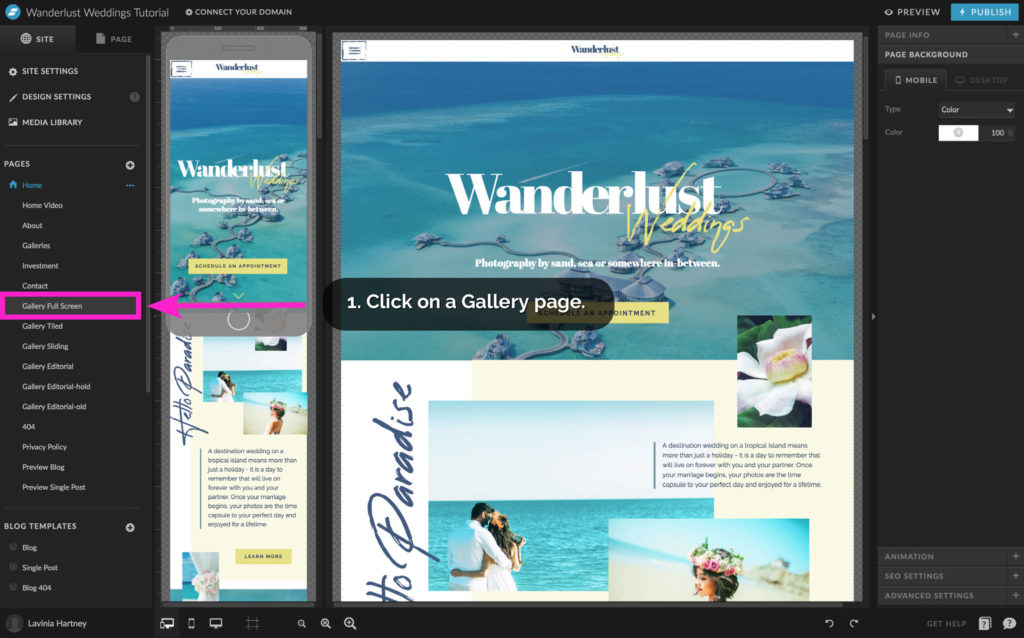
• In our example, we are using our Wanderlust Wedding multiple-page website template, which has a page dedicated to a gallery.
• We’re going to show you how to update the Gallery Full Screen.
Section 1 – Step 3
How to Update Images in Galleries
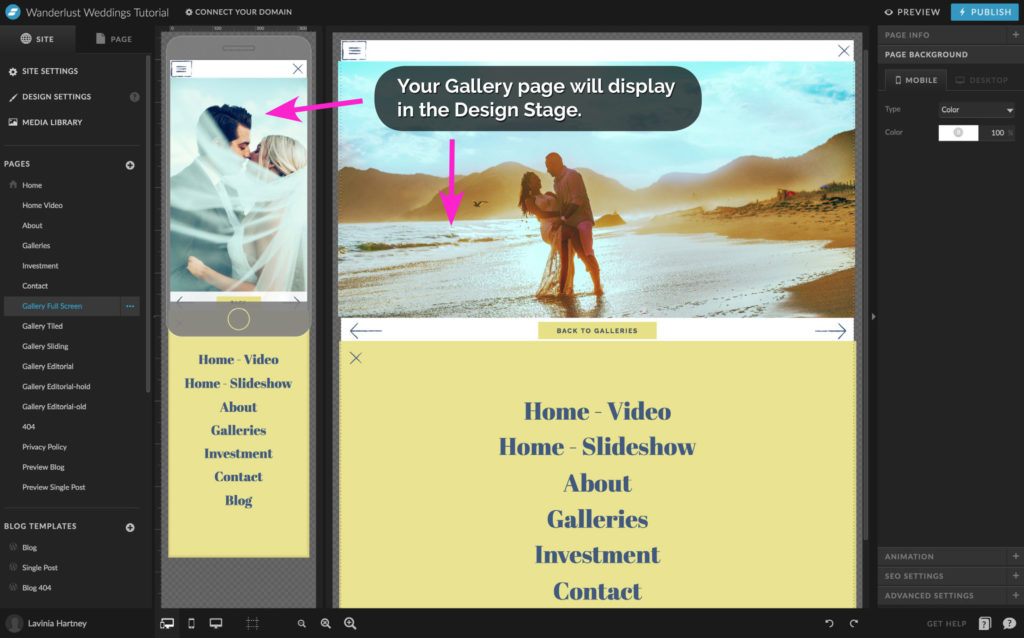
• Once your Gallery page is open, it will display in the Design Stage.
Insider Tip:
You may have noticed in our example, that the gallery images for mobile are different from the gallery images for desktops.
In Showit, you have the option of displaying different content on Mobile
and Desktop. Now you can pick images that fit best within the shape,
e.g. Mobile (portrait) as opposed to Desktop (landscape).
• Once your Gallery page is open, it will display in the Design Stage.
Section 1 – Step 4
How to Update Images in Galleries
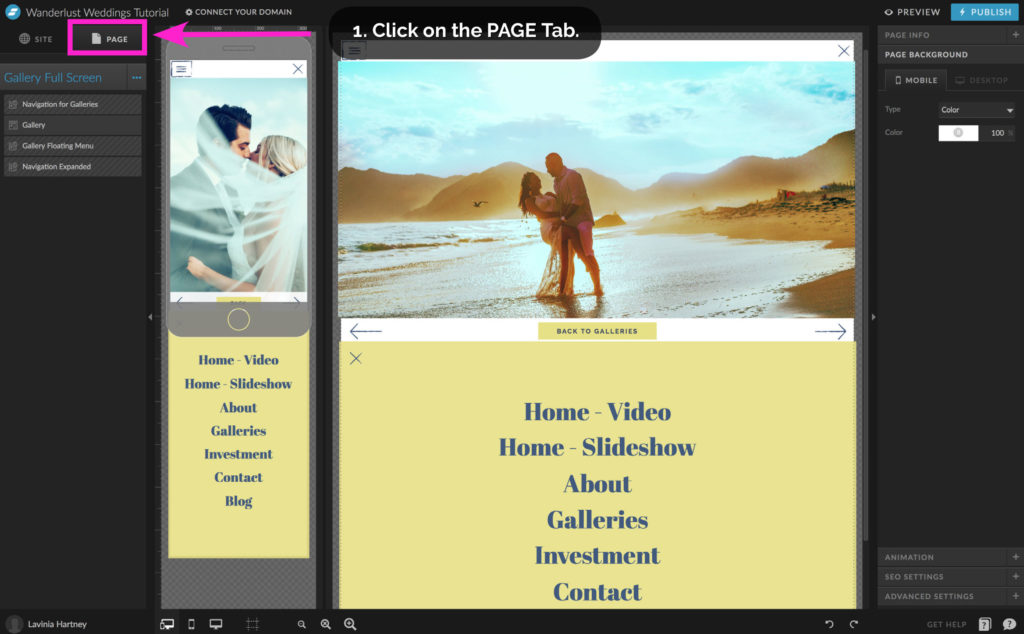
• Click on the PAGE tab to bring up the Canvases that make up the page.
Section 1 – Step 5
How to Update Images in Galleries
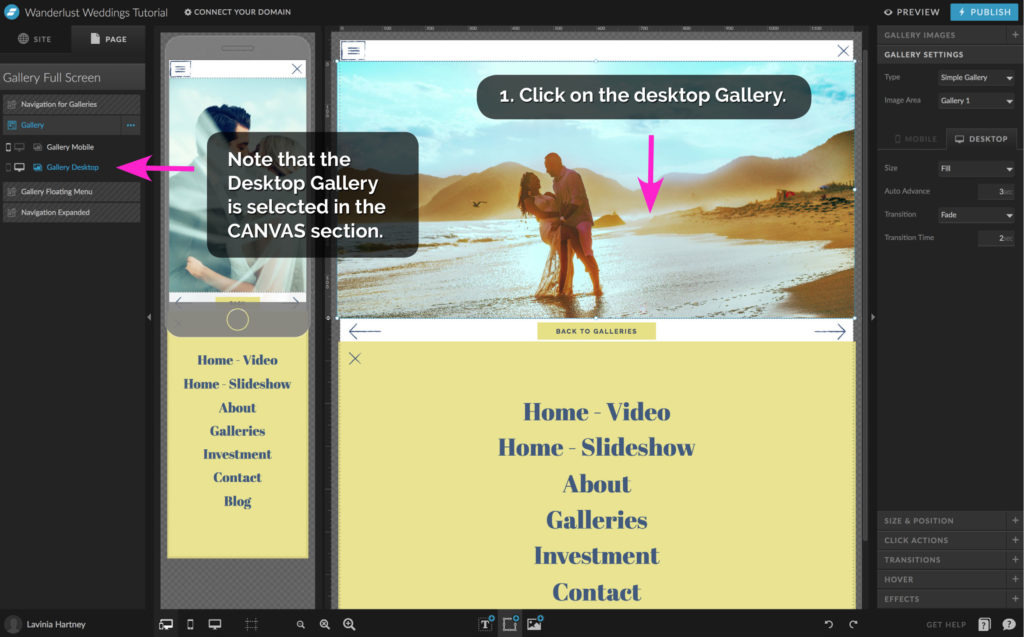
1. Click on the Gallery in the Desktop View, (it will highlight blue when selected).
• Notice in the Canvas section, that the Desktop Gallery is selected.
Insider Tip:

As you can see in the enlarged image above the Mobile Icon is Grayed-out, meaning Gallery Desktop is not visible on Mobile, while the Desktop Icon is White, meaning Gallery Desktop is visible on Desktop.
If you were to click the Grayed-out Mobile Icon, the Desktop Gallery would be visible on Mobile, and the icon would change to White.
This applies to all Elements in Showit, including text, icons, images, boxes etc. This allows you to make Custom Designed Experiences for mobile and desktop.
Section 1 – Step 6
How to Update Images in Galleries
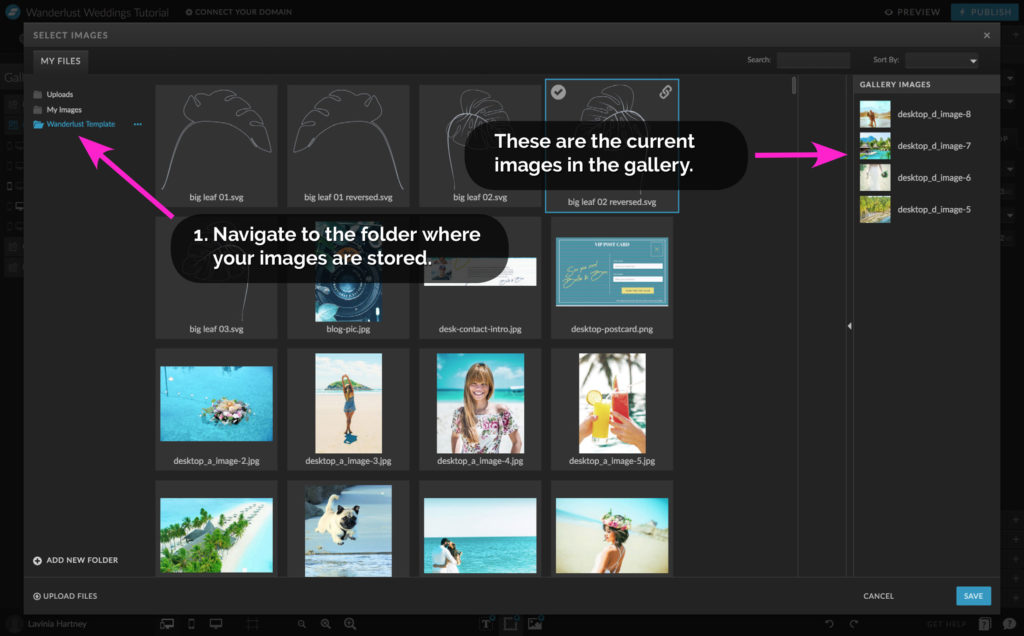
1. Double-Click on the Gallery in the Desktop View (as per the previous page screenshot).
• This will open the SELECT IMAGES pop-up window as above.
• The images under GALLERY IMAGES are the current images in the gallery.
2. Navigate to the folder where your images are stored.
Section 1 – Step 7
How to Update Images in Galleries
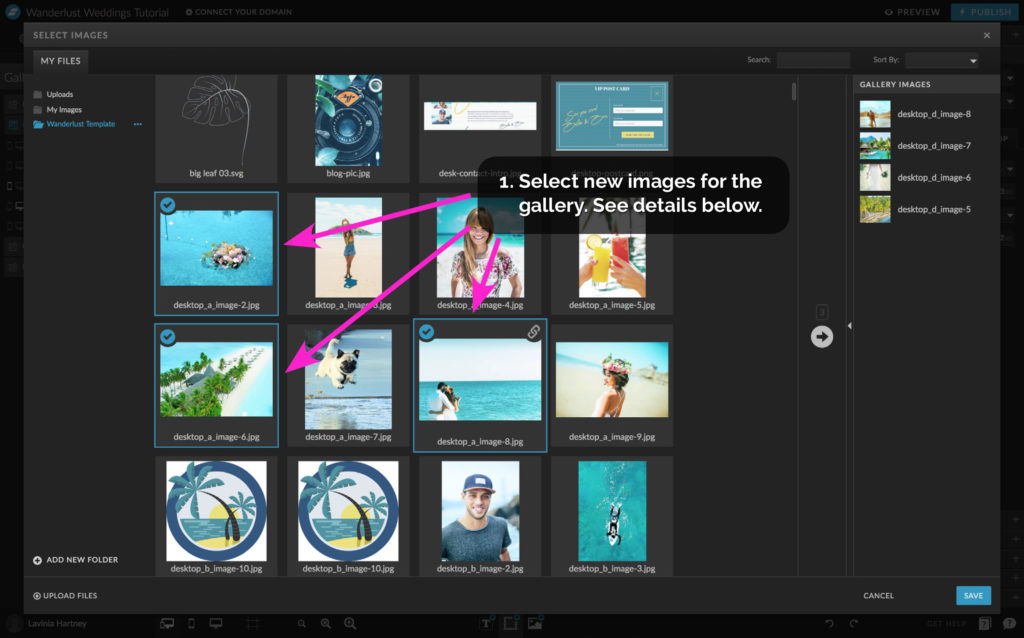
• Click to select an image you want to Add to the Gallery.
A tick will appear in the top left of the image meaning, it is selected.
1. To add more selected images, do one of the following.
For Mac users: hold down the [COMMAND] key and click another image.
For Windows users: hold down the [CONTROL] key and click another image
Insider Tip:
Want to highlight a series of images?
Click the first image, then [SHIFT] click the last image in the series. All images in between will be selected.
Section 1 – Step 8
How to Update Images in Galleries
1. Click the Blue Arrow, when you have all the images you want to add to the gallery.
Section 1 – Step 9
How to Update Images in Galleries
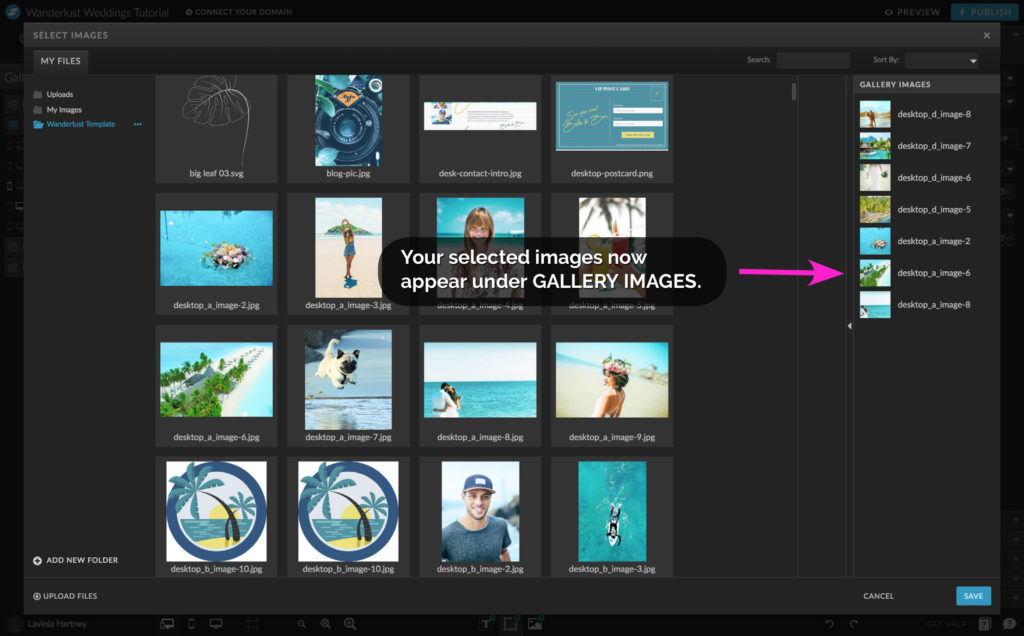
• Your selected images will now appear under GALLERY IMAGES at the
bottom of the list.
Section 1 – Step 10
How to Update Images in Galleries
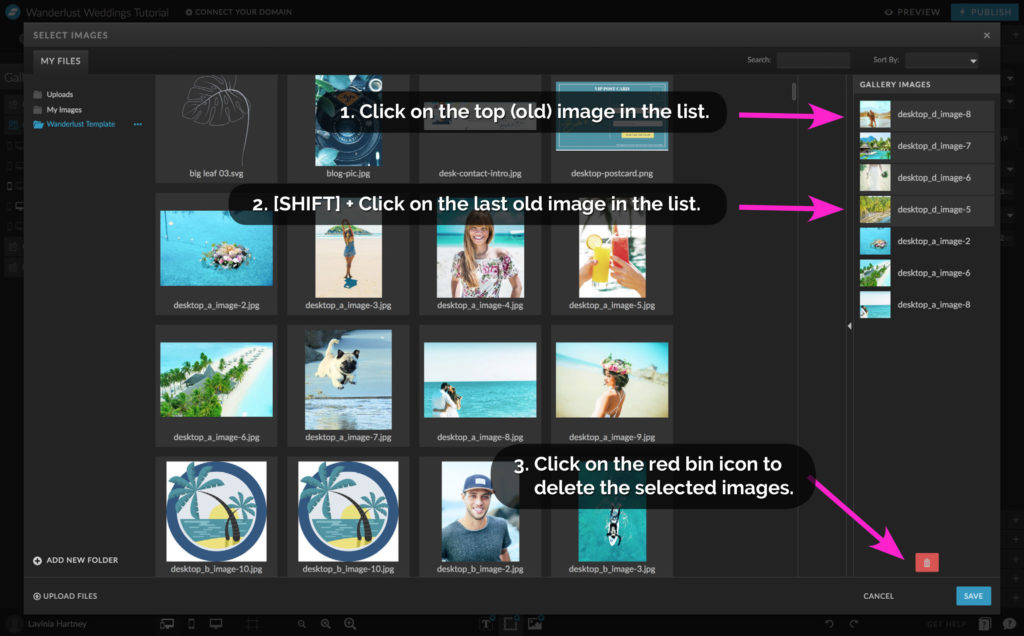
Most Showit Templates come with photos included. Before we update them with your images, let’s delete these old ones.
1. Click on the top old image in the list.
2. Hold down the [SHIFT] key and click on the last old image.
• This highlights all the images in between, indicating they’re selected
3. Click the red bin icon to delete the old images.
Section 1 – Step 11
How to Update Images in Galleries
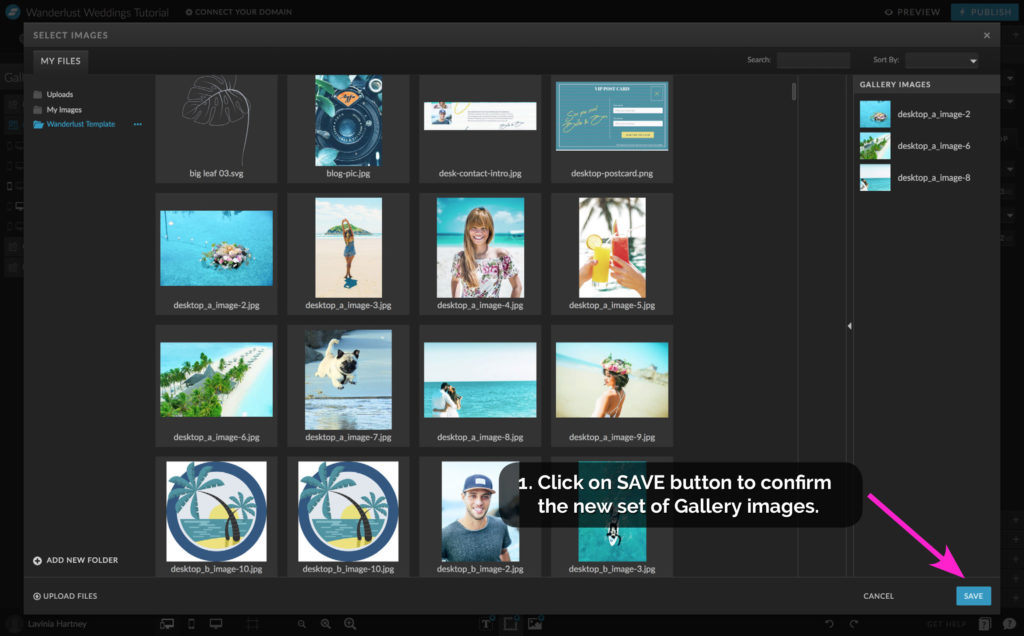
• The old gallery images are now gone.
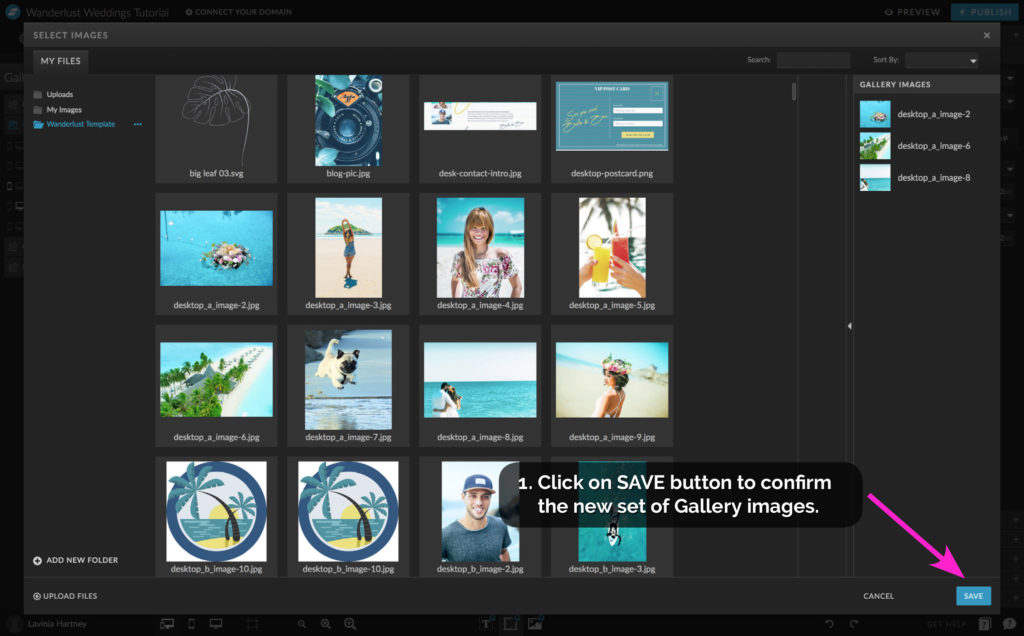
1. Click the SAVE button to confirm the new set of gallery images
Section 1 – Step 12
How to Update Images in Galleries
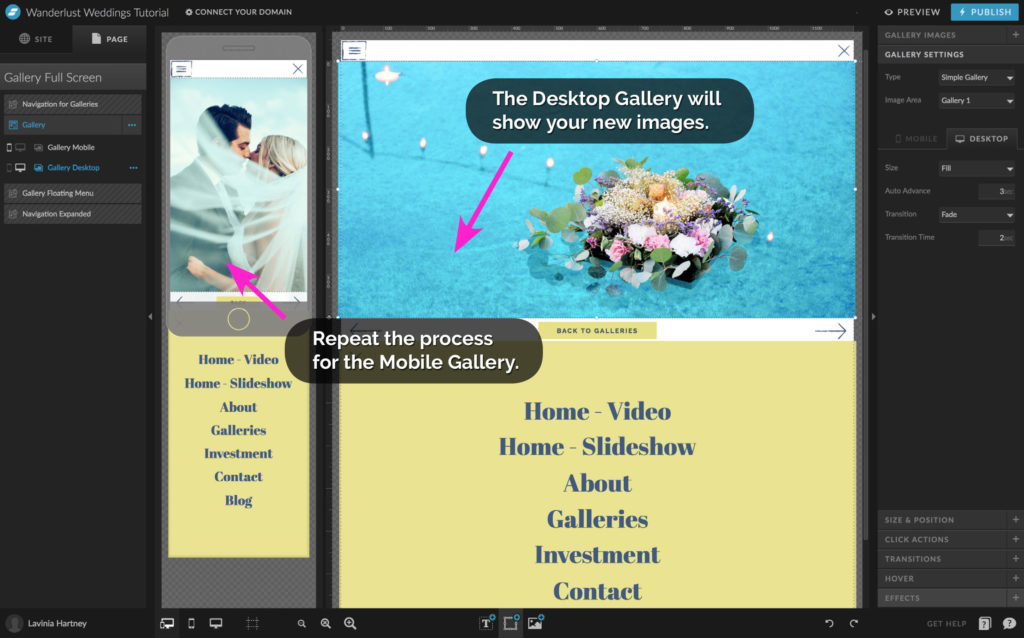
• You’ve now returned to the Design Stage. Notice that the Desktop Gallery Images are updated.
• To set up the Mobile Gallery, Double-Click the Mobile Gallery and repeat the process covered in this chapter.
Insider Tip:
It’s best to have a set of images for mobile and a separate set for desktop. The mobile screen needs a portrait shape, while landscape shapes work best on desktop screens. Crop your images for each format for the best-looking results!
SECTION 2
Now you know that Showit Galleries are just like their real-world counterpart (a collection of images) it’s time to move on to Showit Canvas Views.
Section 2 – Step 1
How to Update Images in Canvas Views
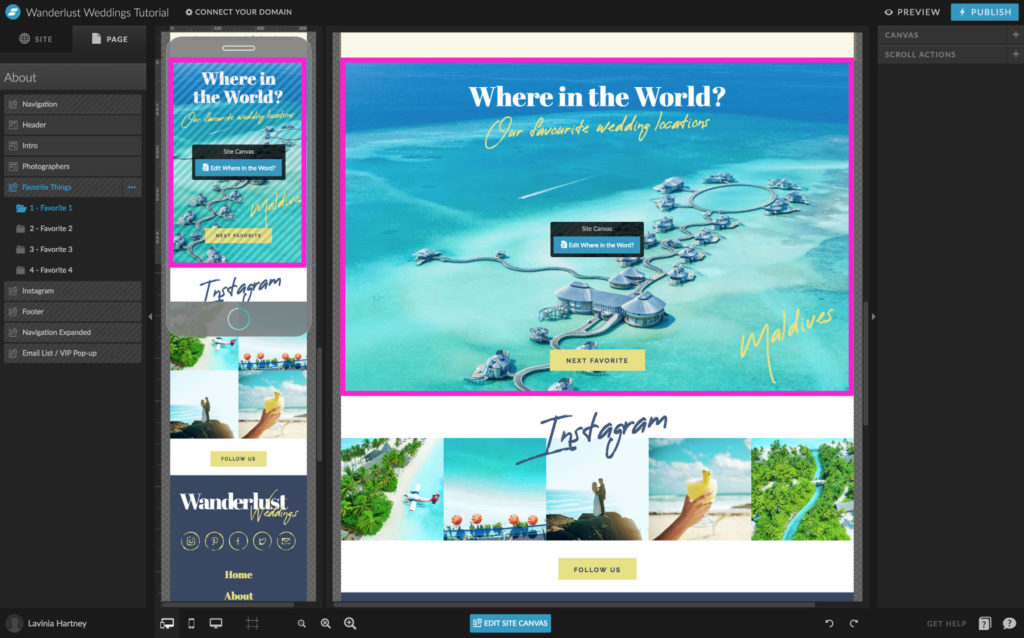
What are Showit Canvas Views?
Canvas Views are like Galleries, but you can add things such as Text and Buttons to each Slide in the Gallery.
The example above is a Canvas View from our Wanderlust Weddings Template. This is our Favourite Things canvas – each Favorite Things image can have its own text.
Other Canvas views we have created include:
• Testimonials – each testimonial has a different image along with individual text accompanying it.
• Contact forms – these have one canvas view where you enter contact details and a second one that is a thank you and confirmation that the form was submitted.
Section 2 – Step 2
How to Update Images in Canvas Views
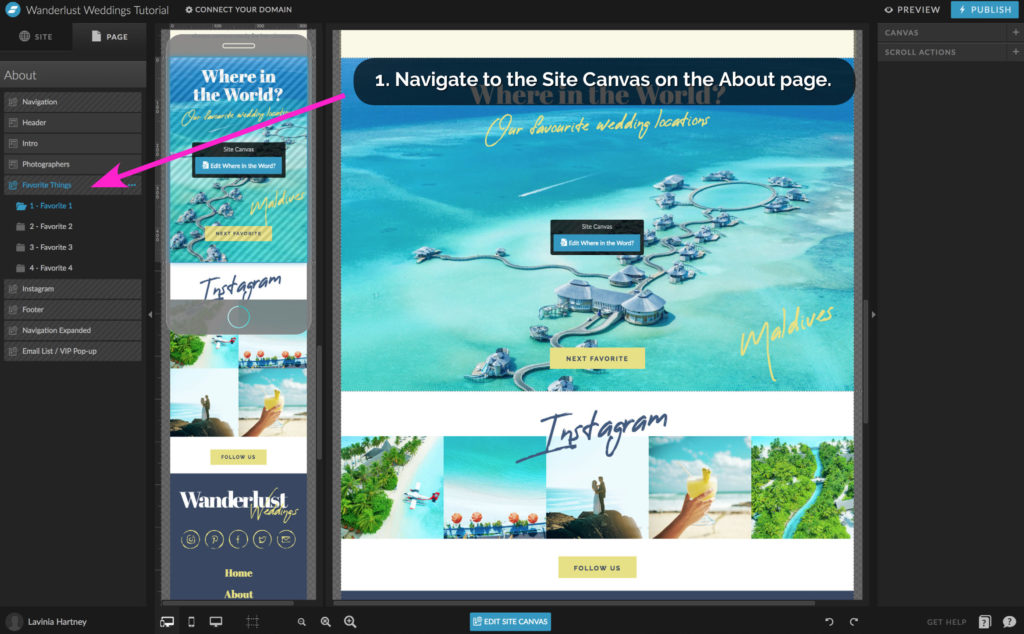
• For our example, we’ll use our Favourite Things canvas.
Follow along with your template design. You probably won’t have a Favourite Things canvas, but if you have a Testimonials canvas, use that instead.
1. Navigate to the About page (or to wherever your canvas is), then to the Favorite Things canvas. Click on the canvas to select it.
Section 2 – Step 3
How to Update Images in Canvas Views
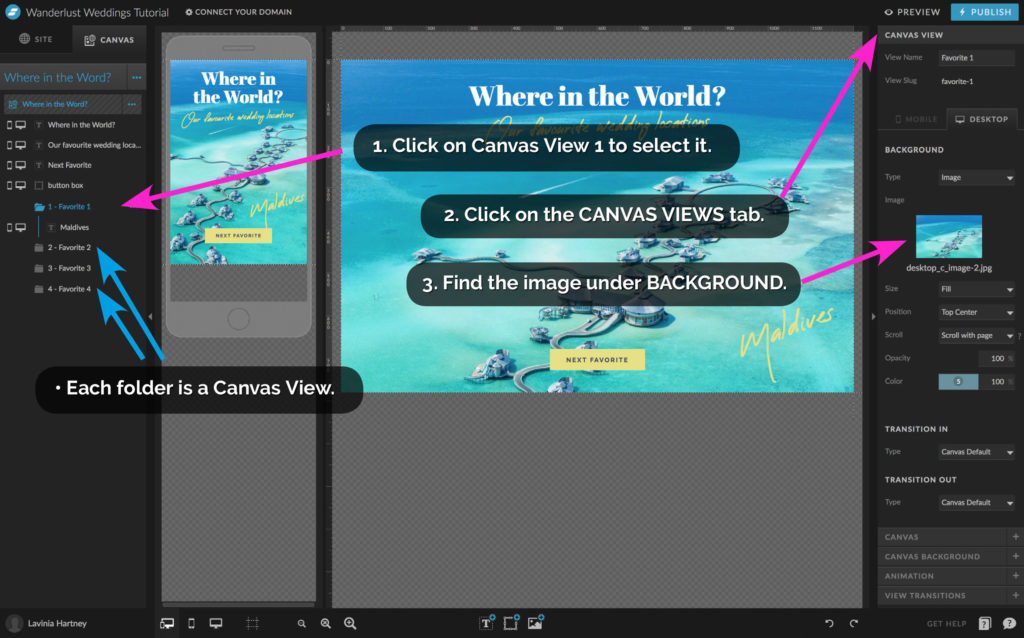
We’ll get to updating Canvas Views soon, but let’s start with a walk around of a Canvas View layout. We will use
• Each folder is a Canvas View.
1. Canvas View 1. Looking at the image above, this is the top folder with a 1 next to the name. The Folder will open, revealing the items that make up the canvas.
• Notice that our example Canvas View only has text. Where is the image?
2. Click the CANVAS VIEW tab.
3. The image is the background of the Canvas View.
Section 2 – Step 4
How to Update Images in Canvas Views
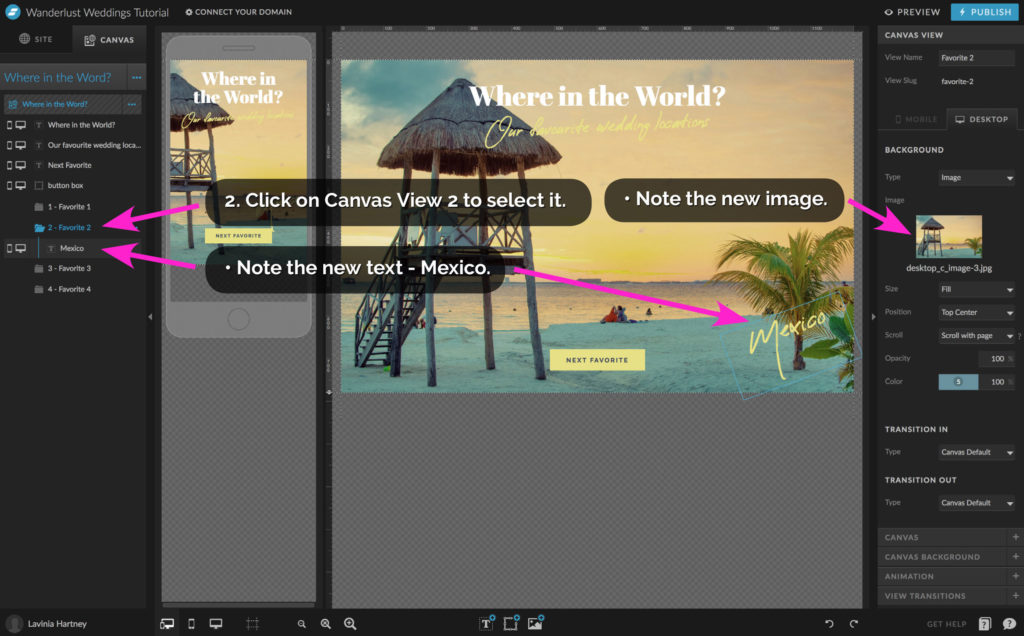
1. Canvas View 2
Using the example above as a guide, we can see it has a different image and different text
• If you were to click through every other canvas view, they too would contain different images and text.
Section 2 – Step 5
How to Update Images in Canvas Views
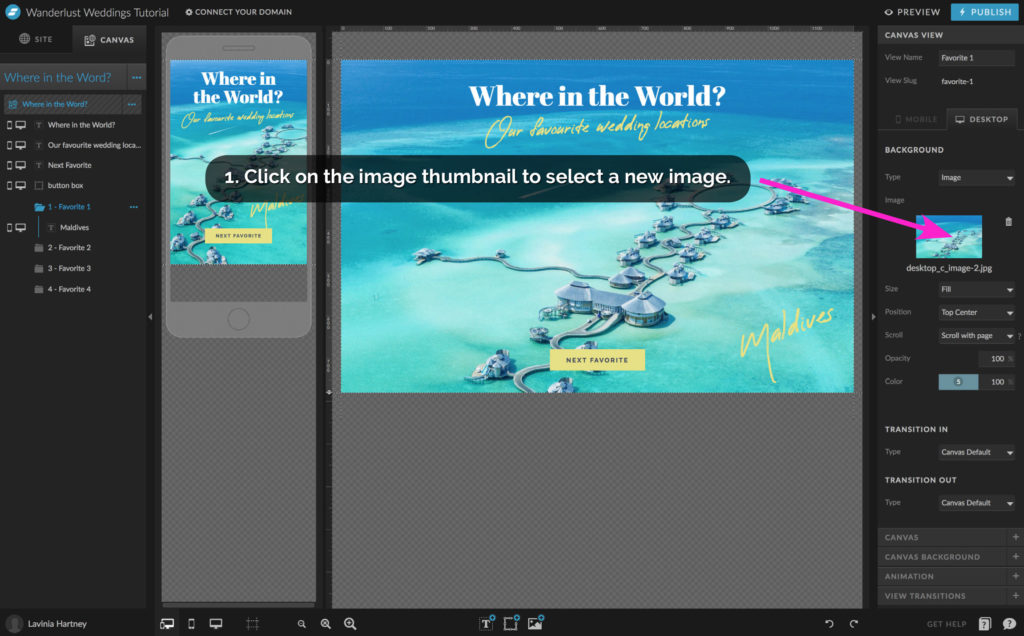
• Let’s head back to Canvas View 1
• To update the image, all you have to do is click on the image thumbnail.
Section 2 – Step 6
How to Update Images in Canvas Views
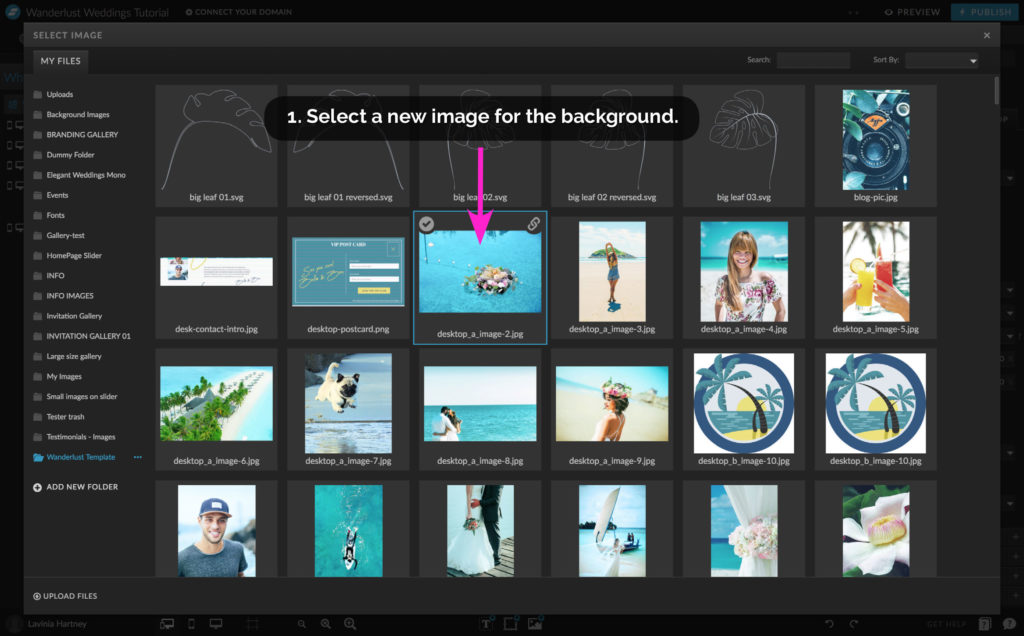
1. In the pop-up window, navigate to your folder and select a new image.
Section 2 – Step 7
How to Update Images in Canvas Views
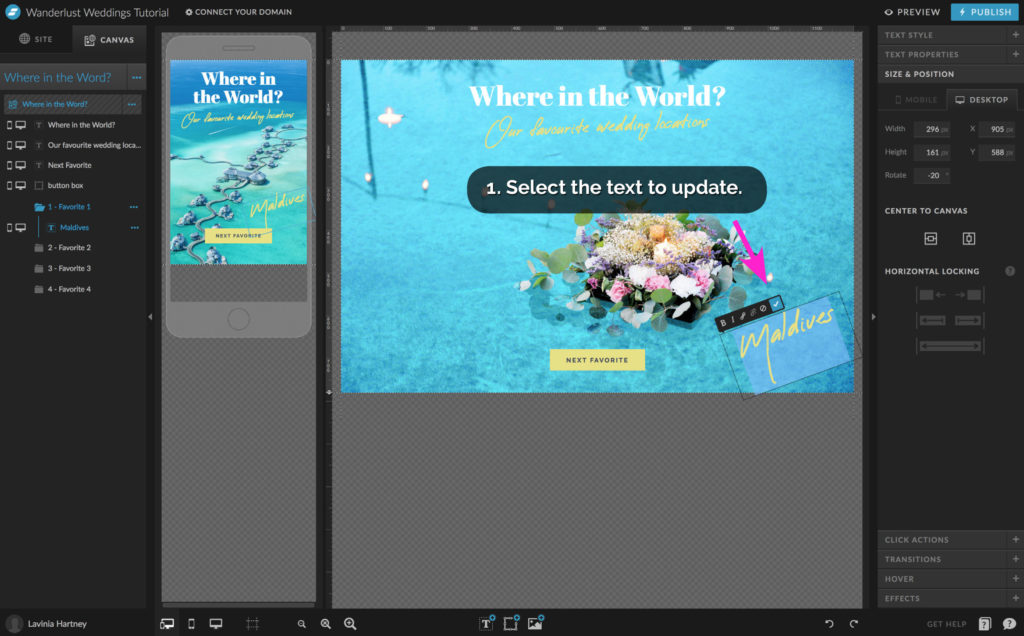
• Your new image will appear on the desktop.
1. Select the text to update.
Section 2 – Step 8
How to Update Images in Canvas Views
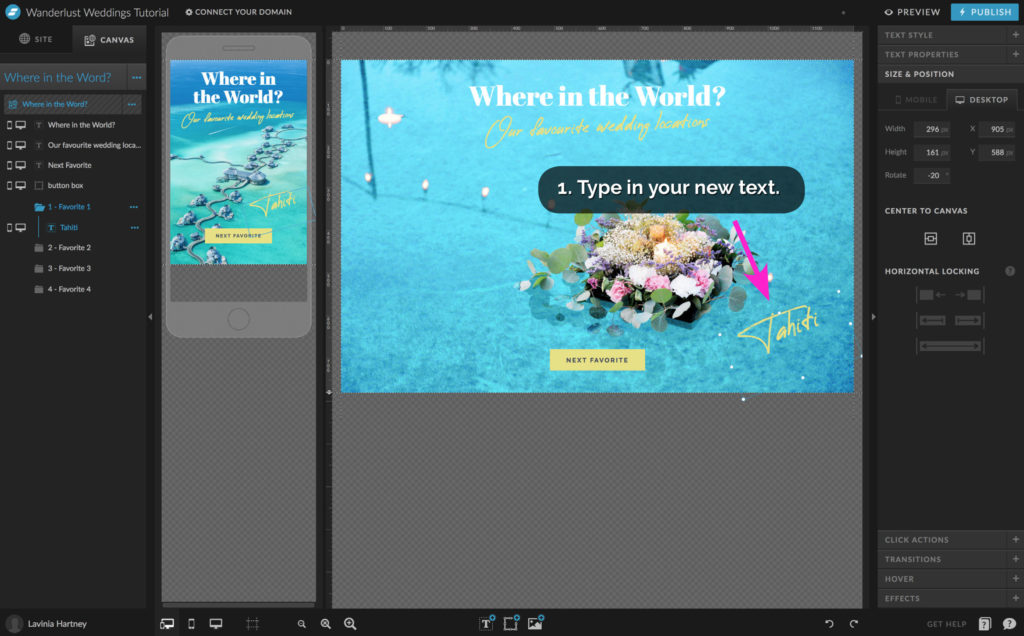
1. Type in your new text.
• It’s time to view all your hard work!
• Press Preview on your screen

You Did it!
You know how to Update Images in Galleries & Canvas Views.
Now you’re ready to learn how to customize the website template by adding your branding colours and fonts to make it truly your own.
We’ll show you the steps next week in, How to update colours & fonts in Showit.
Your Action Steps:
- Follow our easy 12-step process to update images in galleries
- Update images in Canvas view by following our simple 8-step process
- Congratulate yourself! Now you know How to update Images in Galleries & Canvas Views inside Showit
After your 14-day free Showit trial – get an additional paid month for free!
Ready to start creating your website with Showit? Hit the button below and get your first subscription month for free.
Full disclosure, this is our affiliate link. So if you join Showit, you’ll be supporting us which helps us produce more content like this, at no additional cost to you.
Where to now?
Now you’re ready to learn how to customize your template. Get ready for Part 6 (first half) – How to Update Master Fonts in Showit – Show me Now!.
Like this Blog Post?
PIN IT FOR LATER. And for more helpful tips follow us on PINTEREST.

Search
Create & launch your website in a
few simple steps
FREE GUIDE
While you’re here,
grab our FREE
‘Do’s & Don’ts of what to add to your website’ Guide.
‘Do’s & Don’ts of what to add to your website’ Guide.
When you sign up, we’ll send you
emails with additional helpful content.
About Lavinia & Tom
Hi, we're so glad you found us.
We love helping creatives like you finally have the website you’ve always wanted.
Blog Categories
Follow us
