grab our FREE
‘Do’s & Don’ts of what to add to your website’ Guide.
‘Do’s & Don’ts of what to add to your website’ Guide.
emails with additional helpful content.
Hi, we're so glad you found us.
We love helping creatives like you finally have the website you’ve always wanted.
few simple steps
Follow us
15 Showit Shortcuts (you need to know!)
Save time and frustration building your website by using our 15 Showit Shortcuts. We’ve included both keyboard and icon shortcuts to make the process smooth and easy. By the end of this blog, you’ll feel like a Showit Star!
Before we start – missed a part of our Ultimate Showit Series? Catch up below.
- What is Showit & how does it work?
- Your Top 10 Showit Q&As
- 8 Ways to Personalise Your Showit Template
- 3 Ways to Create Client Testimonials in Showit
- Showit Step-by-Step Template Training Series
- How to have a Stress-Free Launch with our Showit Website Audit

Showit Shortcuts – To help you out
Need help using Showit?
• In Showit, go to the bottom toolbar and click the highlighted button below for Showit help docs – A Library of documents from basic to advanced.
Here’s a peek at the help docs

Need Showit technical help?
• Again on the toolbar, click the highlighted button below.
– Click the Ask a Question button to open the Live Chat interface.
– Live Chat is available Mon-Fri, 8 am – 5 pm MST.

Showit Shortcuts – You’ll use every time
How do I SAVE?
There’s no need to save when working on a Showit document. Every change is automatically saved and backed up.
How do I UNDO?
If you want to undo changes, you have made to your template,
use the ‘Undo’ button. (Found in the toolbar at the bottom of the page).

Your computer undo shortcut will also work in Showit
MAC: Command key + Z – PC: Control key + Z
How do I REDO?
Click the ‘Redo’ button to redo your last change.
(Found in the toolbar at the bottom of the page)

Your computer redo shortcut will also work in Showit.
MAC: Command + Shift + Z
PC: Control + Shift + Z
How do I COPY?
Right-click your mouse button, and from the drop-down menu
select Copy. (Mac users may need to set up the right mouse
click under Apple System Preferences, then mouse).
or
Your computer’s copy keyboard shortcut will also work in Showit.
MAC: Command + C
PC: Control + C

How do I PASTE?
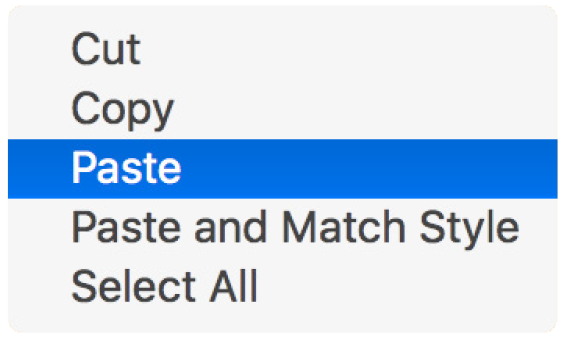
Right-click your mouse button, and from the drop-down menu
select Paste.
or
Your computer’s paste keyboard shortcut will also work in Showit.
MAC: Command + V
PC: Control + V
Prefer these Shortcuts as Cheat Sheet? – Get it here!

How do I DELETE?
Another tool that goes hand in hand with deleting is the Undo key. If you ever delete something by accident, don’t worry, hit the undo key and it will revert.
The only exception is if you delete a page once deleted you can’t get it back.
Delete an element
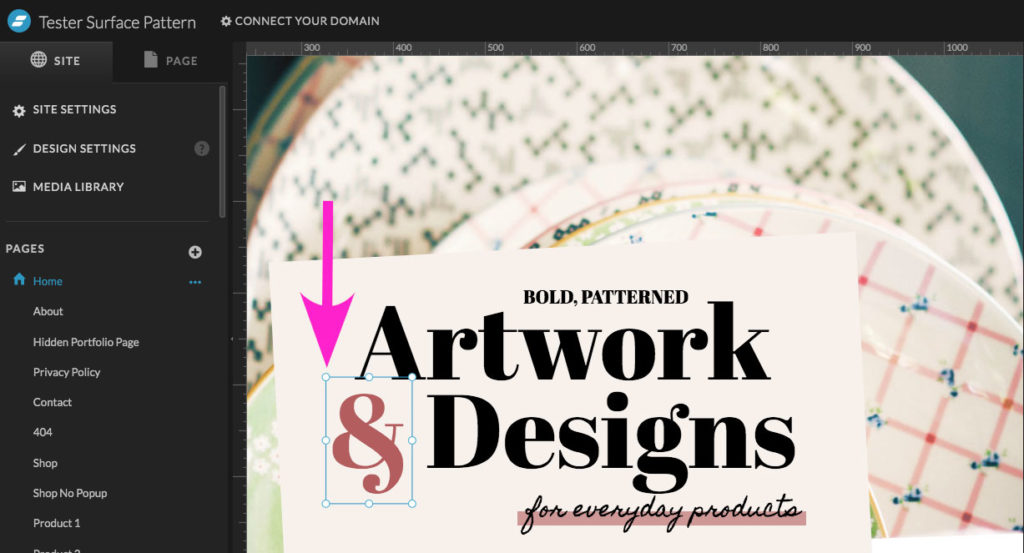
Click the element (image, text, icon etc.) on the canvas you want to delete.
A blue box (as shown in the example below) will appear around it now you can hit delete on your keyboard.
Delete a Canvas
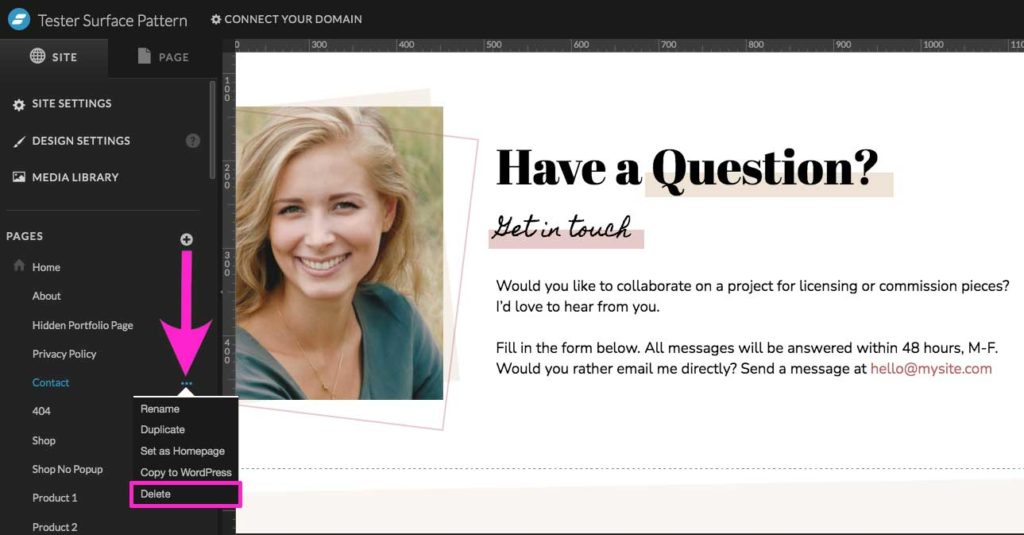
Find the canvas you want to delete. Following our example below, on the right-hand side click the 3 dots fly-out panel and select Delete.
Showit Shortcuts – To view your website
How can I view the MOBILE AND DESKTOP screen together?
In Showit, go to the bottom toolbar and click the mobile and desktop icons outlined below.

How can I view only the MOBILE?
Again on the toolbar, click the mobile icon outlined below.

How can I view only the DESKTOP?
Back on the bottom toolbar, click the desktop icon outlined below.

It’s better to work viewing both mobile and desktop, especially if you are
adding new items to your design.
You can use the desktop or mobile-only view if you need to focus on one
device or if you are working on a smaller laptop screen.
Just remember to check back and see what is happening on the other
view regularly.
Showit Shortcuts – To view your work
How can I ZOOM OUT?

Click on an object in either the Mobile or Desktop view.
The highlighted button (found in the bottom toolbar in Showit) ‘Zooms’ the view out, making it smaller.
Use this to see an overview of your site.
How can I ZOOM IN?

Click on an object in either the Mobile or Desktop view.
The highlighted button (found in the bottom toolbar in Showit) ‘Zooms’ the view in, making it larger.
Use this to see more detailed work.
How can I RESET ZOOM?

Click on an object in either the Mobile or Desktop view.
The highlighted button (found in the bottom toolbar in Showit) resets the view to 100%.
Use this to see how your website will appear when published.
Showit Shortcuts – Special Paste
This amazing time-saving shortcut allows you to copy settings you have created between objects, layouts and even between your desktop and mobile layouts.
How to create a Special Paste
- Use the copy shortcut we taught earlier
MAC: Command + C
PC: Control + C - Click and select the element you want to paste the settings onto
- Special Paste
MAC: Shift + Command + C
PC: Shift + Control + V
Insider Pro Tip
If the above shortcut does not work, it may be because something else in Chrome is conflicting with it.
We have found if Google Docs is open at the same time, Special Paste does not work. We also use a Chrome Screenshot extension that uses the same shortcut.
The workaround is to have only Showit open in your Chrome browser (No Google Docs), and change any browser extension shortcuts if they conflict.
Special Paste is perfect if you need to update lots of similar items on your layout.
Example A:
You have text in your buttons that you want to make black and a different font.
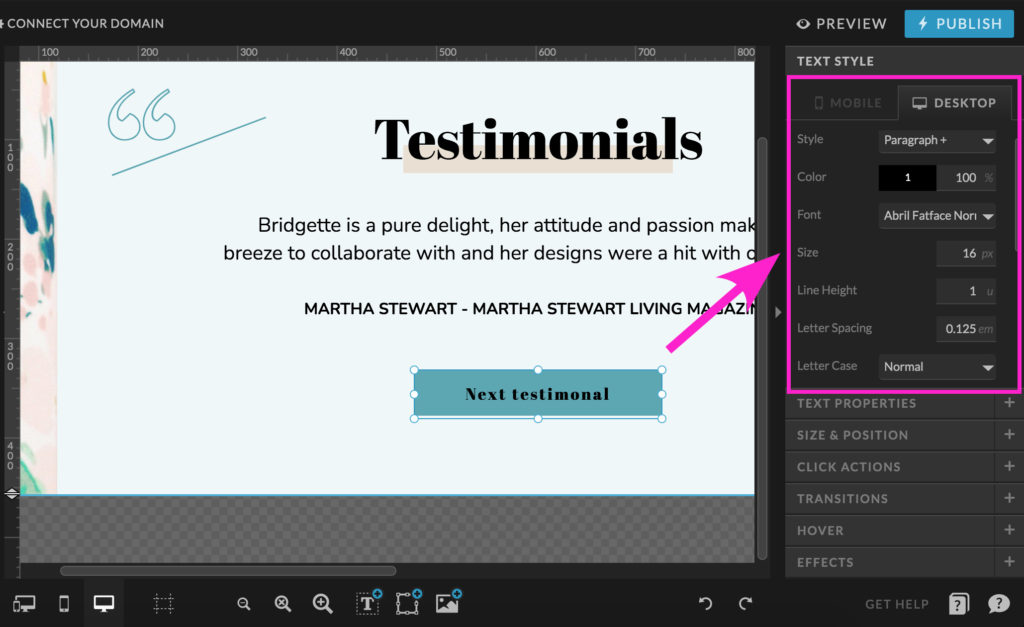
Step 1
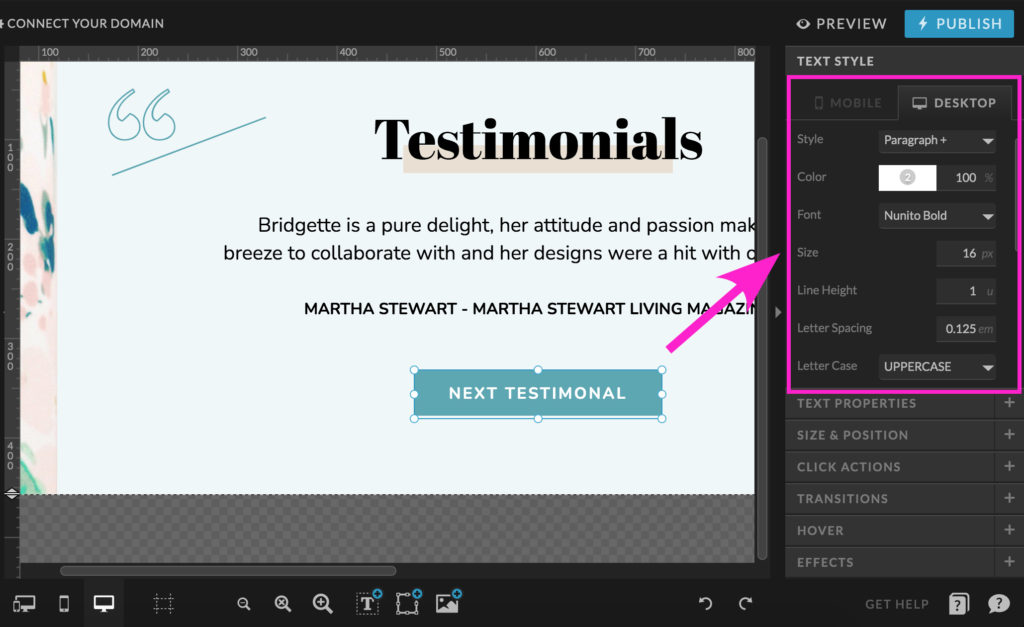
• In Showit click on an existing button text. (As shown below).
• Open the TEXT STYLE panel to see its styling.
Step 2
• Change the button text style to what you want your other buttons to appear like. In this case, we changed the font and made the colour black.
• Now copy your buttons text by using the Shortcut
– MAC: Command + C
– PC: Control + C
Step 3
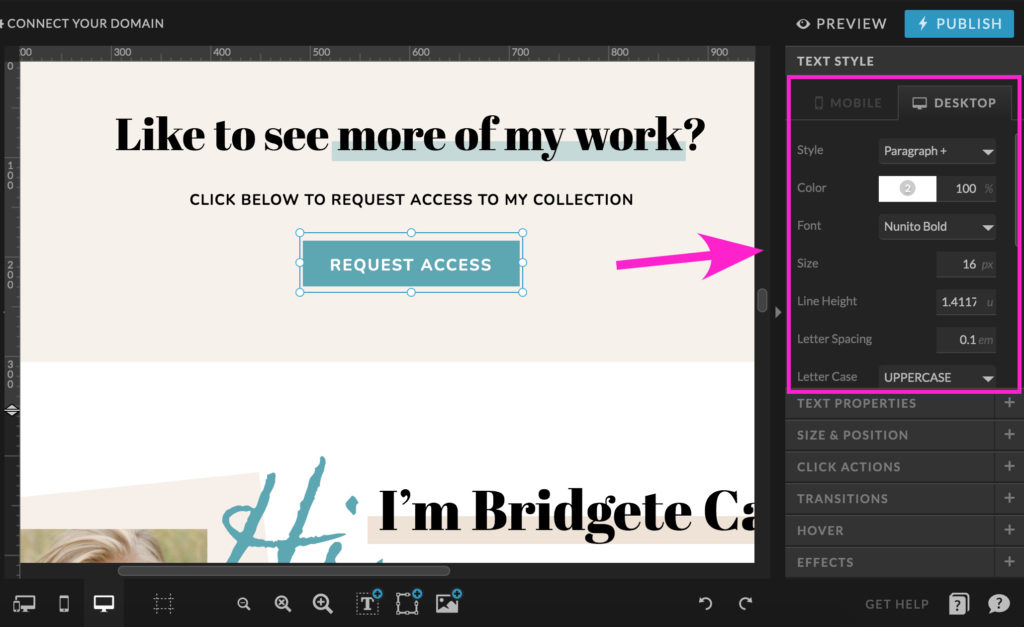
• Now navigate to another button on your website.
• Notice how it has the original button styles.
Step 4
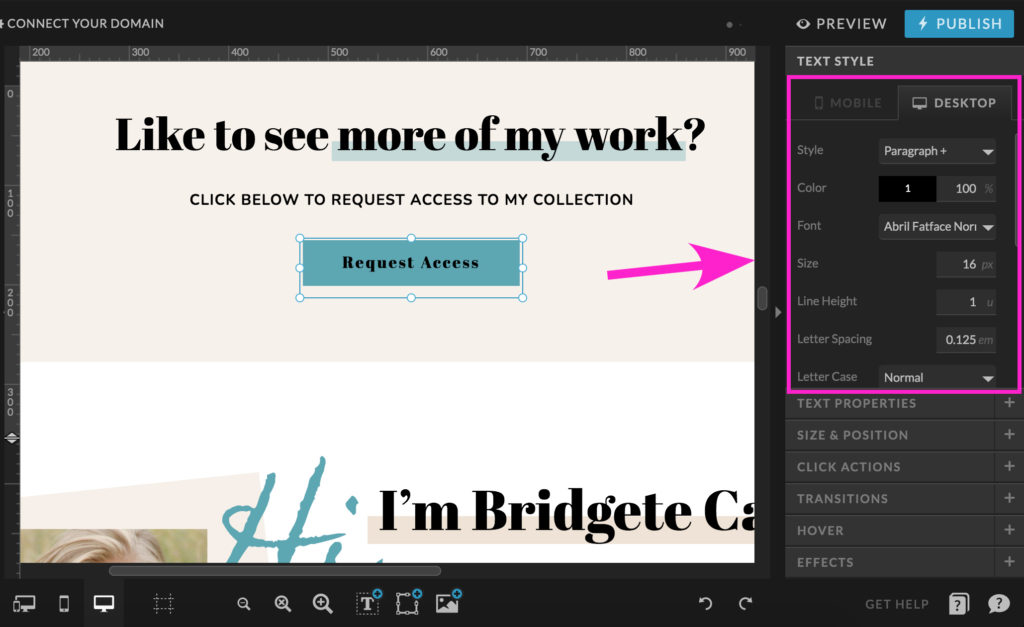
• Special Paste your new button attributes using the Shortcut
– MAC: Command + Shift + V
– PC: Control + Shift + V
• Your button should update to the new style you created – note the font and colour have been updated in the Text Style panel.
Example B:
Want to change what happens to your images when your mouse hovers over them?
Special Paste with an image
• In this case, we want to change what happens to your images when your mouse hovers over them, then copy this animation style to other images.
• We want our images to fade out slightly when our mouse is over them.
Insider term alert! – this is called a ‘hover state’.
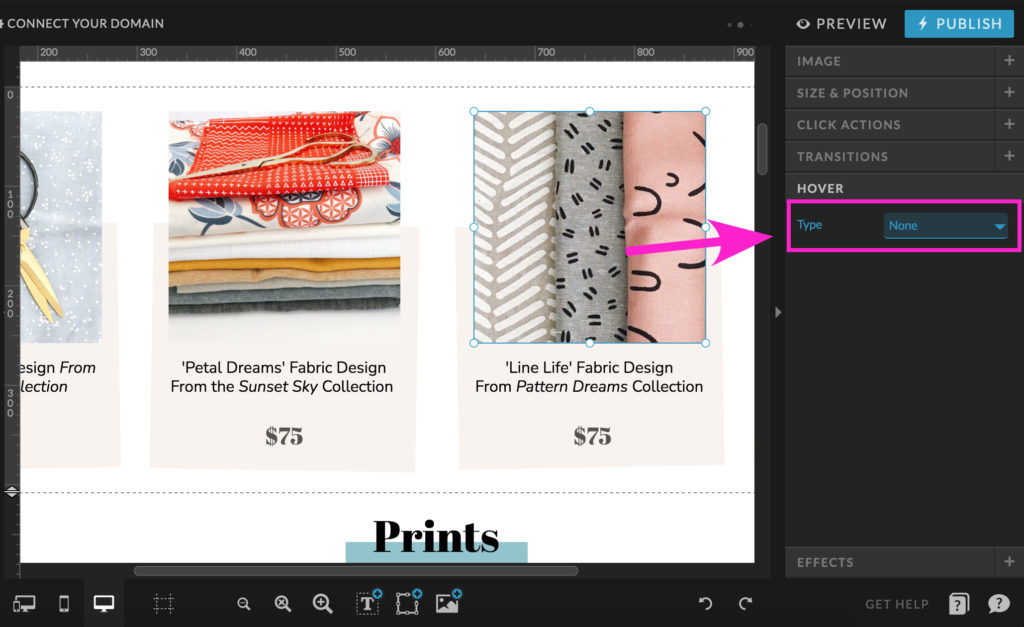
- Click on an image you want to apply our animation hover state to.
- Expand the HOVER tab by clicking on it. (As shown below).
3. As shown below, under the Type drop-down menu, select Custom.
4. Set the Opacity to 66% – making it see-through.
5. Set the Time to 0.5.
The above setting means that our image will fade to 66% opacity, over 0.5 seconds (half a second). You can Preview the changes if you like at this stage.
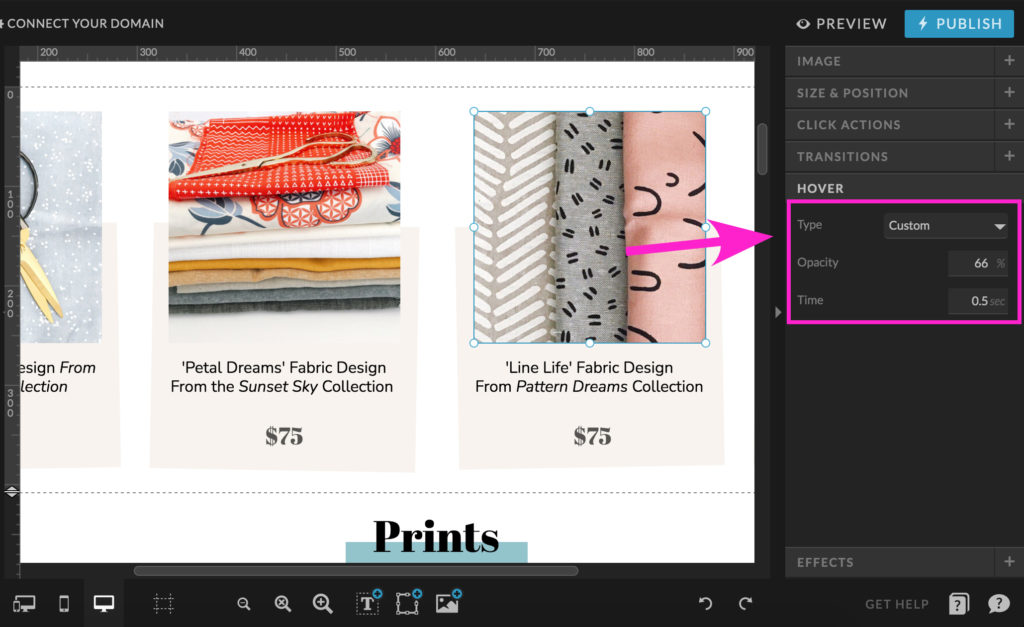
Copying the fade-out Animation
1. As shown below, click on the adjusted image so it is selected.
2. Copy your image animation using the Shortcut below.
– MAC: Command + C
– PC: Control + C

3. Choose another image you would like the fade-out animation to appear on. Note its HOVER tab setting.
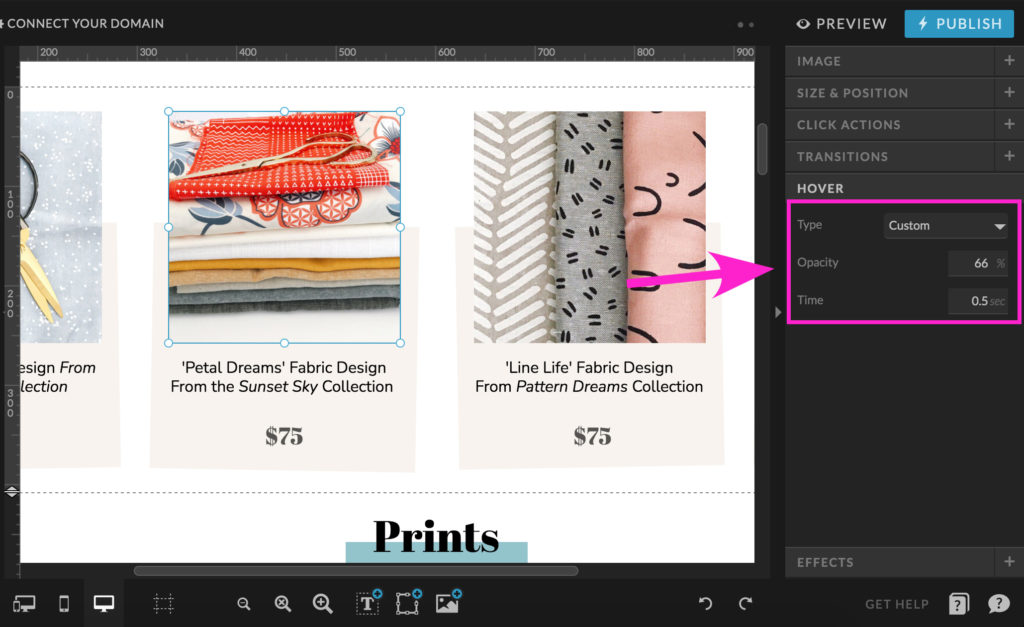
4. Special Paste our fade-out animation using the Shortcut below:
– MAC: Command + Shift + V
– PC: Control + Shift + V
The animation setting should update in the HOVER tab.
You can now test the animation by previewing your page.
After your 14-day free Showit trial – get an additional paid month for free!
Ready to start creating your website with Showit? Hit the button below and get your first subscription month for free.
Full disclosure, this is our affiliate link. So if you join Showit, you’ll be supporting us which helps us produce more content like this, at no additional cost to you.
You Did it!
Now you know 15 Showit Shortcuts to help speed up your workflow and make designing your website so much simpler.
Here’s what we covered in this blog.
2 Shortcuts when you need help
6 Shortcuts you’ll use every time
3 Shortcuts to view your website
3 Shortcuts to view your work
1 Shortcut called Special Paste (that will change the way you work!)
Where to now?
Need help using Showit? Start here with our 12-Part Step-by-Step series.
Stuck creating your Visual Branding? This method works every time.
Confused about Domain Names? Here’s everything you need to know.
Like this Blog Post?
PIN IT FOR LATER. And for more helpful tips follow us on PINTEREST.

Search
Create & launch your website in a
few simple steps
FREE GUIDE
While you’re here,
grab our FREE
‘Do’s & Don’ts of what to add to your website’ Guide.
‘Do’s & Don’ts of what to add to your website’ Guide.
When you sign up, we’ll send you
emails with additional helpful content.
About Lavinia & Tom
Hi, we're so glad you found us.
We love helping creatives like you finally have the website you’ve always wanted.
Blog Categories
Follow us
