grab our FREE
‘Do’s & Don’ts of what to add to your website’ Guide.
‘Do’s & Don’ts of what to add to your website’ Guide.
emails with additional helpful content.
Hi, we're so glad you found us.
We love helping creatives like you finally have the website you’ve always wanted.
few simple steps
Follow us
How to Update Text in Showit
Now you have imported your Showit Template the next step is to make it your own. How do you do that? Let’s start with updating the text.
In Part 3 or our How-to Showit Series, we’ll guide you step-by-step plus, we have added a BONUS section by introducing the Preview screen (which allows you to see how your website will look when it goes live).
Wait, want to learn more? Check out our entire – How-to Use Showit Series below.
- 1. How to Create a Showit Subscription
- 2. How to Import Your Showit Template
- 3. How to Update Text in Showit – (this is the blog you’re reading)
- 4. How to Import & Update your images in Showit
- 5. How to Update Images in Galleries & Canvas Views inside Showit
- 6a. How to Update Master Fonts in Showit – Site Styles Part 1
- 6b. How to Update Master Colours in Showit – Site Styles Part 2
- 7. How to Update Site Canvases in Showit
- 8a. How to add my Instagram Feed to a Showit Website – Links Part 1
- 8b. How to Link to Email Addresses in Showit – Links Part 2
- 9. How to Link to your Social Media Accounts in Showit – Links Part 3
- 10. How Blogging works with Showit
- 11. How to get your Showit Website Ready for Launch
- 12. Countdown to Launching your Showit Website
- BONUS – After your 14-day free Showit trial – use our affiliate link to get your first paid month for free!

Section 1
How to update text on your Homepage
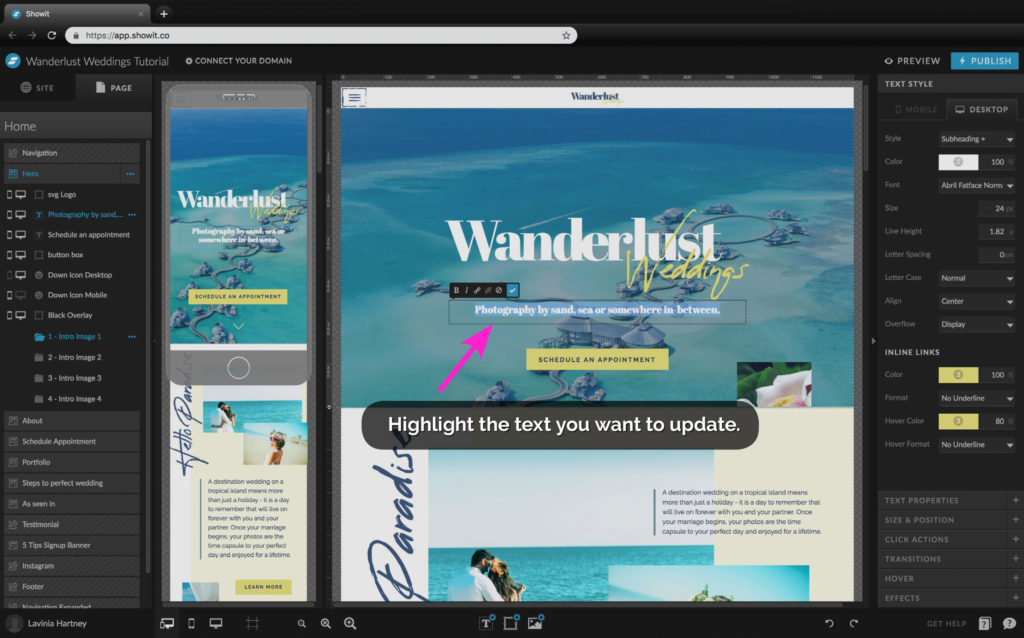
- Select and highlight any text you want to update.
- Next, click and drag your mouse over the text you want to change.
- The text will now appear highlighted in blue, as in the above image.
What’s that black box above the text?
The Editing Symbols Box. It lets you know you’re in text edit mode.

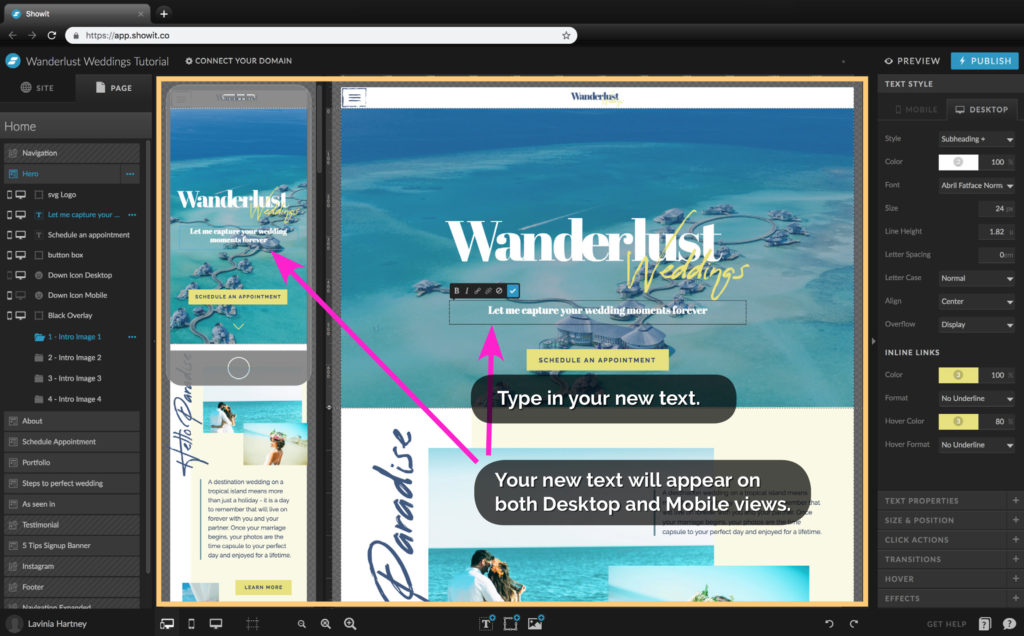
Typing in new text
• Once entered, this text will update on both Desktop View & Mobile View on the Design Stage.
• The Design Stage (marked in yellow above) is where you’ll edit your site visually.
Insider Tip:
If you want to change the colour of your text, that sits under what’s known as Design Styles. We’ll explain exactly how to update these in a later guide on How to change your colours and fonts in Showit.
Section 2
How to update text on other Showit Website Pages – Step 1
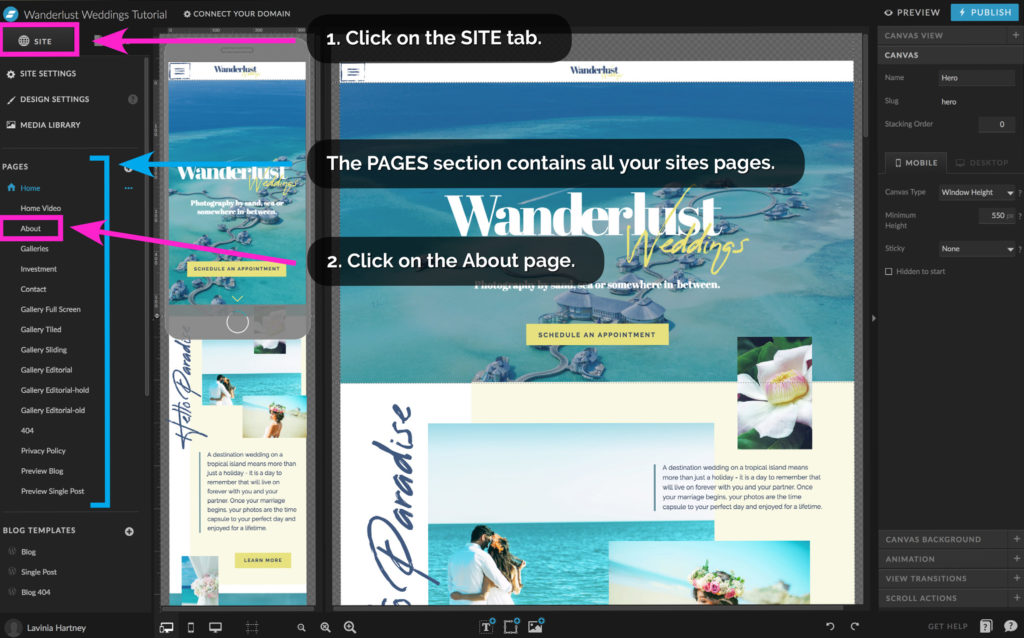
• To update the rest of your template text, you’ll need to be able to access other pages in your website template.
1. Click on the SITE tab.
The SITE tab contains things that relate to your website overall.
• The PAGES section lists all the pages of your website by name.
2. Click on the About page (or any other page you like) to activate it.
How to update text on other Showit Website Pages – Step 2
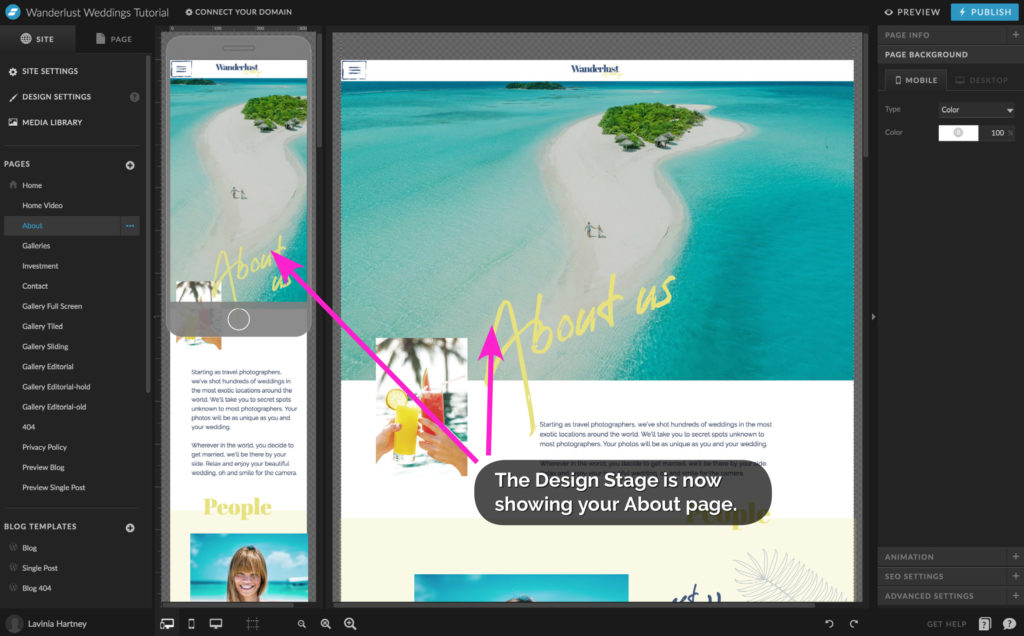
• Your Design Stage will update to the About page.
How to update text on other Showit Website Pages – Step 3
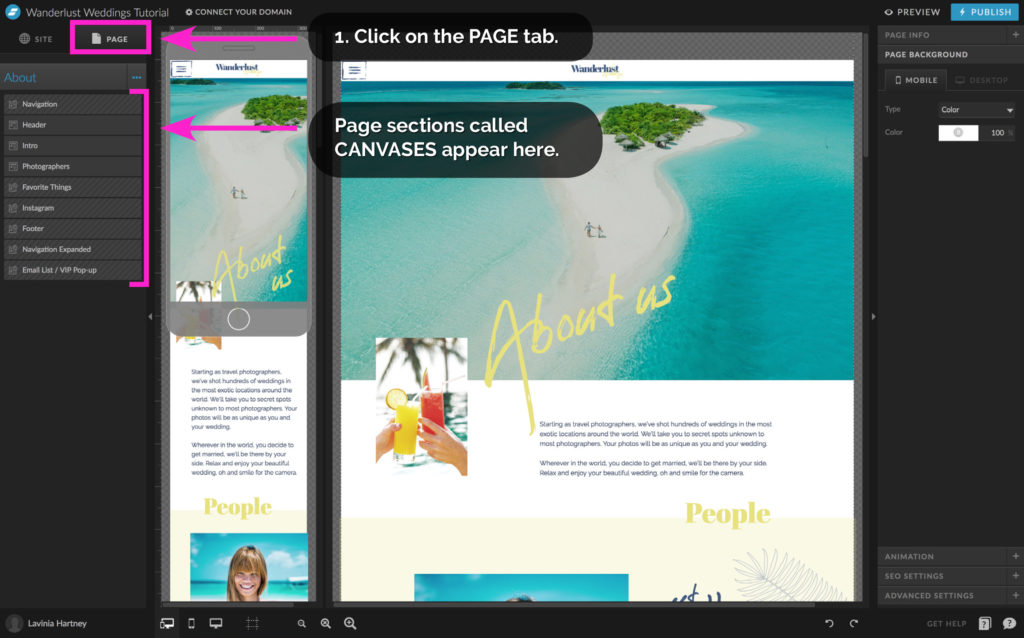
• Click on the PAGE tab.
The PAGE tab contains things that make up the Page you are on.
E.g. heading sections, Introductory sections and footer sections.
• Showit calls sections on your page Canvases.
• You can see a list of all the Canvases on the left.
How to update text on other Showit Website Pages – Step 4
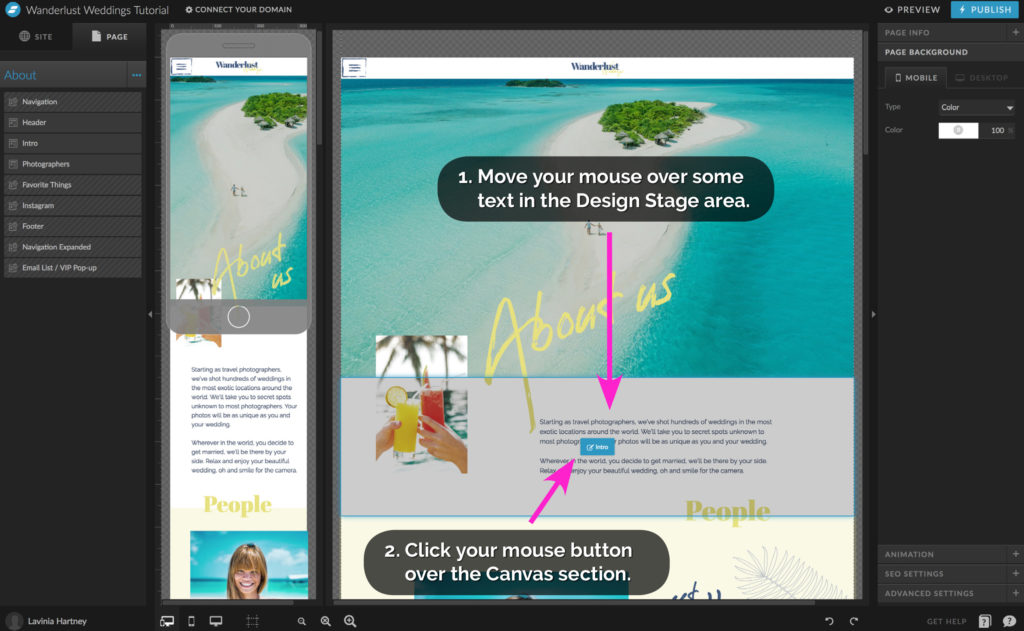
1. Move your mouse over some text in the Design Stage area.
• You will see the Canvas section highlighted with a blue line as above.
2. Click your mouse button to enter the Canvas section.
How to update text on other Showit Website Pages – Step 5
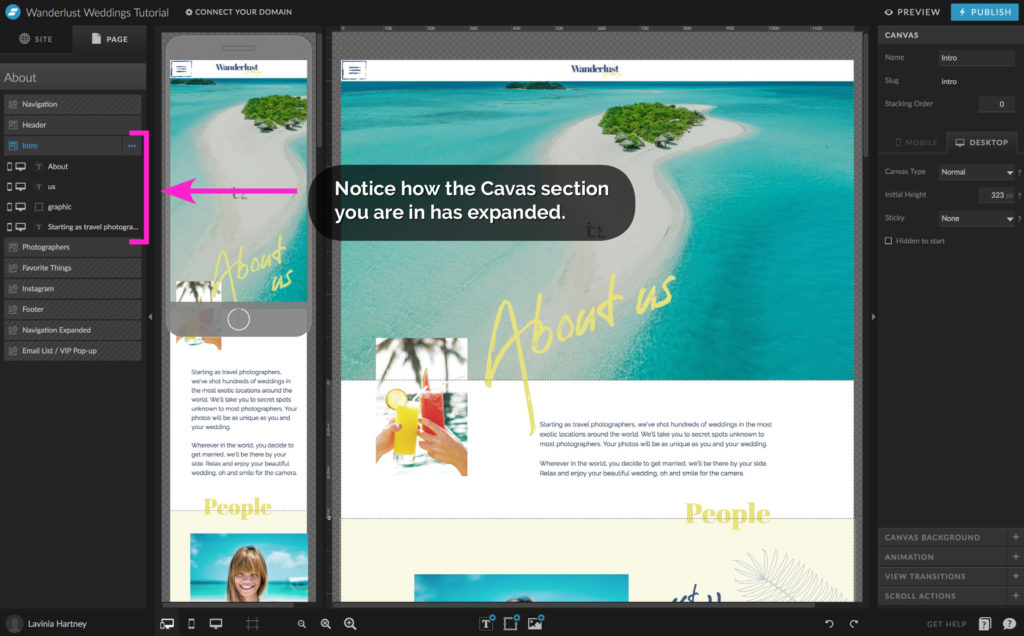
• You will now be inside the Canvas Section.
• Note how the Canvas has expanded in the PAGE tab, showing you
the objects in that Canvas like text and graphics (images).
How to update text on other Showit Website Pages – Step 6
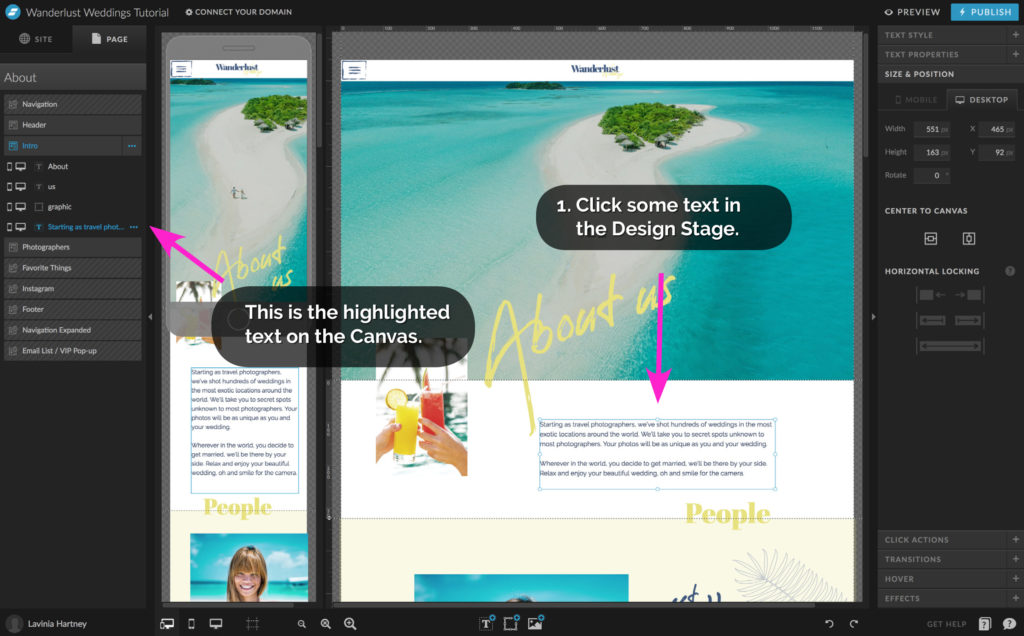
• From here on the process is the same as you learned in section 1 of this blog.
1. Click on some text in the Design Stage to select the Text Box.
• The Text Box selected has also been Highlighted in the PAGE tab.
How to update text on other Showit Website Pages – Step 7
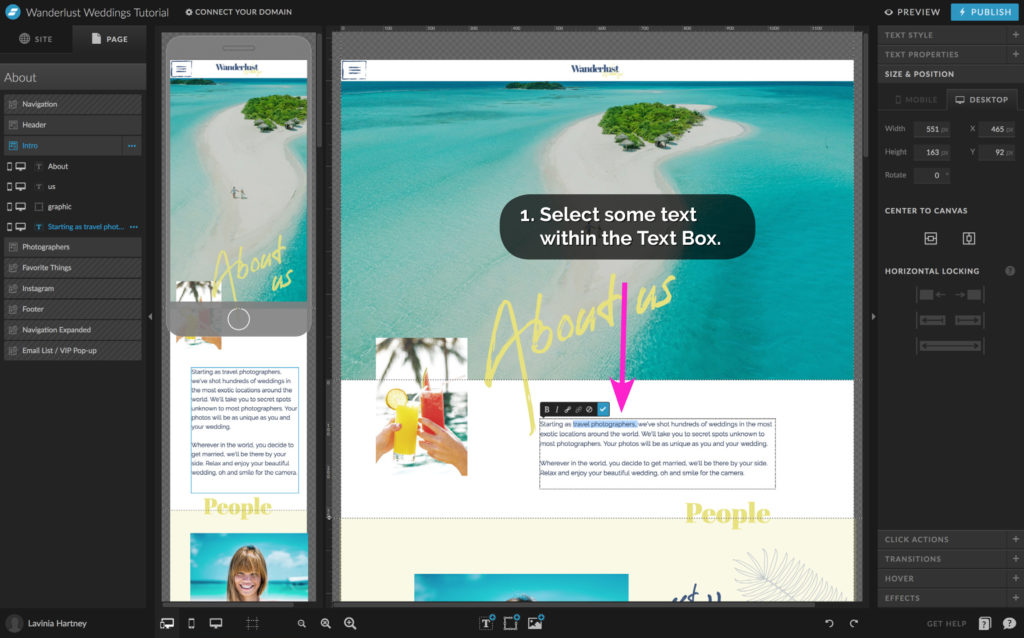
1. Now you can select the text within the text box by dragging a selection with your mouse button held down or by Double-Clicking the text to select all text.
• Enter your text – If you need a refresher, go back to Section 1.
Insider Tip:
Struggle with knowing what to write on your website? Our Template Emporium Showit Templates can help. Here’s how.
Real Text
Unlike other template providers, we insert real text into our templates as opposed to ‘dummy’ placeholder text.
Custom created Text
All the text has been custom created and gives you hints as to what to write to help attract your ideal client.
Direction for your messaging
Our text gives you a direction for your messaging, as well as a suggested word count.
Check them out here.
BONUS SECTION
How to Preview your Showit Site – Step 1
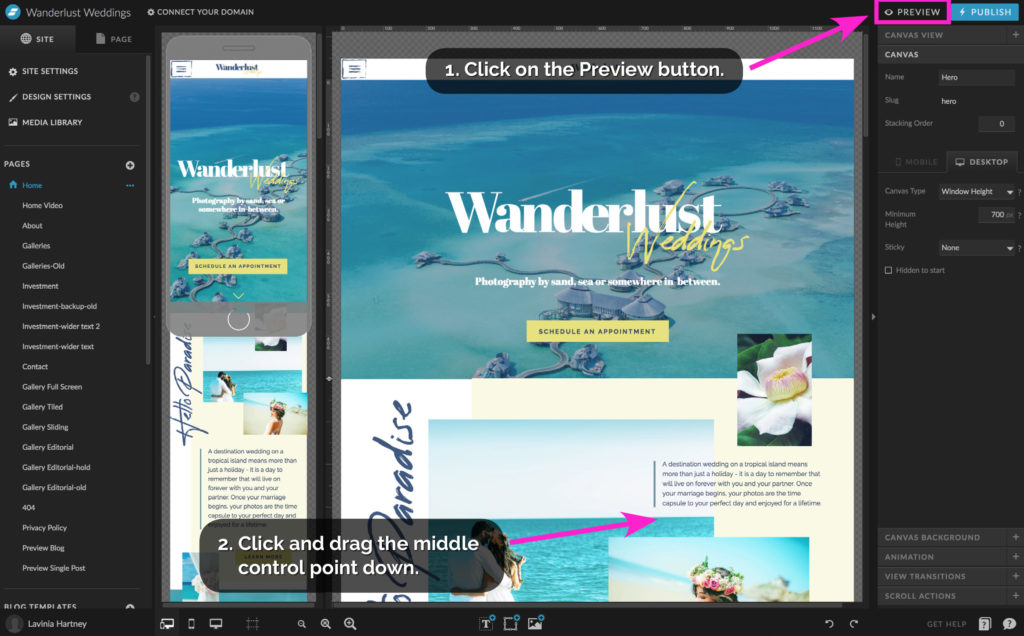
• The PREVIEW button lets you see how your site will appear when you publish it.
1. Click the PREVIEW button.
Insider Tip:
The PREVIEW screen is the only way to see animations, transitions and effects you have in your design.
It is also a great way to see how the desktop version will look in various sizes. Scale your browser window to see this in action.
How to Preview your Showit Site – Step 2

• You can select between mobile and desktop view by clicking their icons.
1. Start with the desktop view. Look around the page you’re working on by
scrolling, clicking, etc. as you would do on any website.
How to Preview your Showit Site – Step 3

1. Select the mobile preview.
• Look around the page you’re working on by scrolling, clicking, etc. as you would do on any website.
2. After previewing, press the close button.
You Did it!
You know how to select and update the text and preview your site.
Now you’re ready to learn all about images within your template.
We’ll show you the steps next week in How to Update Images in Showit.
Your Action Steps:
- Update text on your Showit homepage. (Section 1).
- Next, update the text on the other Showit website pages. (Section 2).
- Preview your site on desktop & mobile. (Bonus Section).
After your 14-day free Showit trial – get an additional paid month for free!
Ready to start creating your website with Showit? Hit the button below and get your first subscription month for free.
Full disclosure, this is our affiliate link. So if you join Showit, you’ll be supporting us which helps us produce more content like this, at no additional cost to you.
Where to now?
Now you’re ready to learn all about images within your template. It’s time for Part 4 – How to Import & Update your images in Showit – Show me How.
Like this Blog Post?
PIN IT FOR LATER. And for more helpful tips follow us on PINTEREST.
Search
Create & launch your website in a
few simple steps
FREE GUIDE
While you’re here,
grab our FREE
‘Do’s & Don’ts of what to add to your website’ Guide.
‘Do’s & Don’ts of what to add to your website’ Guide.
When you sign up, we’ll send you
emails with additional helpful content.
About Lavinia & Tom
Hi, we're so glad you found us.
We love helping creatives like you finally have the website you’ve always wanted.
Blog Categories
Follow us
