grab our FREE
‘Do’s & Don’ts of what to add to your website’ Guide.
‘Do’s & Don’ts of what to add to your website’ Guide.
emails with additional helpful content.
Hi, we're so glad you found us.
We love helping creatives like you finally have the website you’ve always wanted.
few simple steps
Follow us
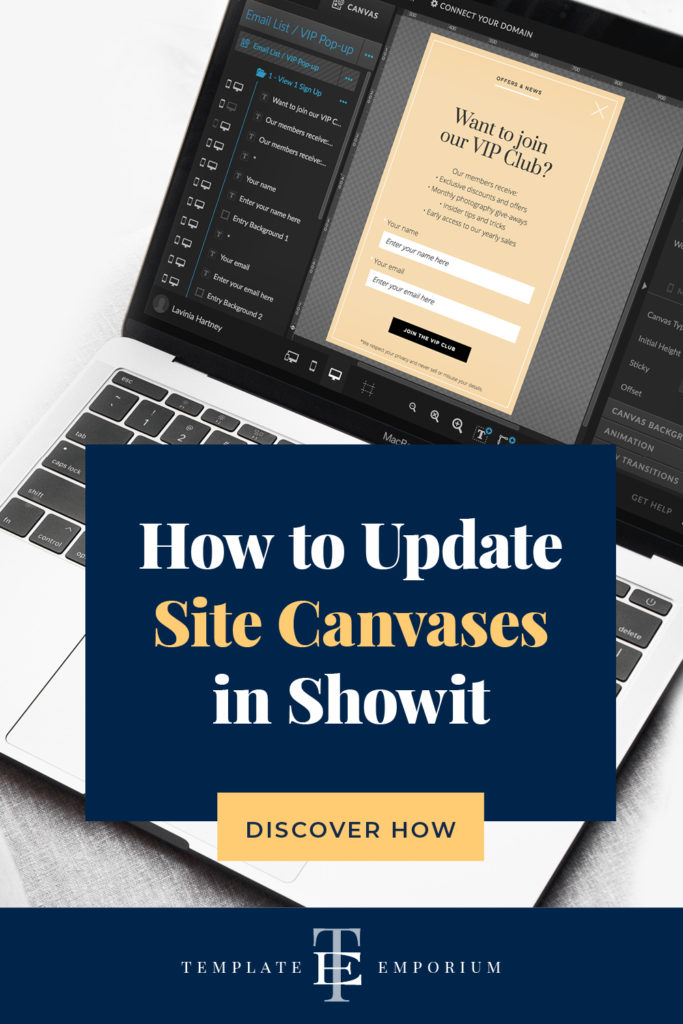
How to Update Site Canvases in Showit
Our How to Showit Series continues and, this week, it’s all about How to update Site Canvases in Showit. In this step-by-step blog, you’ll learn what they are and after that, we’ll show you how they make changes across your entire website!
Wait, want to learn more? Check out our entire – How-to Use Showit Series below.
- 1. How to Create a Showit Subscription
- 2. How to Import Your Showit Template
- 3. How to Update Text in Showit
- 4. How to Import & Update your images in Showit
- 5. How to Update Images in Galleries & Canvas Views inside Showit
- 6a. How to Update Master Fonts in Showit – Site Styles Part 1
- 6b. How to Update Master Colours in Showit – Site Styles Part 2
- 7. How to Update Site Canvases in Showit – (this is the blog you’re reading)
- 8a. How to add my Instagram Feed to a Showit Website – Links Part 1
- 8b. How to Link to Email Addresses in Showit – Links Part 2
- 9. How to Link to your Social Media Accounts in Showit – Links Part 3
- 10. How Blogging works with Showit
- 11. How to get your Showit Website Ready for Launch
- 12. Countdown to Launching your Showit Website
- BONUS – After your 14-day free Showit trial – use our affiliate link to get your first paid month for free!
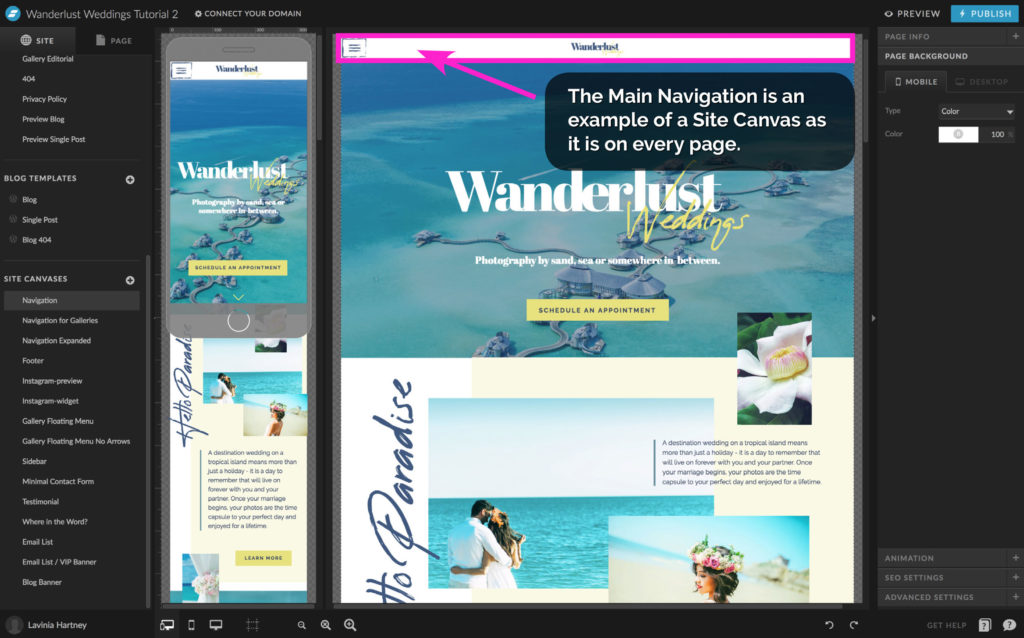
What are Site Canvases?
Showit describes Canvases as the building blocks by which you add content to make up each page in your site. Therefore, Site Canvases appear on multiple pages of your website.
• Examples of Site Canvases are Navigation Objects such as:
– The main menu and footers
– Directly from the page you are on
– Email signup banners
– Testimonials
– Navigation
– Instagram feeds
Although these canvases appear on many pages throughout your site, you only have to edit them in one master spot. After that, all the changes you make will carry across to every page the canvas lives on.
The Footer Site Canvas
Step 1
How to Update the Footer Site Canvas
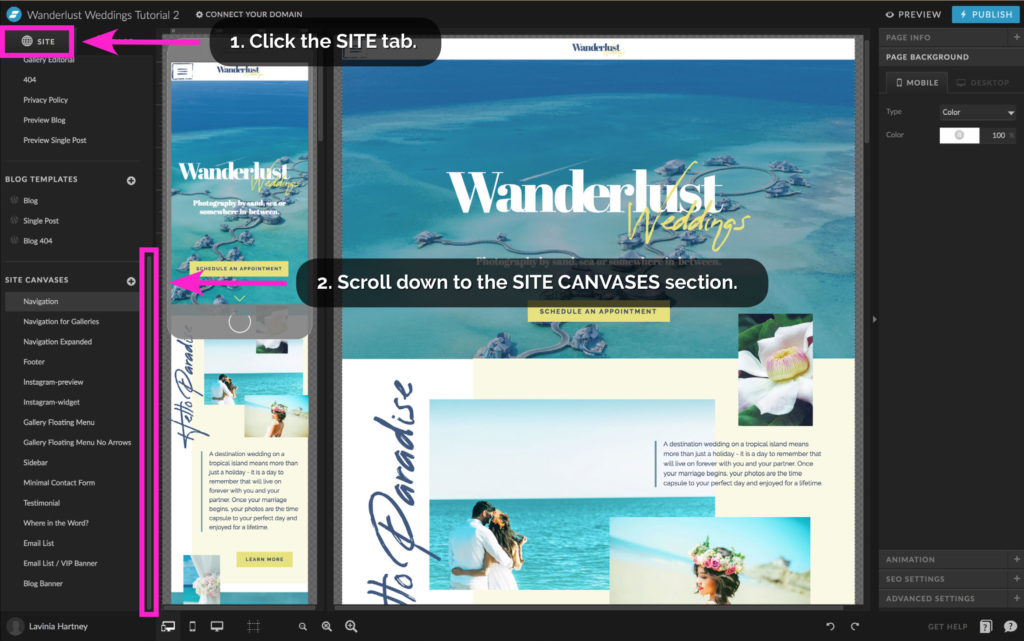
Firstly, let’s start with the Footer Site Canvas. The footer appears on every page in our example template.
1. Click the Site Tab.
2. Scroll down using the scroll bar until you reach the SITE CANVASES section.
Insider Tip:
If your Showit template is a one-pager, you may not have as many Site Canvases as our example which is a Multi-Page Template.
Step 2
How to Update the Footer Site Canvas
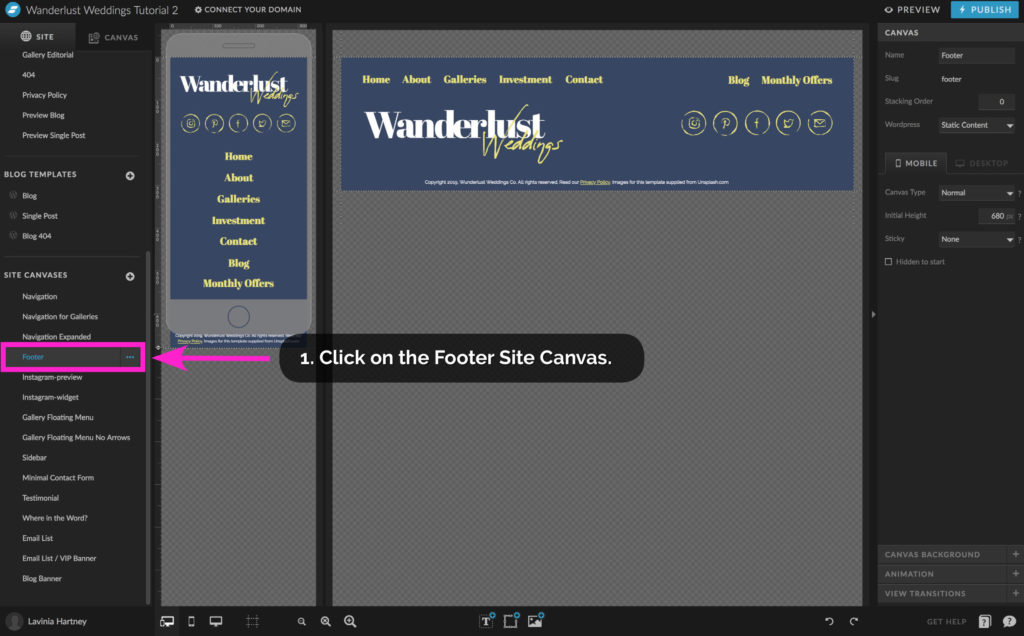
• We’re going to update the logo to see this change across all Footers on our website.
- Select the Footer-Site Canvas.
Step 3
How to Update the Footer Site Canvas
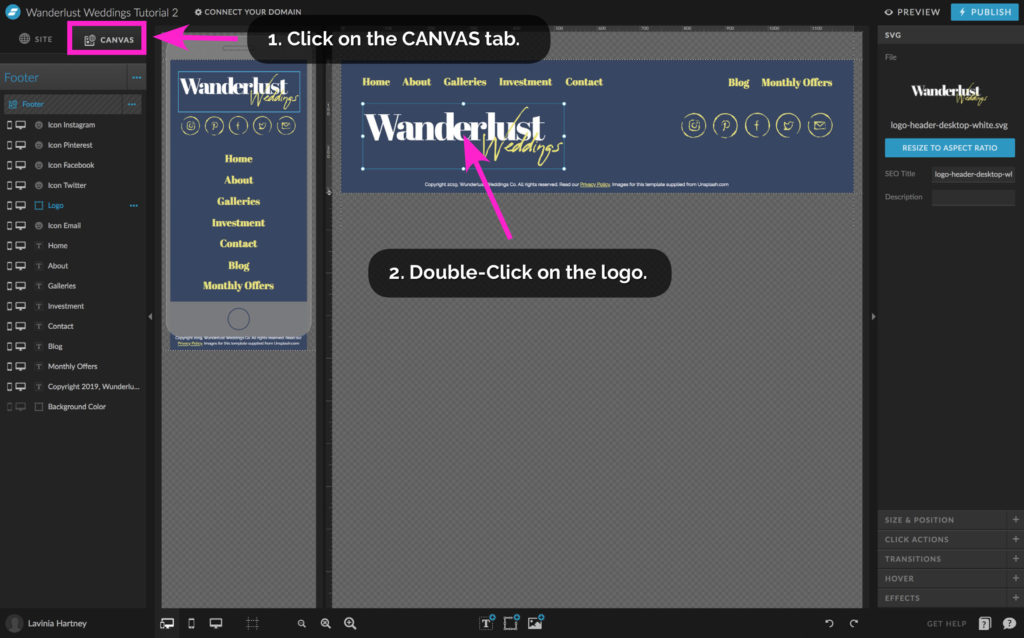
1. Click on the CANVAS tab to see the objects that make up the Footer Canvas.
• We can see a list of all the objects on the left along with the visual representation in the Design Stage in the centre of the screen.
2. Double-click the logo in the Design Stage to select a new logo image.
Step 4
How to Update the Footer Site Canvas
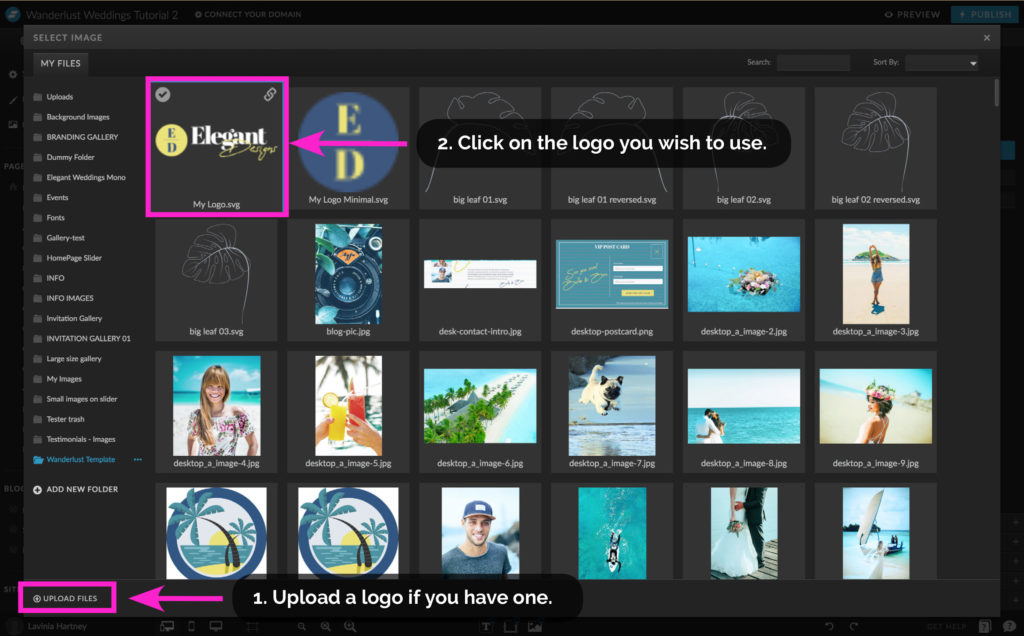
1. In the SELECT IMAGE pop-up, you can upload your logo.
• If you need a refresher on uploading images and logos, visit our blog How to Update Images in Showit.
2. Click on the logo you want to use.
Step 5
How to Update the Footer Site Canvas
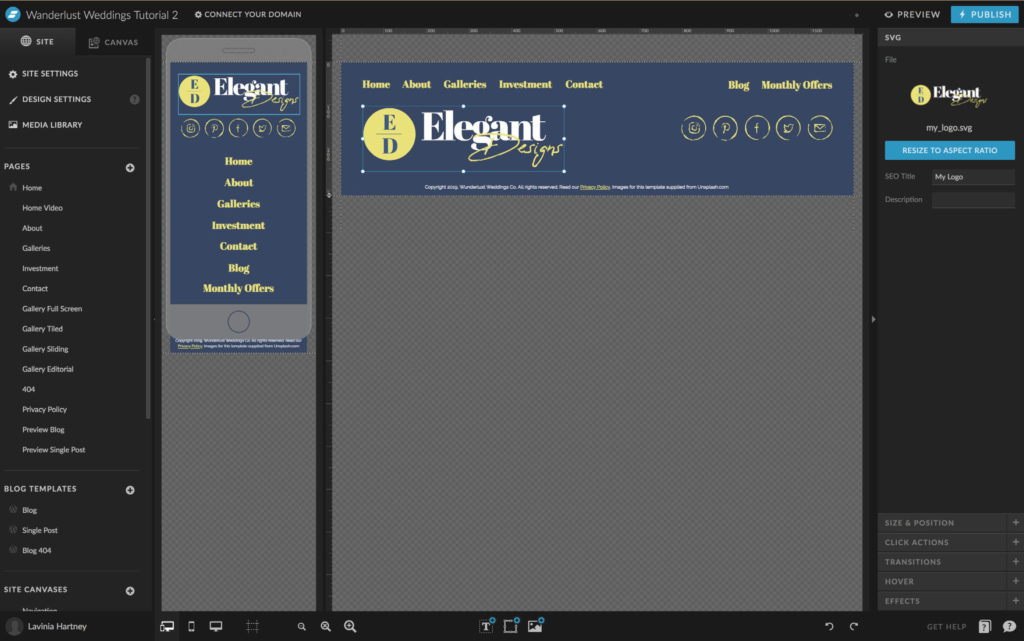
• You’ll return to the Design Stage, and your logo will have replaced
the template logo. However, you may need to adjust the size and position of the new logo.
Insider Tip
When importing a logo, make sure there’s no white space around the edges of the logo. Doing this makes fitting it into a containing box easier.
Step 6
How to Update the Footer Site Canvas
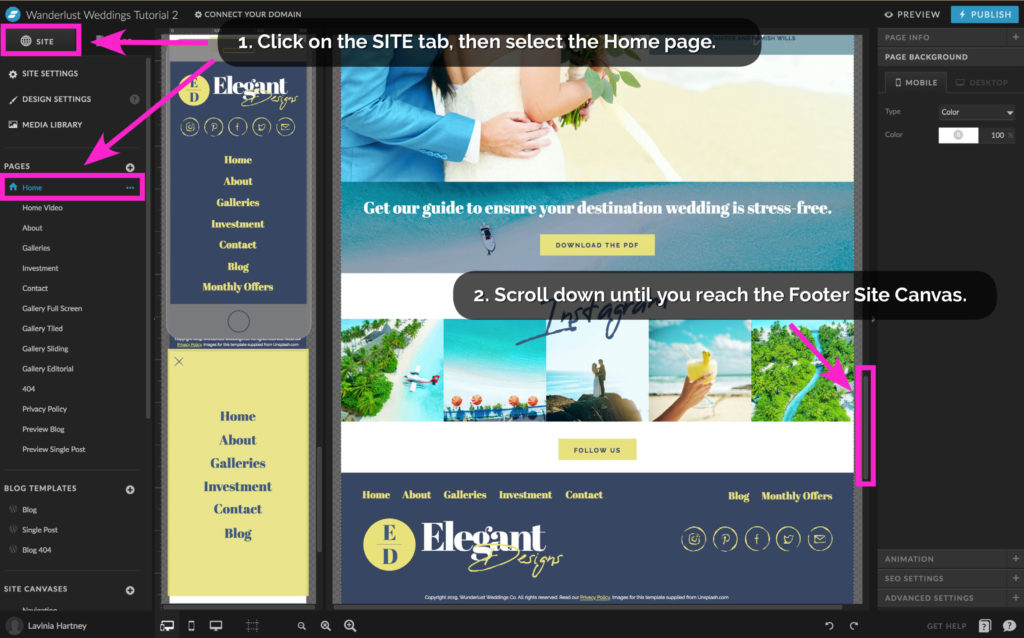
• To see the effect of the Site Canvas update, we’ll look through a few pages on our website.
- Click on the SITE tab, and select Home from the PAGES section.
- Scroll down the page until you reach the Footer Site Canvas, you’ll now see the updated logo.
Step 7
How to Update the Footer Site Canvas
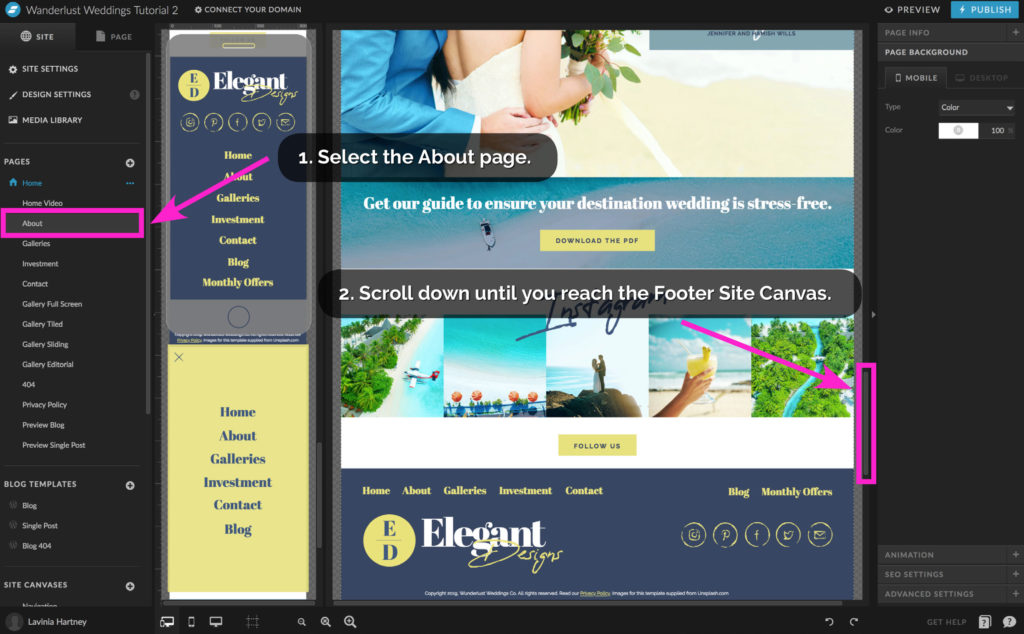
- Next, select the About page.
- Scroll down the page until you reach the Footer Site Canvas. The logo has been updated here as well.
• All the Footer Site Canvases on your website will now be updated.
Click on the remaining pages in your template and see for yourself.
Other Site Canvases
How to edit a Site Canvas directly from the page you are on
– Step 1
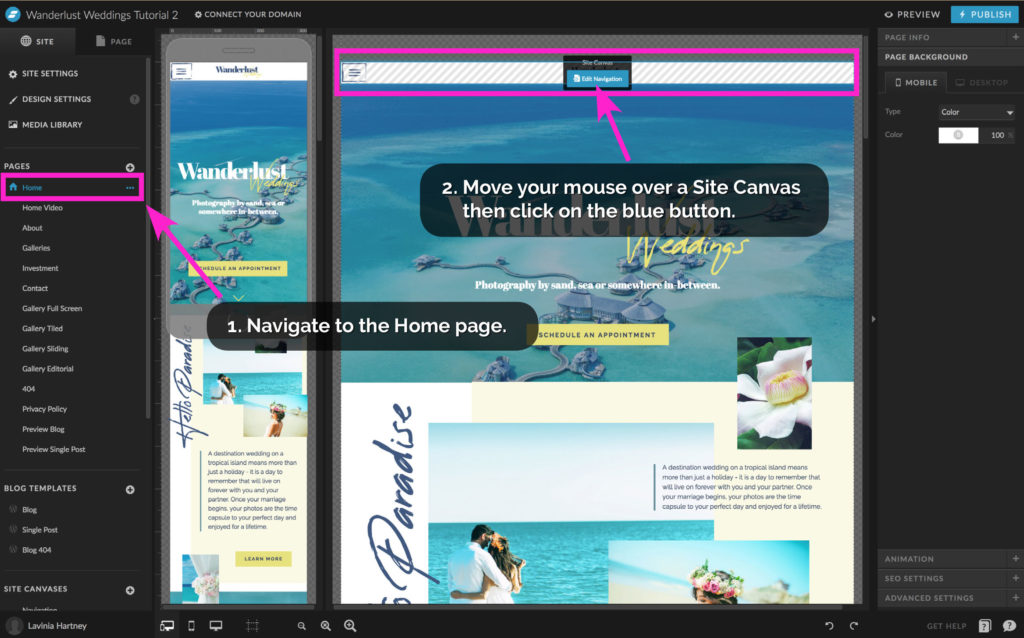
Let’s see how that works.
1. Navigate to the Home page.
2. Move your mouse pointer over the top Navigation Menu area.
Notice the striped lines over the Site Canvas as well as the blue button.
These are indicators that the canvas you are hovering over is a Site Canvas.
3. To edit the Site Canvas click the blue button.
How to edit a Site Canvas directly from the page you are on
– Step 2
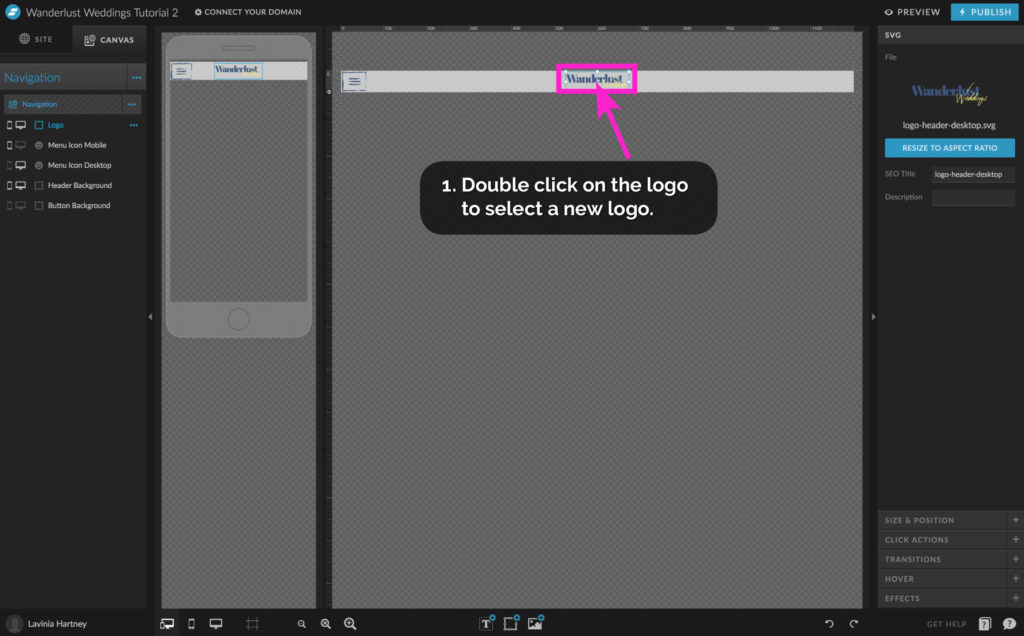
• We’re now in the Navigation Site canvas.
• For this exercise, we’ll be swapping out the logo in the Navigation Site canvas. The editing, however, will be identical to our footer example.
• Double-click on the logo to select a new logo image.
How to edit a Site Canvas directly from the page you’re on
– Step 2
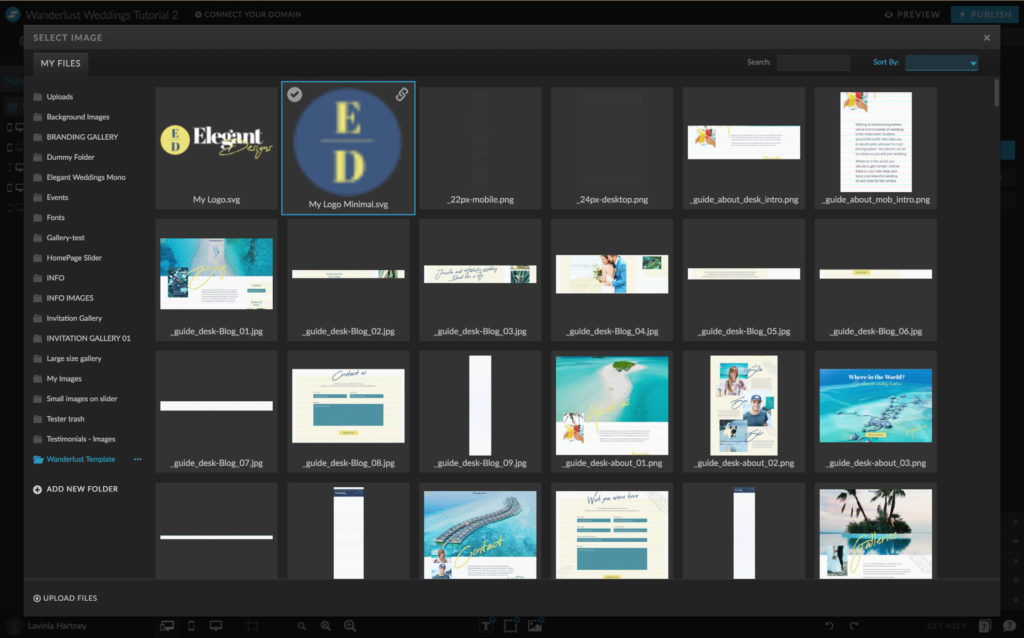
• The pop-up SELECT IMAGE screen will open.
- Navigate to your logo or use our downloadable example from the previous Footer Site Canvas exercise.
• For our example, we’re using a simplified monogram logo (as space
available is smaller in our template’s Navigation Site Canvas).
How to edit a Site Canvas directly from the page you’re on
– Step 3
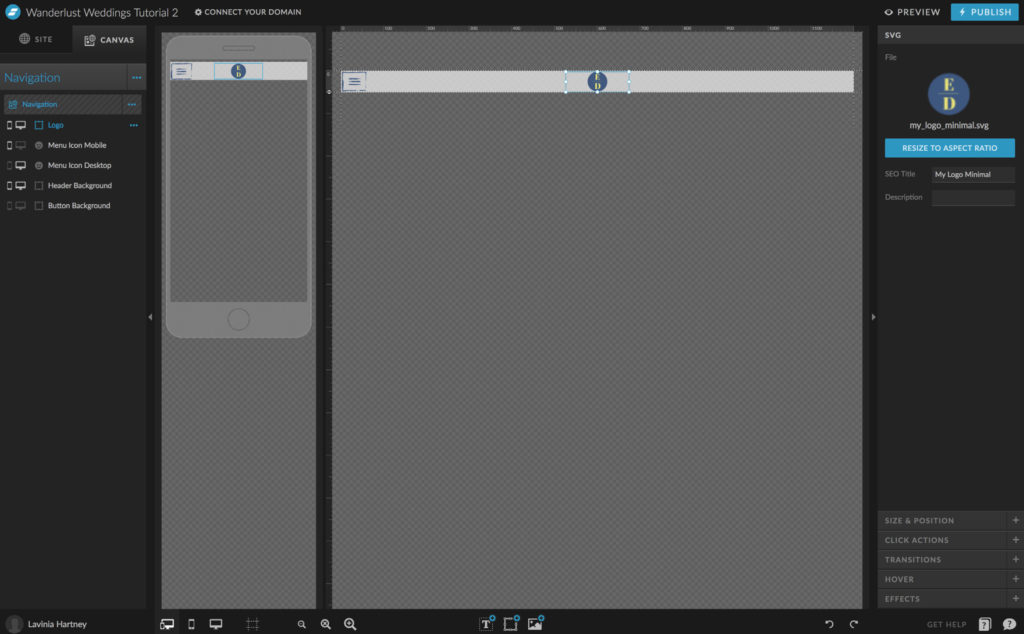
• The new logo will replace the old one in the Design Stage.
• Note: You may need to adjust the size and position of the new logo.
How to edit a Site Canvas directly from the page you’re on
– Step 4
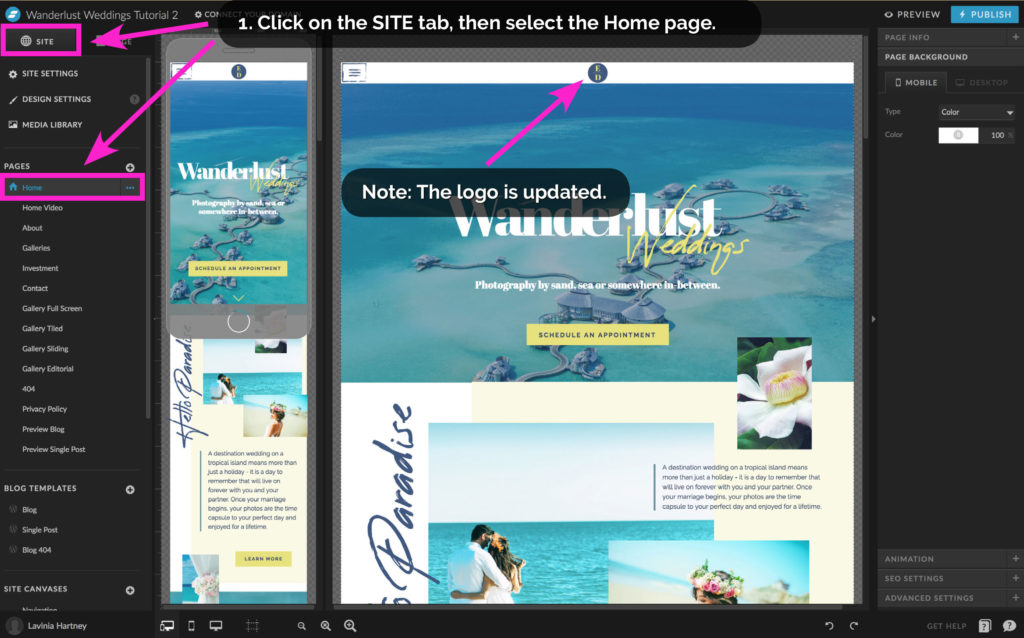
• Return to the Home page by clicking on Site, then Home.
• Notice that the logo in the header has been updated.
How to edit a Site Canvas directly from the page you’re on
– Step 5
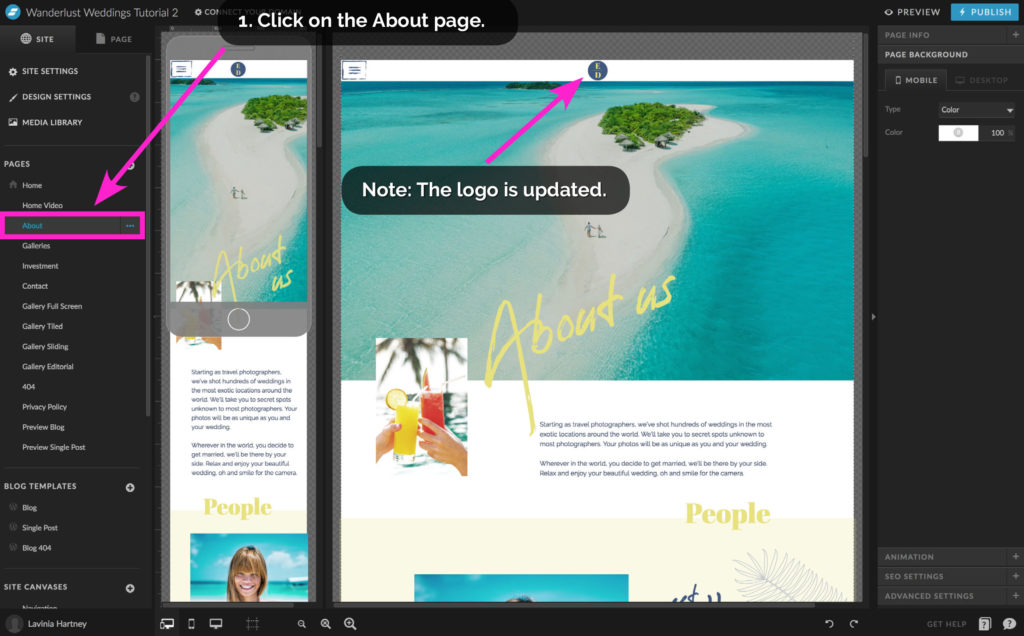
• Navigate to the About page.
• Notice that the Navigation Site Canvas has the new logo here as well.
The Email List Site Canvases
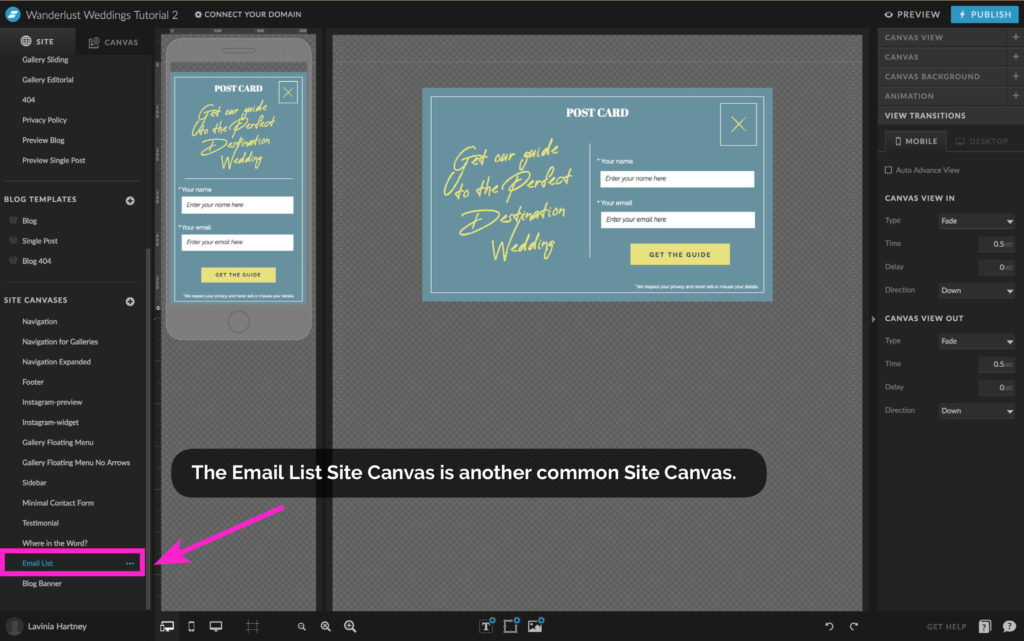
• The screen above shows another Site Canvas used to get people to sign up to your email list. If you have something similar, you can update it now.
• This Email Site Canvas appears on every page on the website as it is a link in the Footer Site Canvas.
The Testimonials Site Canvases
– Step 1
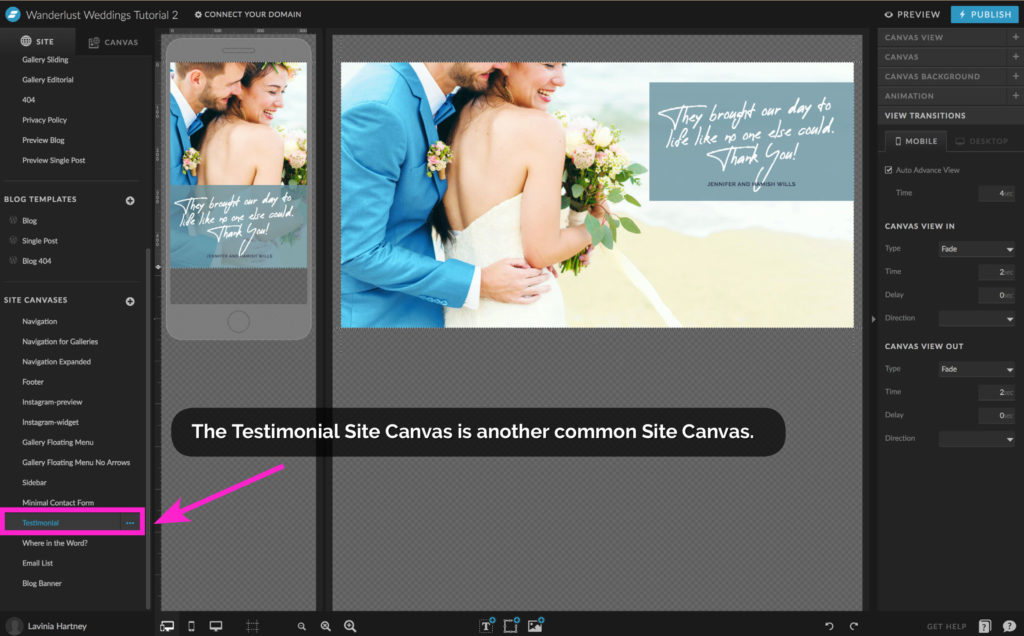
• The Testimonials Site Canvas is another common Site Canvas.
• You now add your content to the Testimonials Site Canvas.
The Testimonials Site Canvases
– Step 2
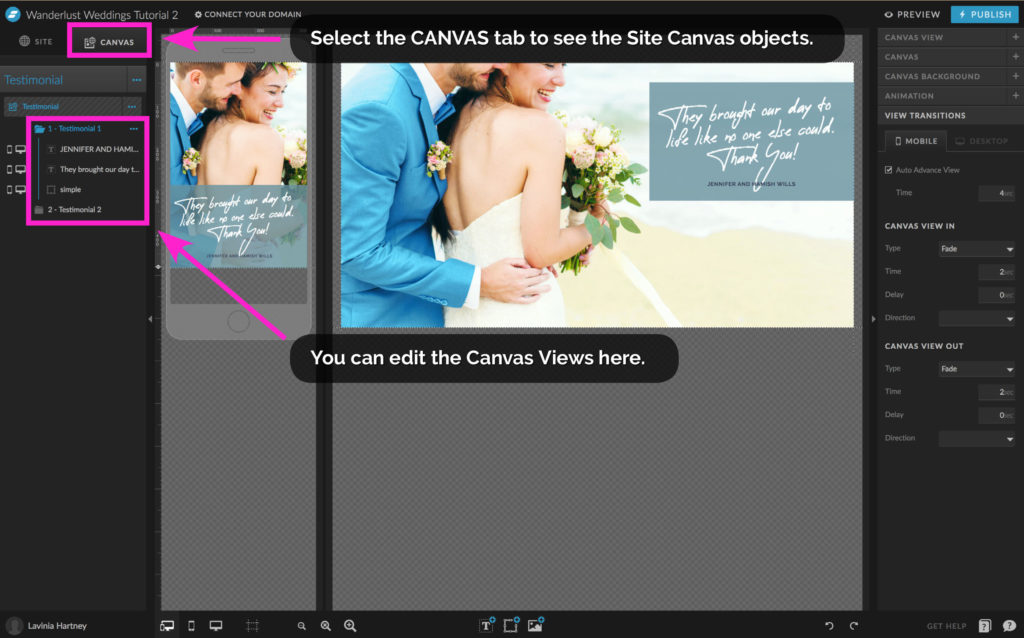
• Start by selecting the CANVAS tab to see what objects are in the Site Canvas.
• You can now edit the Canvas Views as you did before in our blog How to Update Galleries & Canvas Views click here for a refresher.
The Navigation Site Canvases
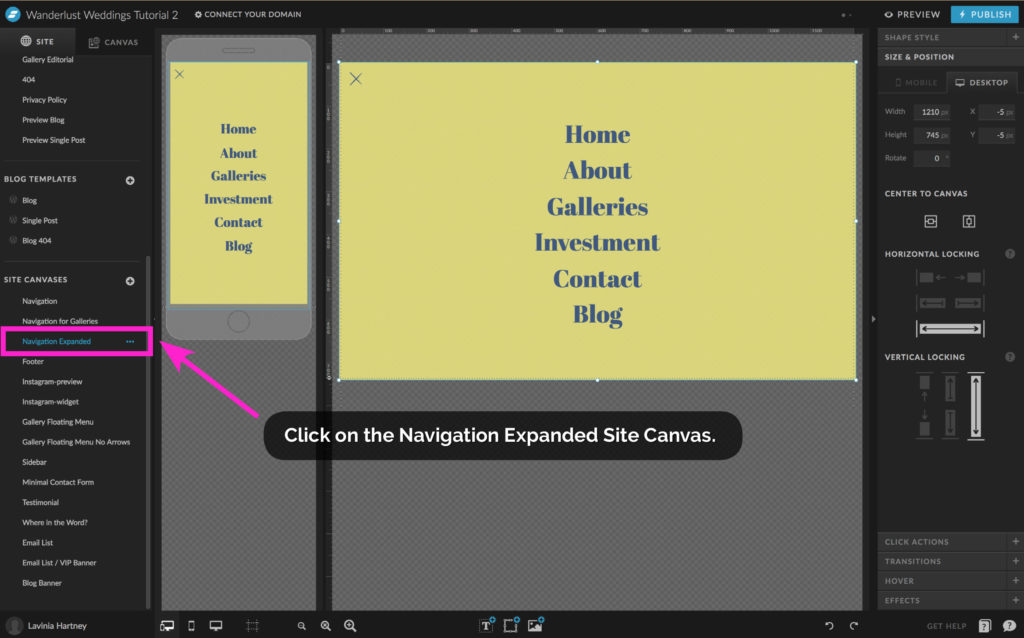
Similarly to the Footer Site Canvas, the Navigation Site Canvas appears on every page of your website.
If you have one in your template, to make it display, click the Menu Icon.
And closed when you click the Close Icon.
It’s time to view all your hard work! Press PREVIEW on your screen.

Insider Tip:

Ever wondered what the 3-lined icon above is?
It’s the Navigation Menu button. And its nickname is the ‘Hamburger Icon’. Now when you hear that name, you’ll know what it means!
Any more Site Canvases?
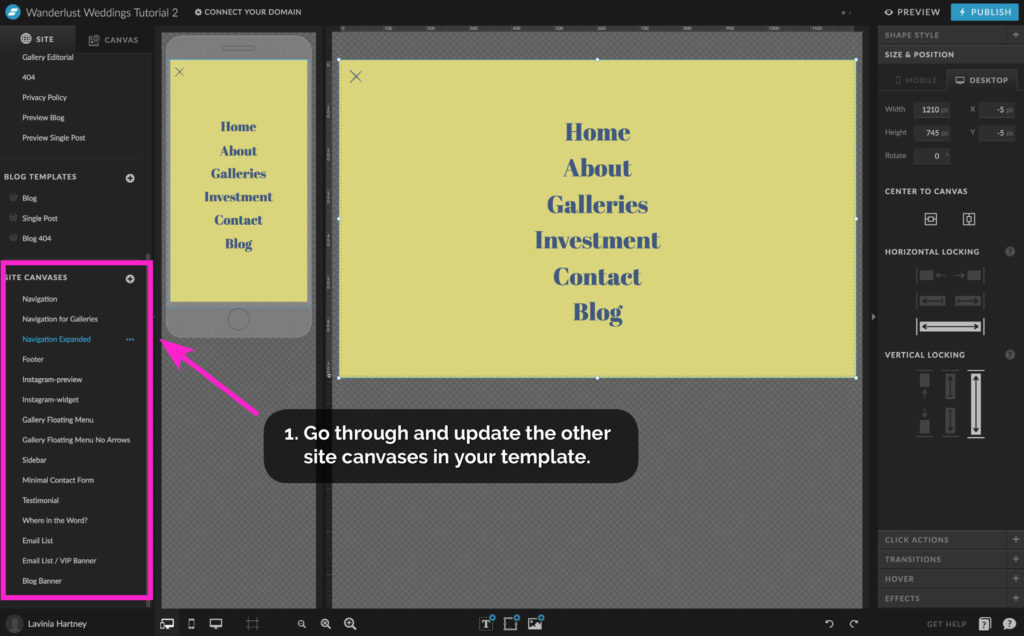
- Go through and update the remaining Site Canvases on your template
with your content. After that,
You Did it!
You know all about Site Canvases and how to edit them. If you ever need a refresher, come back to this blog and follow the steps to make further updates.
Your Action Steps:
- Update your Footer Site Canvas
- Try editing a Site Canvas directly from the page you are on
- Update your Email List Site Canvas
- Make changes to your Testimonials Site Canvas
- The Navigation Site Canvas appears on every page, update that now
- Update any other Site Canvases you may have
- Congratulate yourself! You now know how to update Site Canvases
After your 14-day free Showit trial – get an additional paid month for free!
Ready to start creating your website with Showit? Hit the button below and get your first subscription month for free.
Full disclosure, this is our affiliate link. So if you join Showit, you’ll be supporting us which helps us produce more content like this, at no additional cost to you.
Where to now?
Now that you feel confident using Site Canvases, you’re ready to learn how links work within your website.
We’ll start with Instagram in How to add my Instagram Feed to a Showit Website – Take me there!
Like this Blog Post?
PIN IT FOR LATER. And for more helpful tips follow us on PINTEREST.

Search
Create & launch your website in a
few simple steps
FREE GUIDE
While you’re here,
grab our FREE
‘Do’s & Don’ts of what to add to your website’ Guide.
‘Do’s & Don’ts of what to add to your website’ Guide.
When you sign up, we’ll send you
emails with additional helpful content.
About Lavinia & Tom
Hi, we're so glad you found us.
We love helping creatives like you finally have the website you’ve always wanted.
Blog Categories
Follow us
