grab our FREE
‘Do’s & Don’ts of what to add to your website’ Guide.
‘Do’s & Don’ts of what to add to your website’ Guide.
emails with additional helpful content.
Hi, we're so glad you found us.
We love helping creatives like you finally have the website you’ve always wanted.
few simple steps
Follow us
How to Import & Update your images in Showit
Want to import & update your images to your Showit Template? We’ll show you exactly how. In Section One – we’ll get you started on importing images. In Section Two – we’ll show you how to add your logo. And finally, in Section Three – be guided through how to update your images on other pages in your Showit Template.
By the end of this blog post, not only will you know how to import & update images in Showit but your template will truly reflect you.
Wait, want to learn more? Check out our entire – How-to use Showit Series below.
- 1. How to Create a Showit Subscription
- 2. How to Import Your Showit Template
- 3. How to Update Text in Showit
- 4. How to Import & Update your images in Showit – (this is the blog you’re reading)
- 5. How to Update Images in Galleries & Canvas Views inside Showit
- 6a. How to Update Master Fonts in Showit – Site Styles Part 1
- 6b. How to Update Master Colours in Showit – Site Styles Part 2
- 7. How to Update Site Canvases in Showit
- 8a. How to add my Instagram Feed to a Showit Website – Links Part 1
- 8b. How to Link to Email Addresses in Showit – Links Part 2
- 9. How to Link to your Social Media Accounts in Showit – Links Part 3
- 10. How Blogging works with Showit
- 11. How to get your Showit Website Ready for Launch
- 12. Countdown to Launching your Showit Website
- BONUS – After your 14-day free Showit trial – use our affiliate link to get your first paid month for free!

SECTION ONE
Section 1 – Step 1
How to import your images in Showit
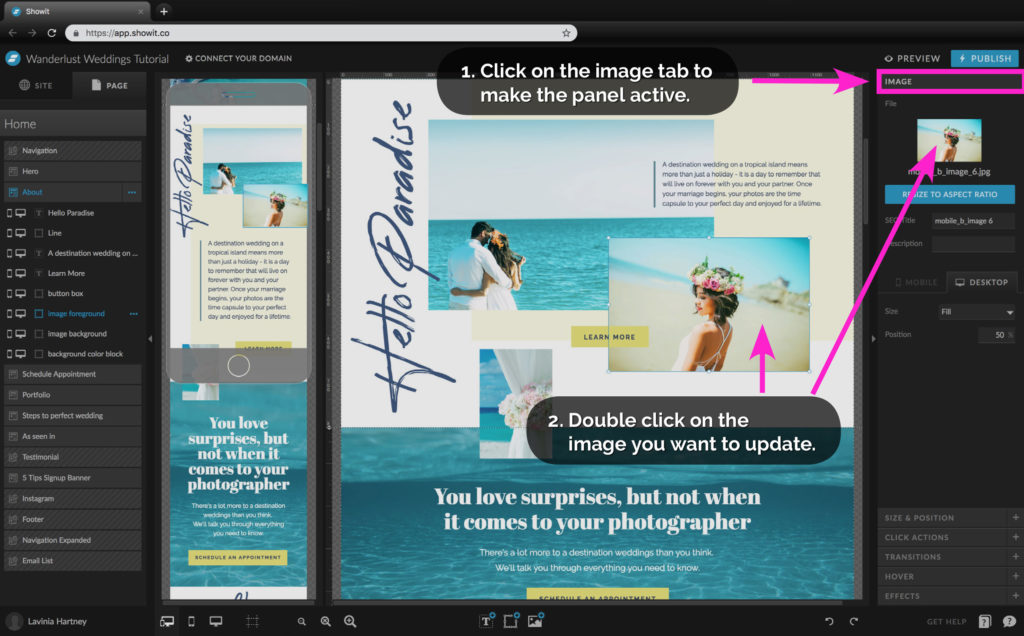
1. First, we need to select an image. Click on an image in your template.
2. We need to make the IMAGE tab active, so we can see information about the images we select.
3. To import a new image on your layout, you can double-click on the image you want to update, as per the arrow above. OR
Click on the small thumbnail image in the IMAGE tab.
Both of these import actions do the same thing. Try them out, and use the one you like best.
Section 1 – Step 2
How to import your images in Showit
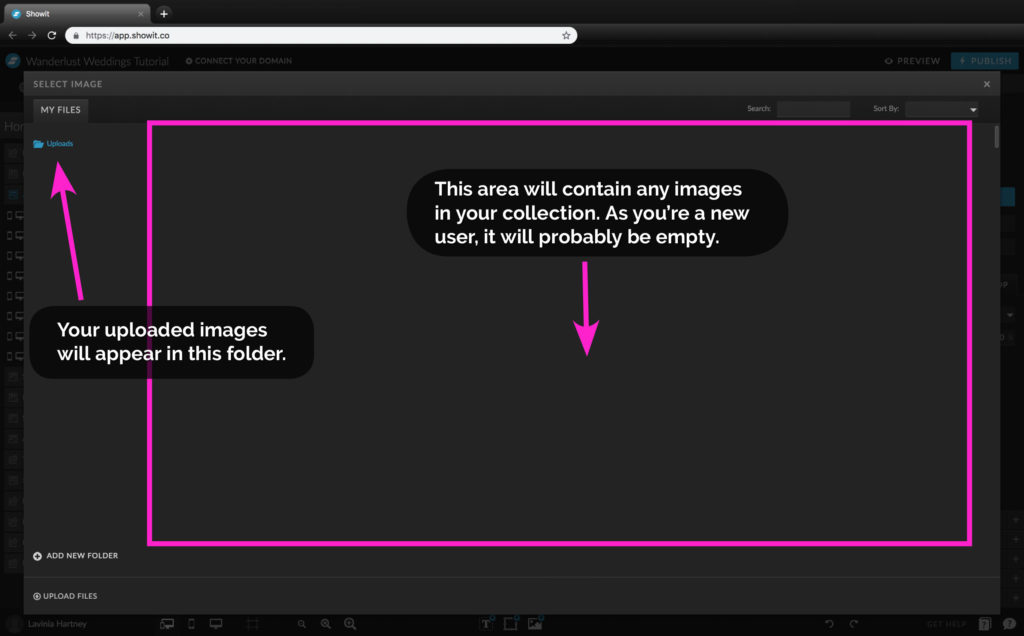
You will now get a popup screen over your layout which shows your current images in your collection.
If you are new to Showit, this will most probably be empty, as you have not imported any images yet.
To the left of this screen is a list of Folders, in which you can place images to keep them organised.
The Uploads folder is the default place your images will be uploaded to.
Section 1 – Step 3
How to import your images in Showit
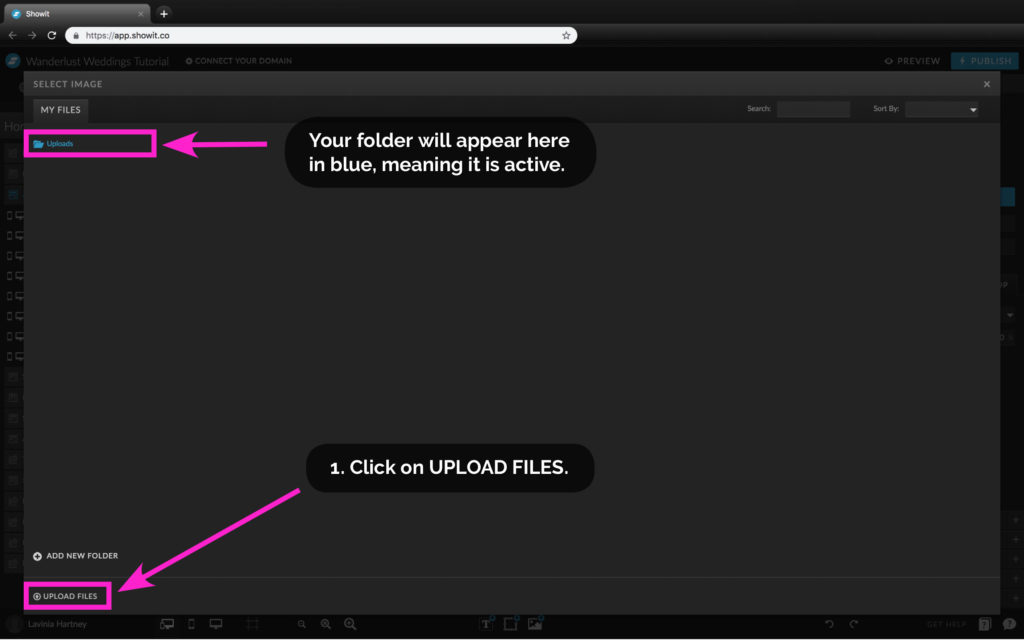
• The Blue colour of the folder indicates that the folder is active, and any images you import will go into that folder.
• You’re ready to upload your images.
1. Click on UPLOAD FILES on the bottom left of the screen.
Section 1 – Step 4
How to import your images in Showit
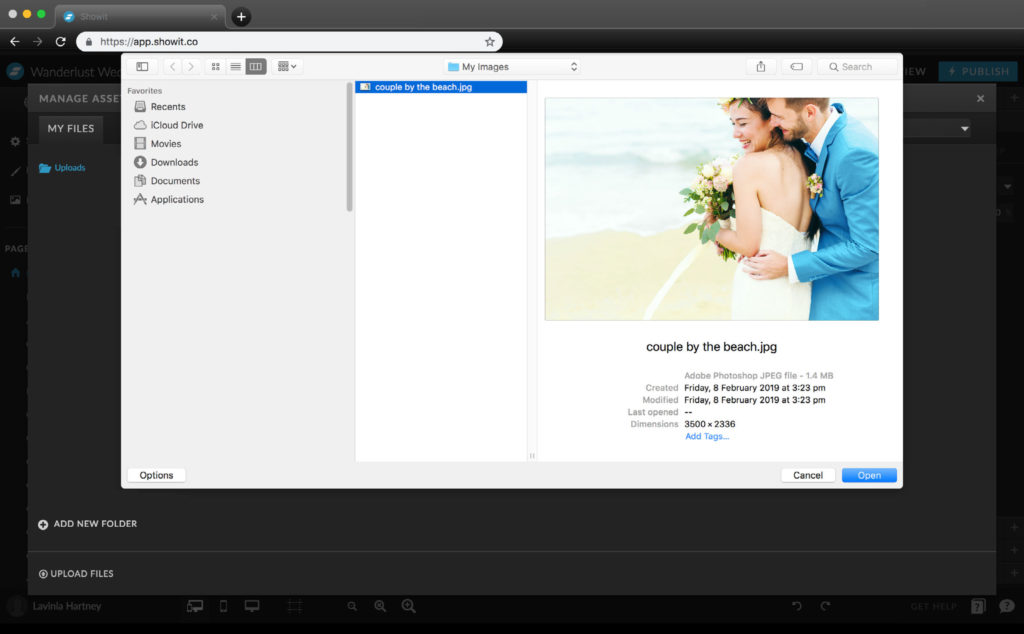
• In the pop-up window that is now active, navigate to where you stored the images for your template.
• Highlight one or multiple images that you want to import and then click the Open button.
Section 1 – Step 5
How to import your images in Showit
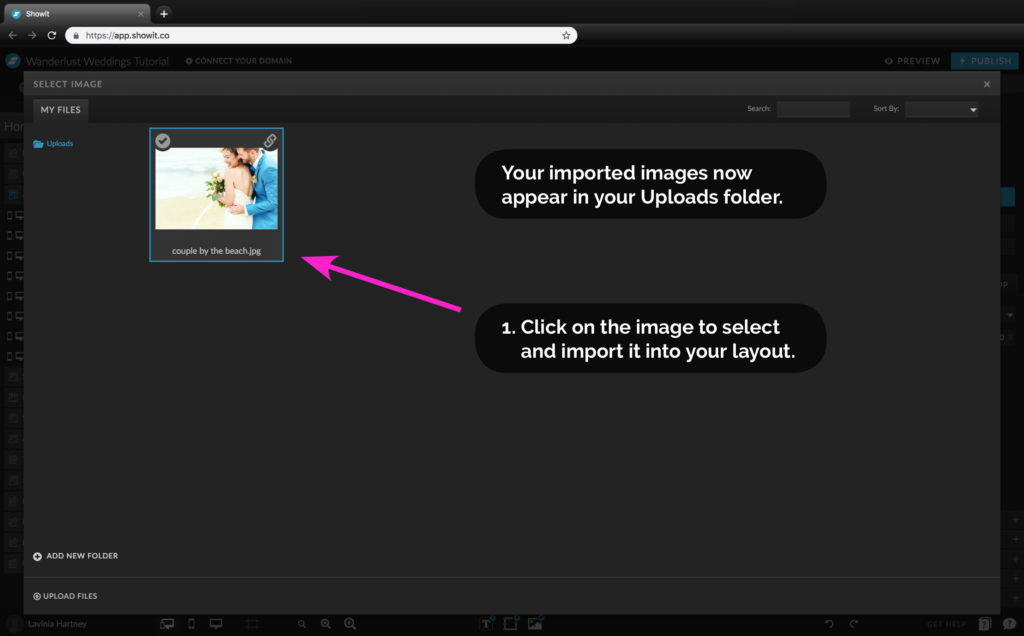
The image (or images) will now appear in the folder you created earlier.
1. Click on the image thumbnail to select the image you want to use.
Section 1 – Step 6
How to import your images in Showit
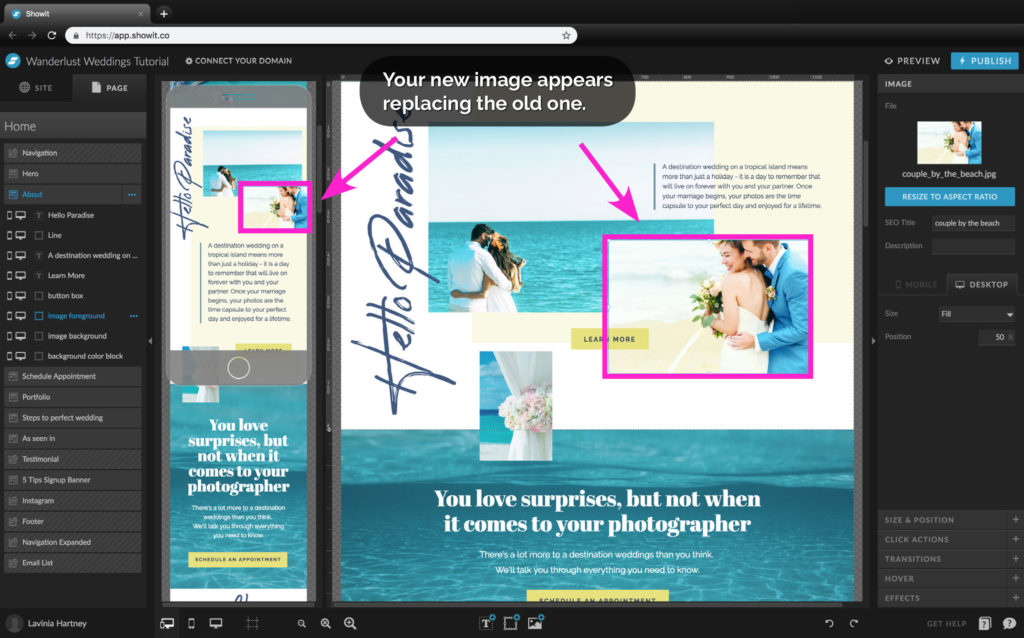
• Selecting the image takes you back to your layout screen.
• Your imported image will appear in place of the old one.
SECTION TWO
Section 2 – Step 1
How to add your logo in Showit
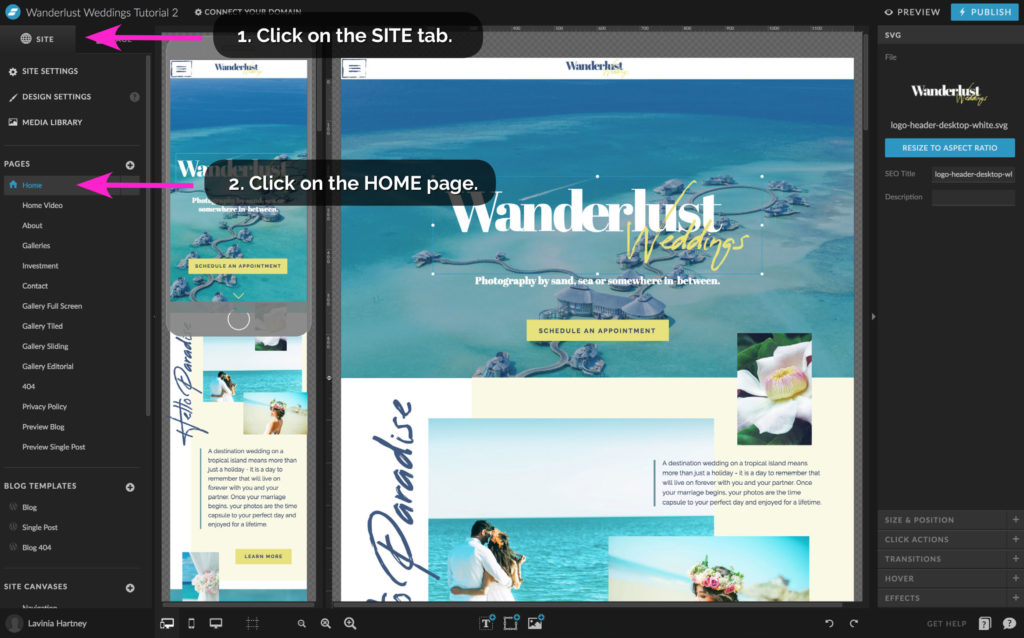
• We’re going to update the logo on the homepage.
Follow along with your template.
1. Select the SITE tab.
2. Select the Home page.
Section 2 – Step 2
How to add your logo in Showit
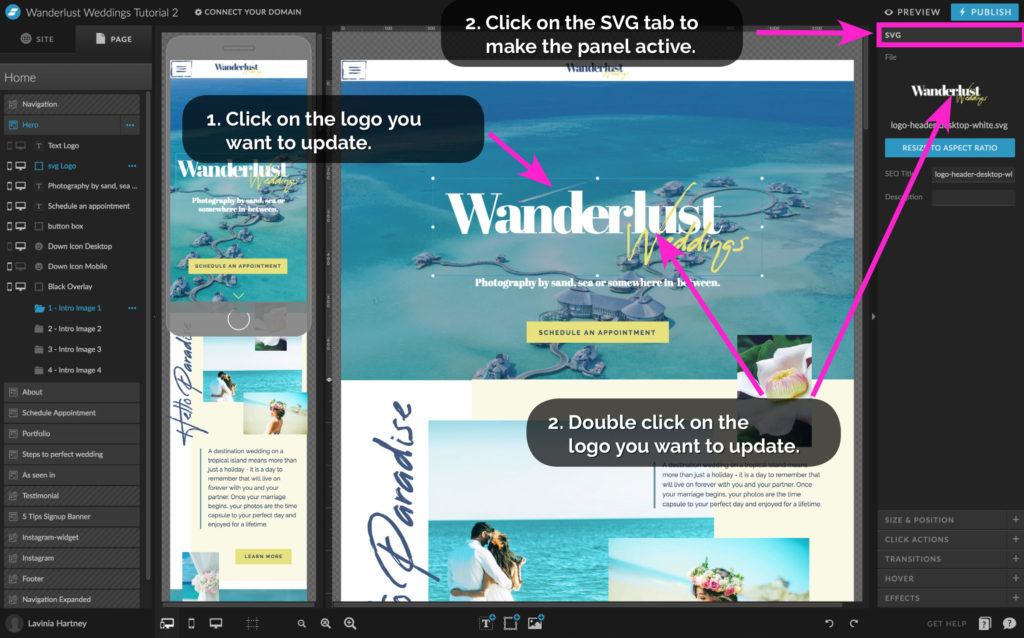
• The process for uploading a logo is the same for an image.
1. First, we need to select a logo. Click on a logo in your template. The homepage heading area usually has a large logo.
2. We need to make the SVG tab active, so we can see information about the images we select.
3. To import a new image on your layout, you can double-click on the logo you want to update, as per the arrow above. OR
Click on the small thumbnail image in the SVG tab.
Section 2 – Step 3
How to add your logo in Showit
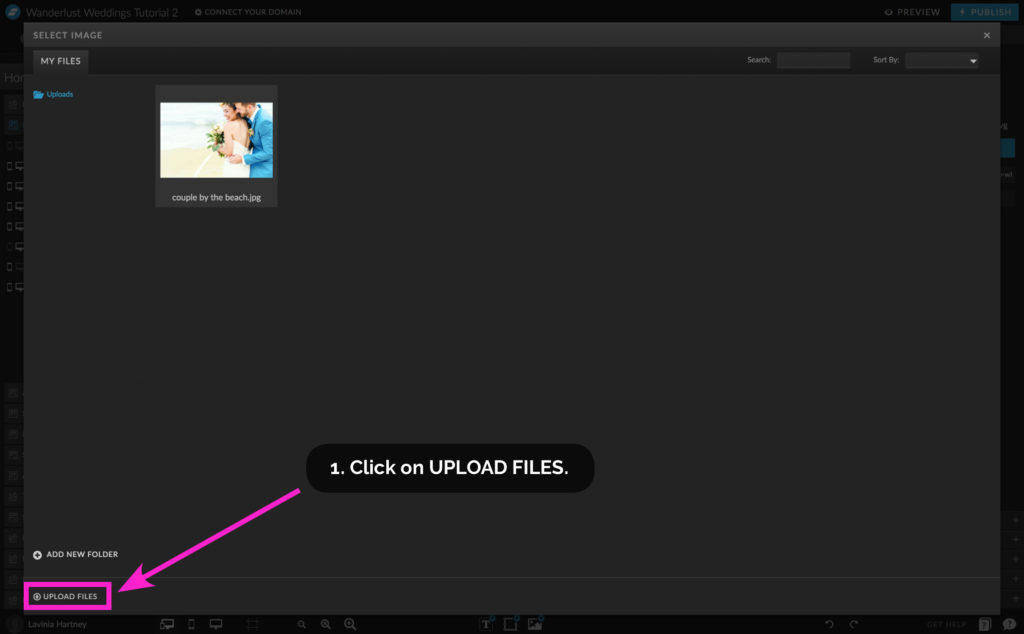
• You’ll now get a pop-up screen over your layout which shows the current images in your collection.
1. Click on UPLOAD FILES on the bottom left of the screen.
Section 2 – Step 4
How to add your logo in Showit
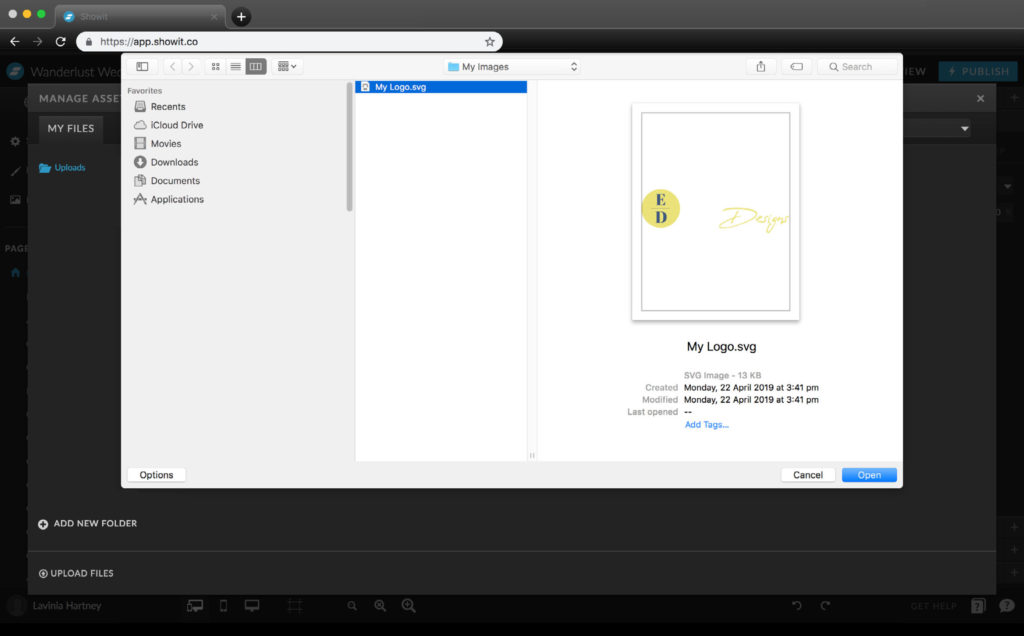
1. In the SELECT IMAGE pop-up, you can upload your logo.
• Highlight the logo that you want to import and then click the Open button.
Section 2 – Step 5
How to add your logo in Showit
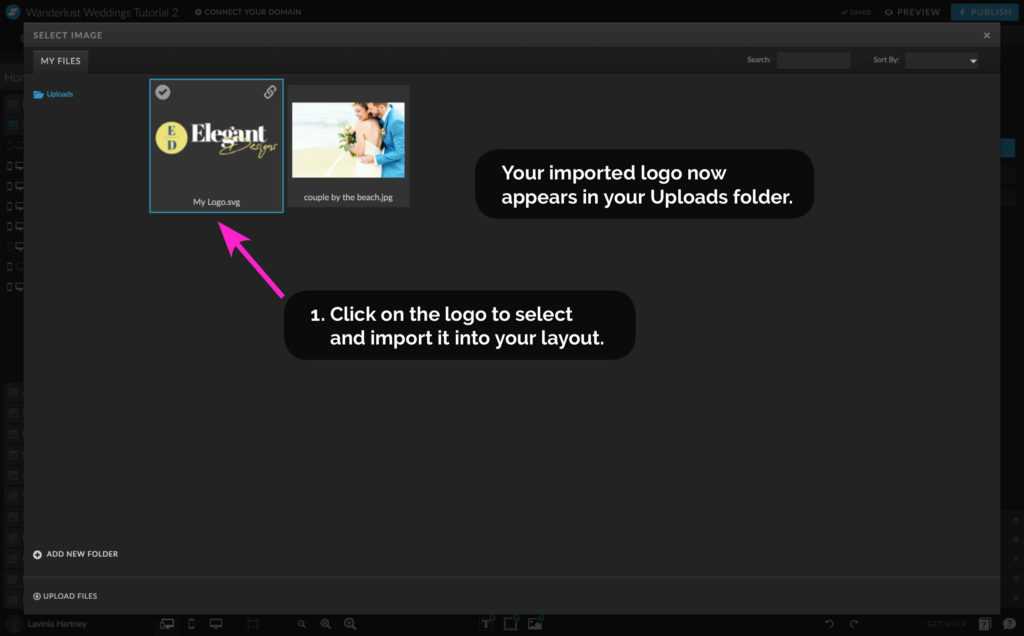
The logo will now appear in your library of images.
1. Click on the logo thumbnail to select the image you want to use.
Section 2 – Step 6
How to add your logo in Showit
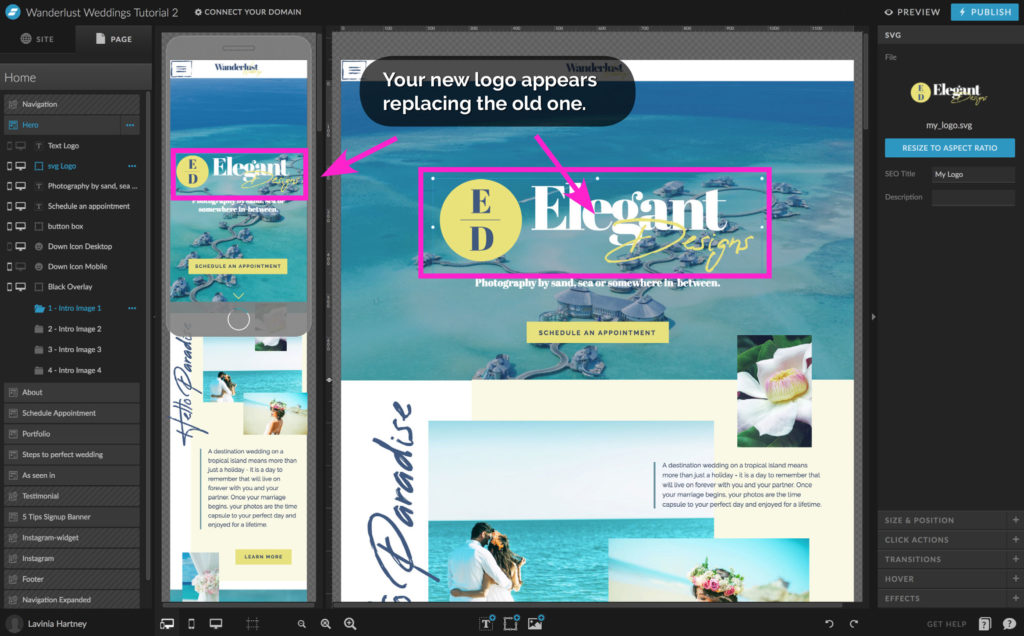
• Selecting the image takes you back to your Design Stage.
• Your imported logo will appear in place of the old one.
SECTION THREE
Section 3 – Step 1
How to update images on other pages
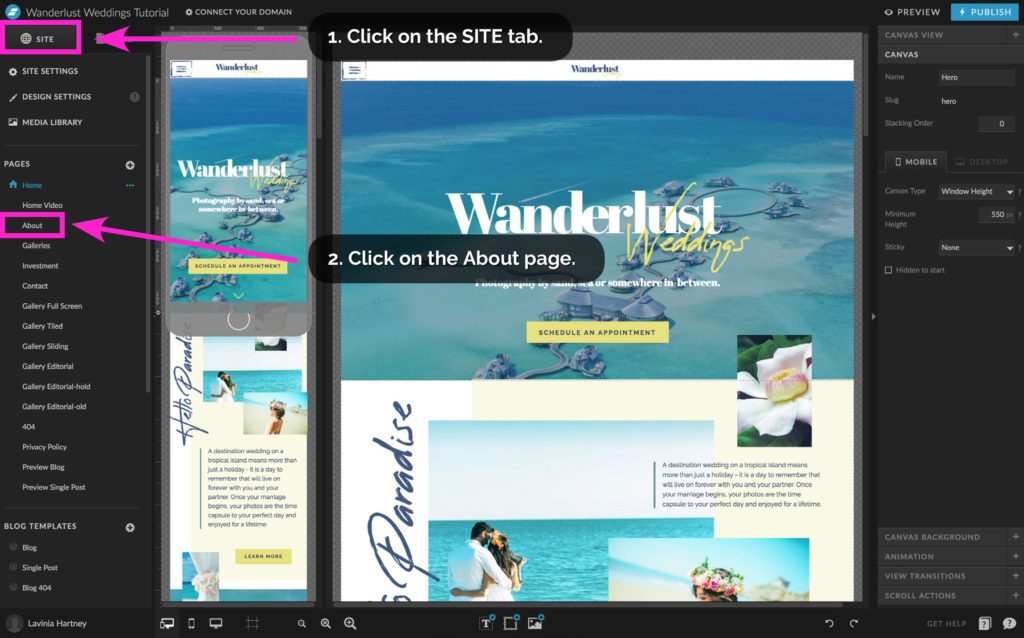
• The process of getting to other pages in your template is the same as we covered in the previous blog How to update text in Showit.
• To update the rest of your template images, you’ll need to be able to access other pages in your website template.
1. Click on the SITE tab. The SITE tab contains things that relate to your website overall.
2. Click on the About page (or any other page you like) to activate it.
Section 3 – Step 2
How to update images on other pages
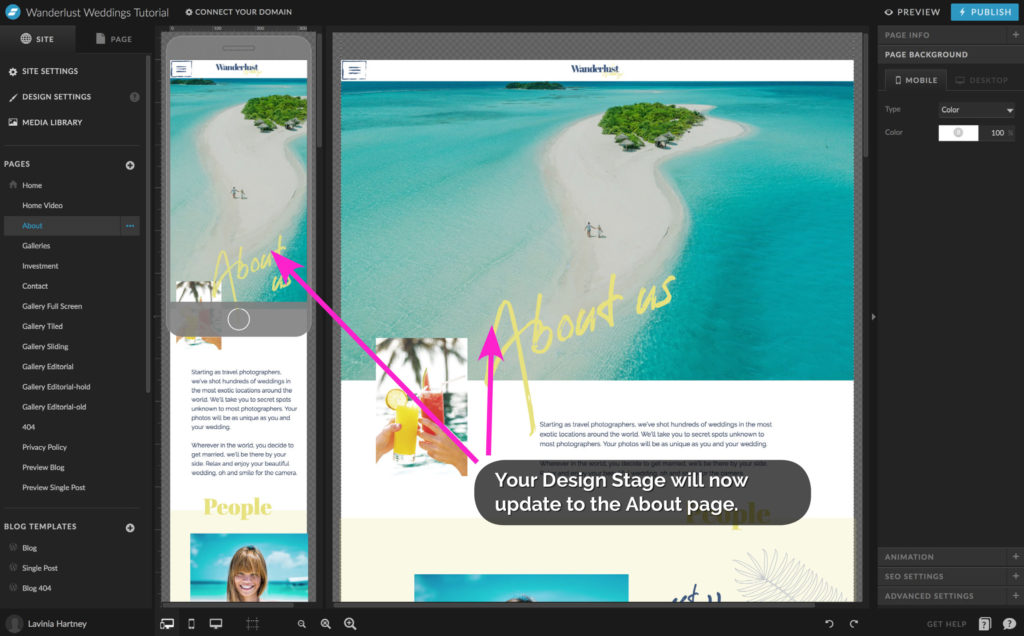
• Your Design Stage will update to the About page.
Section 3 – Step 3
How to update images on other pages
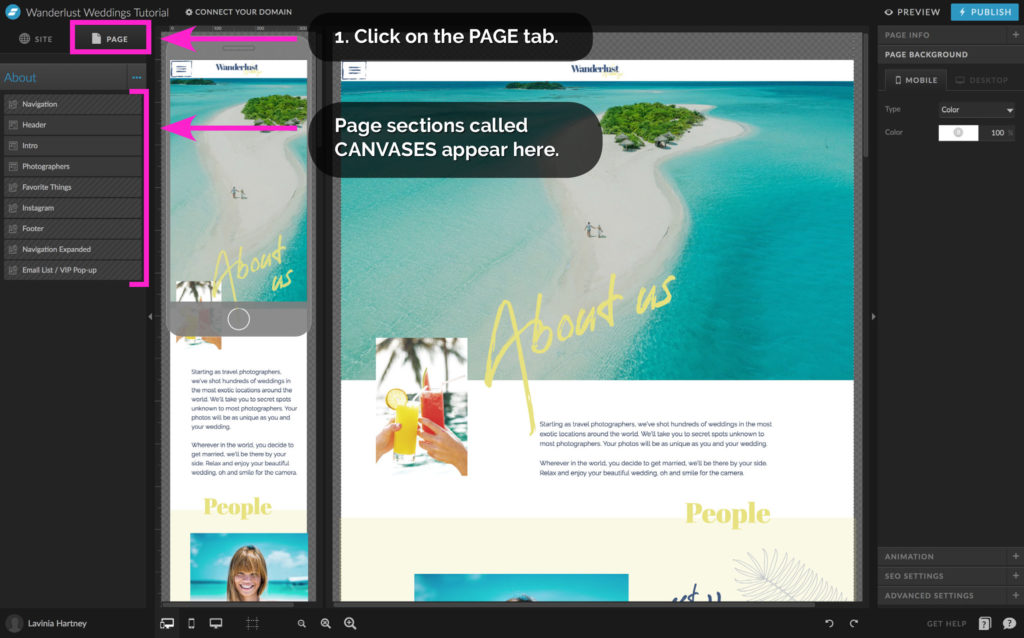
• Click on the PAGE tab.
The PAGE tab contains things that make up the Page you’re on – for example heading sections, Introductory sections and footer sections.
• Showit calls sections on your page Canvases.
• You can see a list of all the Canvases on the left.
Section 3 – Step 4
How to update images on other pages
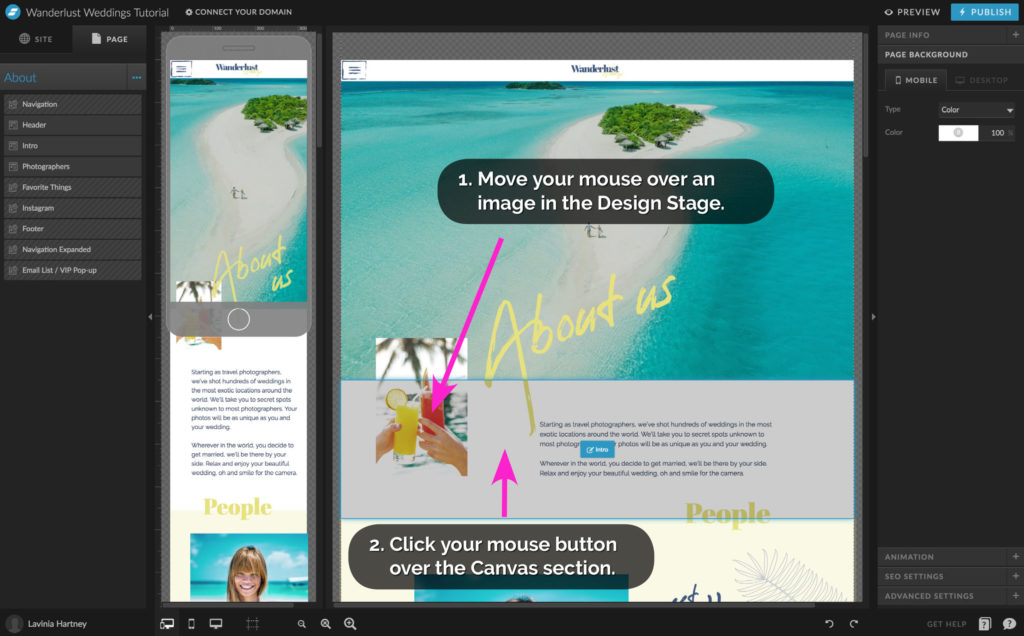
1. Move your mouse over an image in the Design Stage area.
You’ll see the Canvas section highlighted with a blue line as above.
2. Click your mouse button to enter that Canvas section.
Section 3 – Step 5
How to update images on other pages
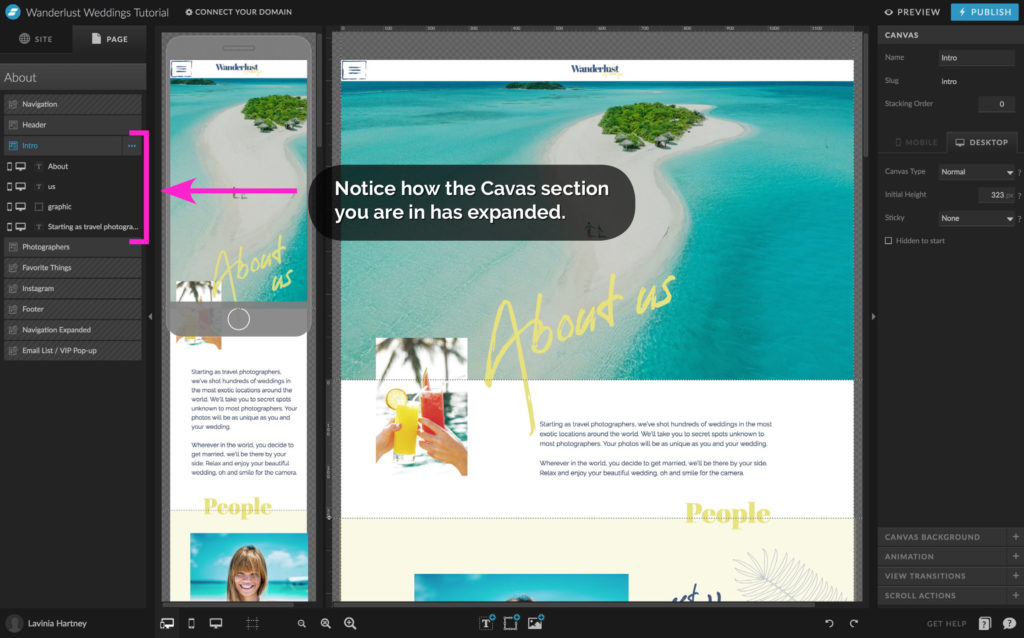
• You’ll now be inside the Canvas Section.
• Note how the Canvas has expanded in the PAGE tab, showing you the elements in that Canvas like text and graphics (images).
Section 3 – Step 6
How to update images on other pages
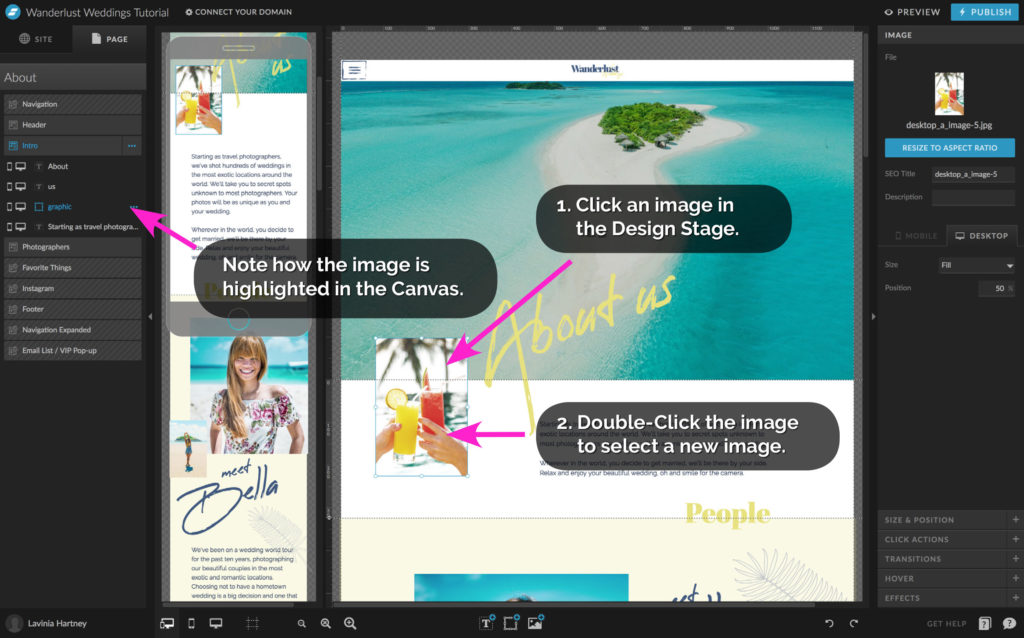
• From here on the process is the same as you learnt in Section One of this guide.
1. Click on an image in the Design Stage to select it.
• This action highlights it in the PAGE tab.
2. Double-click on an image in the Design Stage to open it.
Section 3 – Step 7
How to update images on other pages
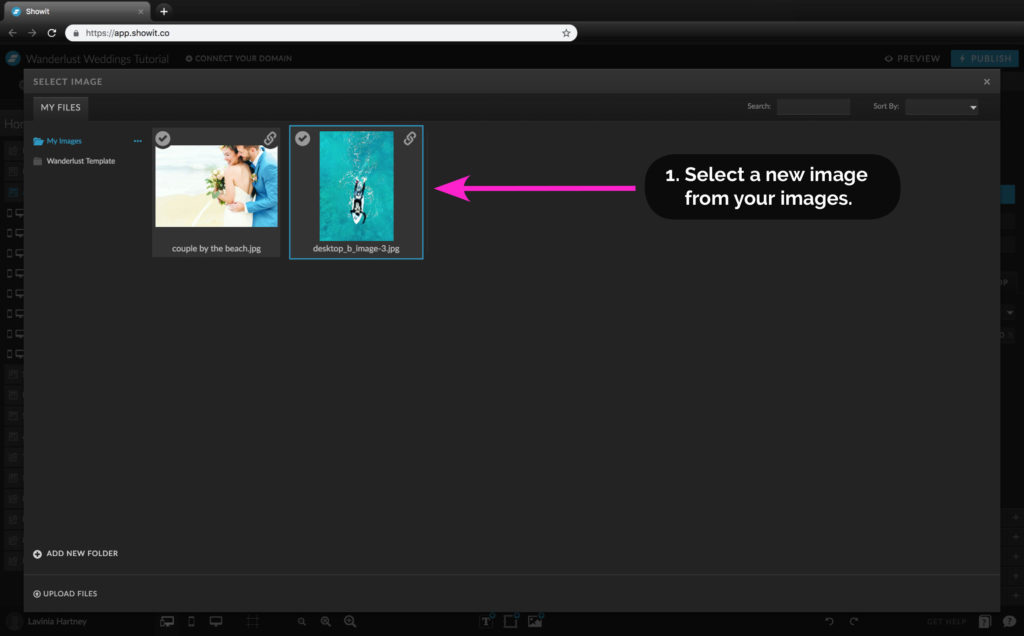
1. Select a new image from your image files.
• If you need a refresher, refer to Section One in this guide, How to import your images.
Section 3 – Step 8
How to update images on other pages
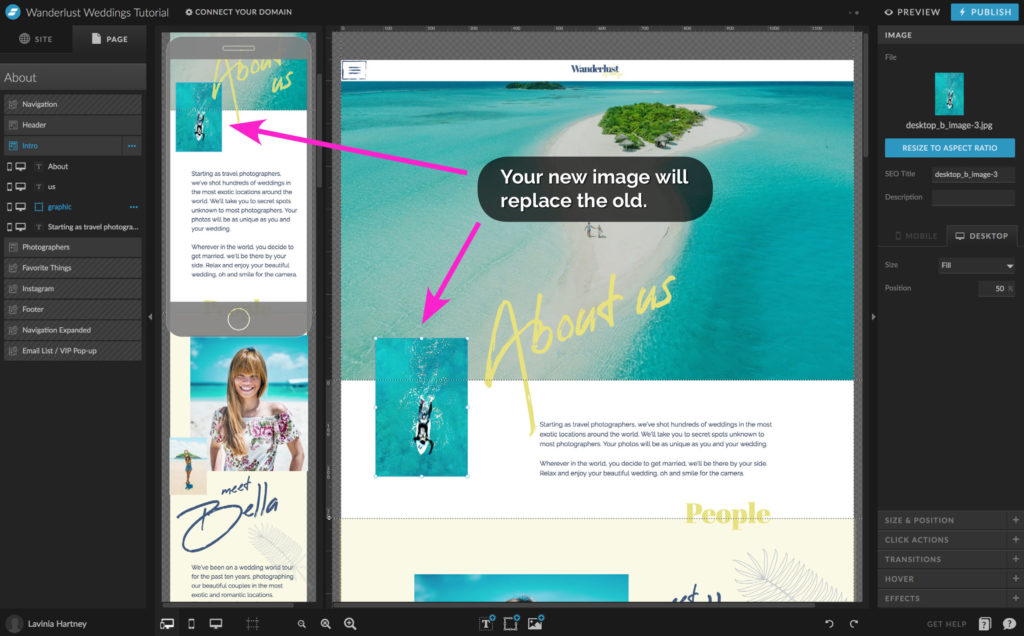
• Following the example above, the new image will replace the old one.
• Repeat the processes you have learnt so far, to import & position images across all your website pages.
Now, it’s time to view all your hard work!
Press the preview button on your screen.

You Did it!
Now you know how to import & update images in Showit, including how to place them in picture frames and resize them within picture frames. (Plus update your logo!)
The next step is for your to start diving deeper into using images.
We’ll show you all the steps next week on How to update galleries & canvas views.
Your Action Steps:
- Import your images into your Showit template. (Section 1)
- Add your logo to the Showit template. (Section 2)
- Update your images on other pages on your Showit template. (Section 3)
- Congratulate yourself! You now know How to Import & Update Images in Showit
After your 14-day free Showit trial – get an additional paid month for free!
Ready to start creating your website with Showit? Hit the button below and get your first subscription month for free.
Full disclosure, this is our affiliate link. So if you join Showit, you’ll be supporting us which helps us produce more content like this, at no additional cost to you.
Where to now?
Now you’re ready to start diving deeper into using images. We’ll cover that in Part 5 – How to Update Galleries & Canvas Views in Showit. Here’s How.
Like this Blog Post?
PIN IT FOR LATER. And for more helpful tips follow us on PINTEREST.

Search
Create & launch your website in a
few simple steps
FREE GUIDE
While you’re here,
grab our FREE
‘Do’s & Don’ts of what to add to your website’ Guide.
‘Do’s & Don’ts of what to add to your website’ Guide.
When you sign up, we’ll send you
emails with additional helpful content.
About Lavinia & Tom
Hi, we're so glad you found us.
We love helping creatives like you finally have the website you’ve always wanted.
Blog Categories
Follow us
