grab our FREE
‘Do’s & Don’ts of what to add to your website’ Guide.
‘Do’s & Don’ts of what to add to your website’ Guide.
emails with additional helpful content.
Hi, we're so glad you found us.
We love helping creatives like you finally have the website you’ve always wanted.
few simple steps
Follow us
From Blurry to Brilliant! Top 4 Ways to Improve your Website Images
Previously, in Part 1 of this series, you discovered why images on your website might look blurry and pixelated and, we shared our Ideal Image Setting Tip Guide. If you missed it, catch up below. Now we’re going to dive in deeper and show you how to turn your images from Blurry to Brilliant using the Top 4 ways to improve your website images today!
Before you get started, check out Part 1:
Picture Perfect Website Images

Index – How to Improve Your Website Images
- Begin with the Best
– What if I don’t have the image in a large format? - Adjust the Brightness, Contrast & Colour of your Image
– Apple Photo
– Lightroom
– Photoshop
– Pro Industry Retouching Tip - Pick the correct Image Type & Compression
– What image type should I use?
– What export settings should I use?
– Pixels per inch/dots per inch
– Photos App - Free Online Image Optimizers
– Bonus Insider Tip – Tom’s Guide to Exporting JPEGS from Photoshop
– Phone apps for editing photos
1. Begin with the Best
Always start with the largest & best possible source image
There are two ways to do this. Let’s discuss both below.
Download from phone/camera at higher dimensions
It is always best to start with the highest image quality possible, and then reduce from there as needed.
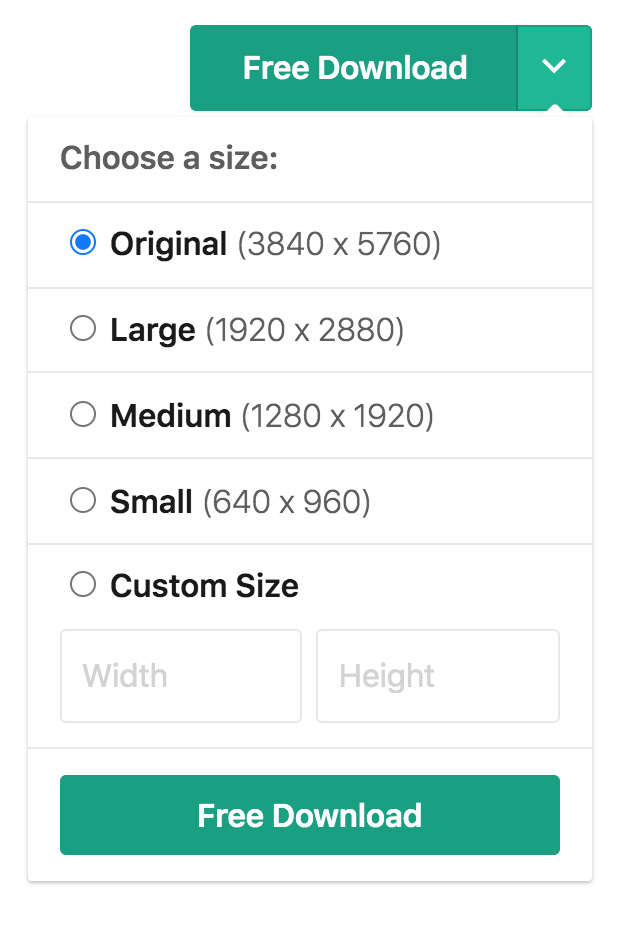
Download the largest size possible from the source website
Some stock photo sites like pexels.com offer downloads in a variety of sizes.
What if I don’t have the image in a large format?
Use an Online Upscaler
We don’t recommend upscaling your images as it usually leads to lesser image quality, but sometimes you don’t have any other options.
You can use a free online Upscaler like letsenhance.io or imageupscaler.com
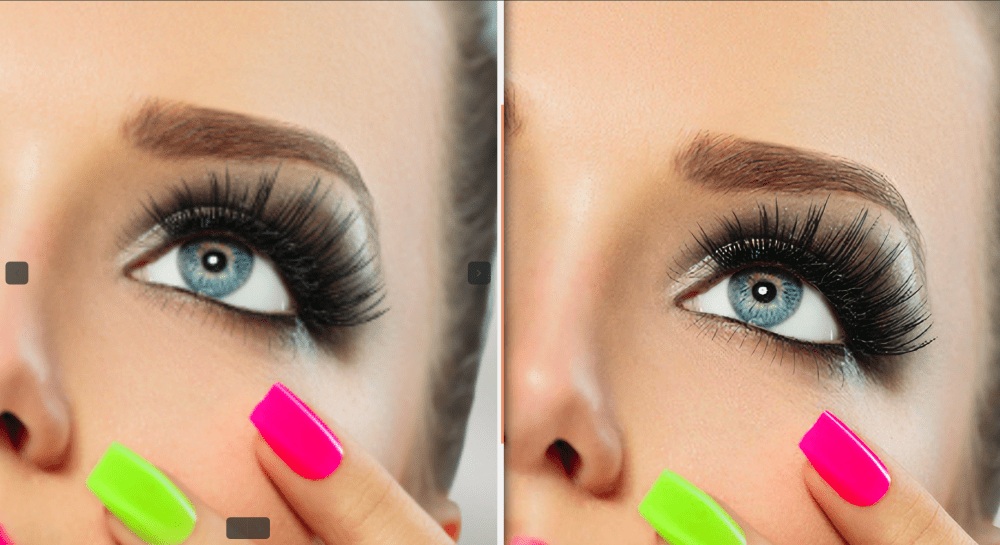
These use Artificial Intelligence (AI) to upscale your image – preserving a lot of the fine details that often get lost with traditional techniques – these results are even better than Photoshop at the time of this Blog Post.
LEFT: Traditional Upscaling – RIGHT: AI Upscaling – Image from imageupscaler.com
Insider Tip
If you have apps like Photoshop, Lightroom or Adobe Camera Raw, these can also upscale your images to larger sizes. To enlarge an image in Photoshop, go to the menu Image > Image Size.
2. Adjust the Brightness, Contrast & Colour of your image
The key to improving your website images is by using online programs to make them good. Let’s look at our top recommendations from beginner to advanced methods using Apple Photo, Lightroom, Photoshop, plus Pro Industry retouching tips.
Apple Photo
We will be using Apple Photo in this example as it comes included with every Mac Computer. It is very easy to use while still giving you powerful export options.
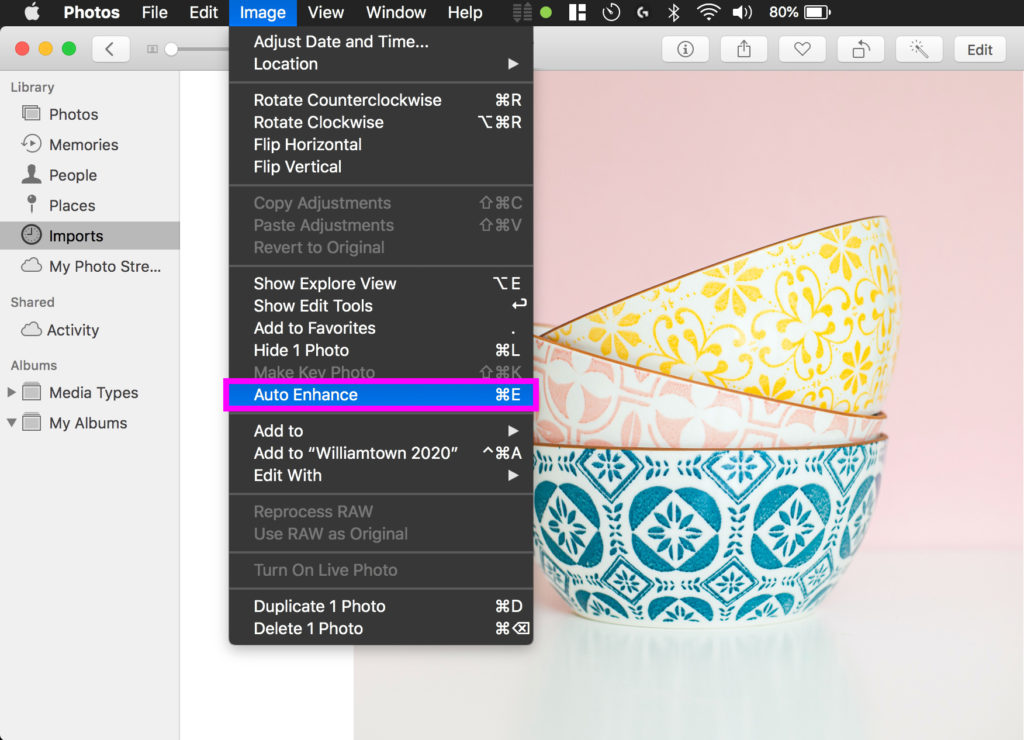
- Open up your image from the Photos App.
- From the Menu up the top select Image > Auto Enhance
- Or click the shortcut ‘Command + E’
This will Auto Enhance your image, levelling out the brightness, contrast and colour.
If you want to tweak the results yourself, or refine the adjustments, follow along to the next steps.
Note that for very colourful images with a solid colour background, you may get unexpected results – if this is the case use the ‘Edit’ Step as outlined below to manually adjust your image.
To further enhance the image yourself, click on the ‘Edit’ button on the top right of the app.
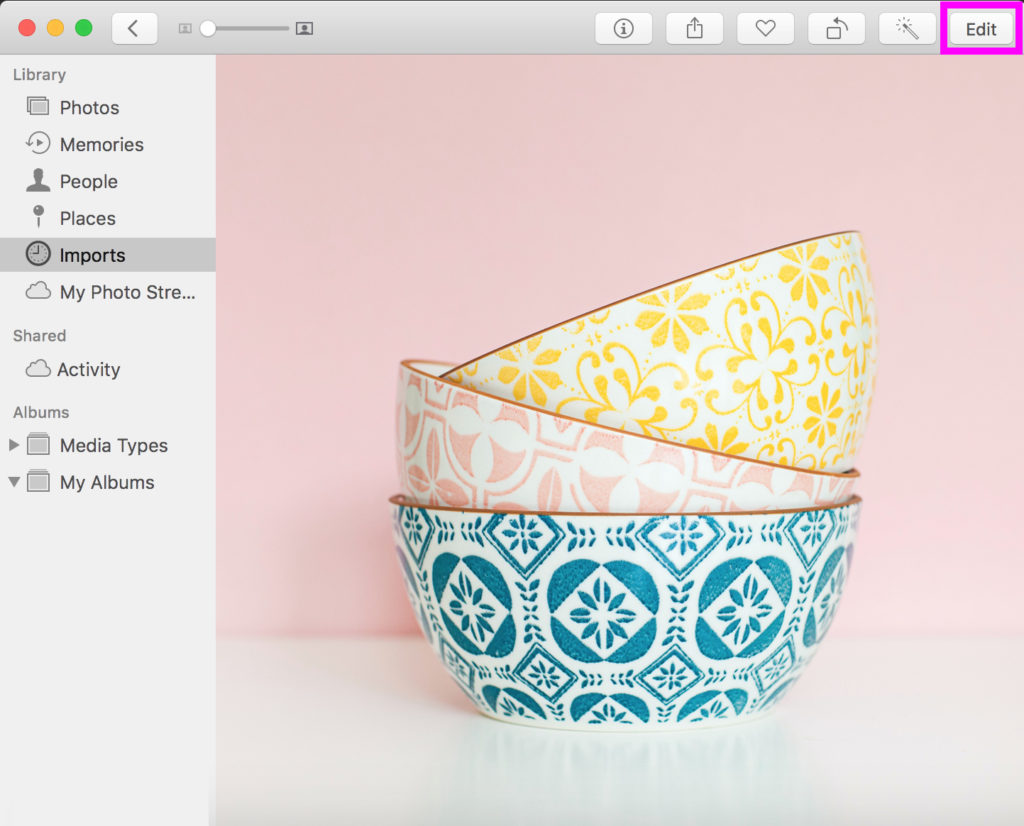
This brings up more adjustments you can tweak.
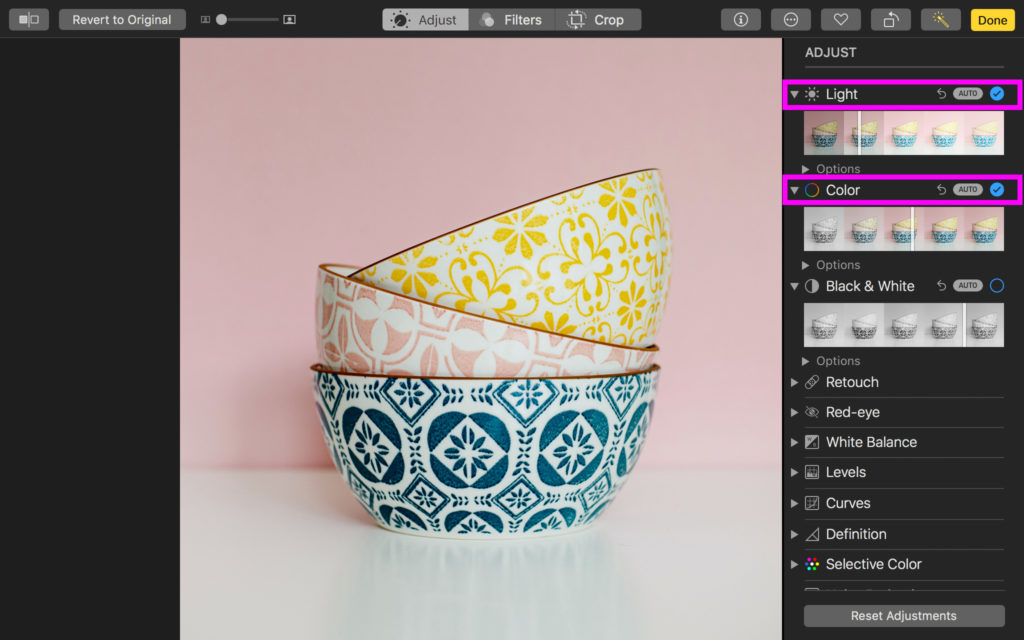
- Select the ‘Light’ and ‘Color’ sections as outlined above top right outlined in magenta.
- You can ‘Auto’ Adjust these settings by clicking on the ‘Auto’ Button.
- Alternatively, you can use the slider on the image directly below to lighten/darken or Saturate/desaturate the colour in your image.
- When you finish your adjustments, click ‘Done’ at the top right of the app.
Insider Tip
If you are feeling adventurous, you can always click on other settings like ‘Selective Color’ to change how your colours appear or ‘levels’ or ‘curves’ if you want more control over your image.
Don’t worry – you can always experiment and then undo all your adjustments by clicking on the ‘Reset Adjustments’ button at the bottom right of the app window.
Lightroom
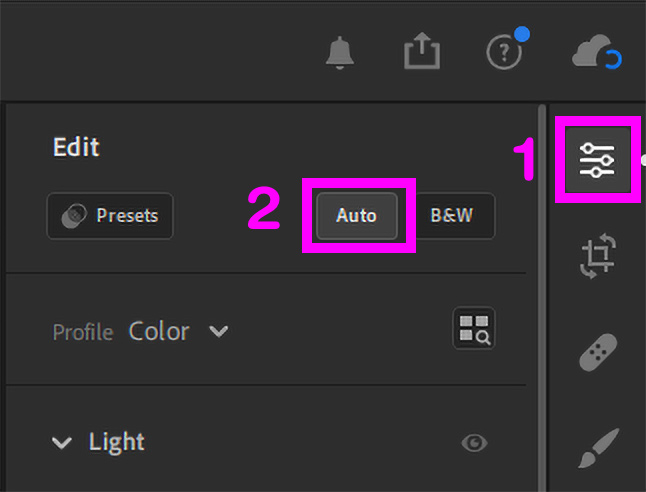
To have Lightroom automatically adjust your image is a simple process.
- Click on the Adjustment tools icon.
- Click on ‘Auto’.
- Optional – make any tweaks using standard tools.
Photoshop
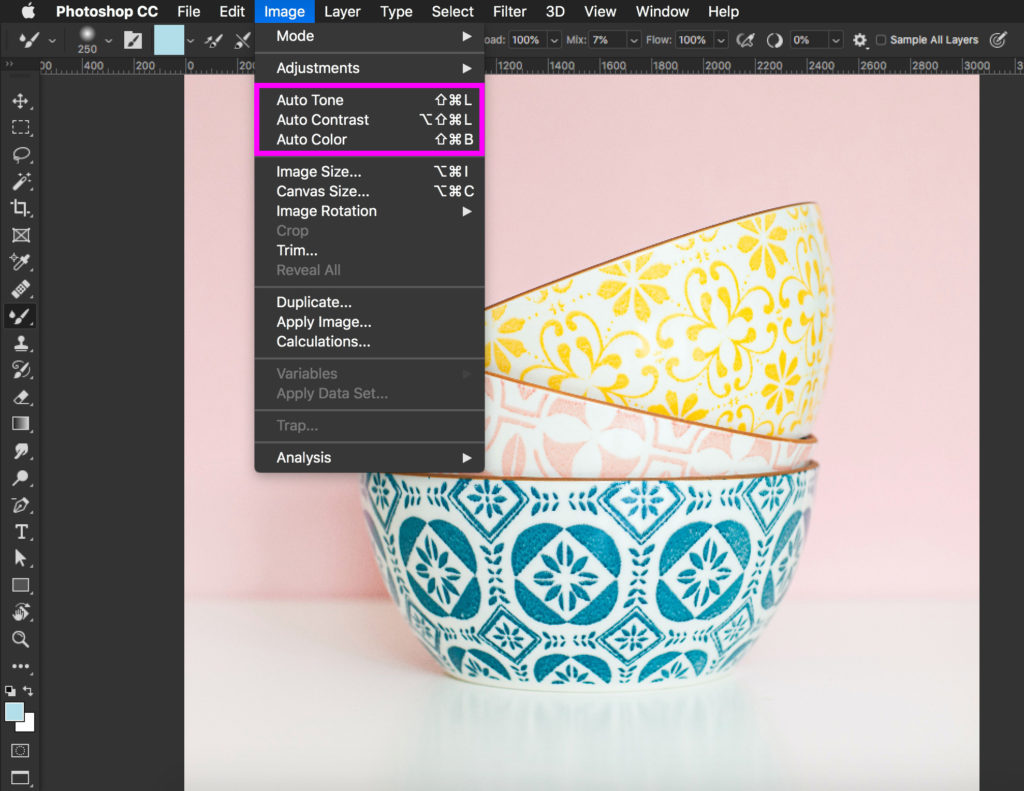
If you have Photoshop and want to easily adjust your images, use Photoshop’s inbuilt Automatic adjustment tools. Find them under the Image Menu.
You can run through all three to have Photoshop automatically Tone, Contrast and Color your image.
Pro Industry Retouching Tip
In our years of working in the graphic design and printing industry, we came across this little tip using Photoshop’s Curves. This insider tip will get most images looking great by adjusting everything with a few simple clicks.
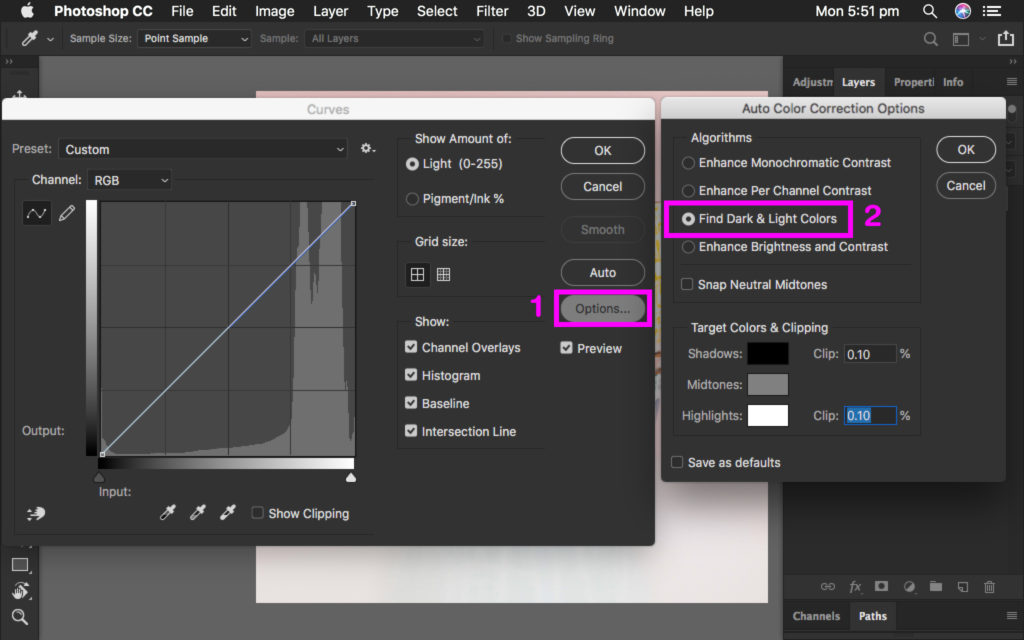
- Bring up the Curves adjustment window by pressing –
COMMAND + M (Mac) or CTRL + M (Windows). - You can now use Photoshop’s Auto Curves, but we need to change one setting to make it perfect.
- Click the ‘Options’ button.
- From the Auto Curves options – select ‘Find dark and light colours’.
- Snapping to neutral mid-tones is optional – (this is Photoshop trying to find a neutral mid-tone and may help if you are trying to remove colour casts from your image.)
Using Photoshop’s Adjustment Layers to get the same result
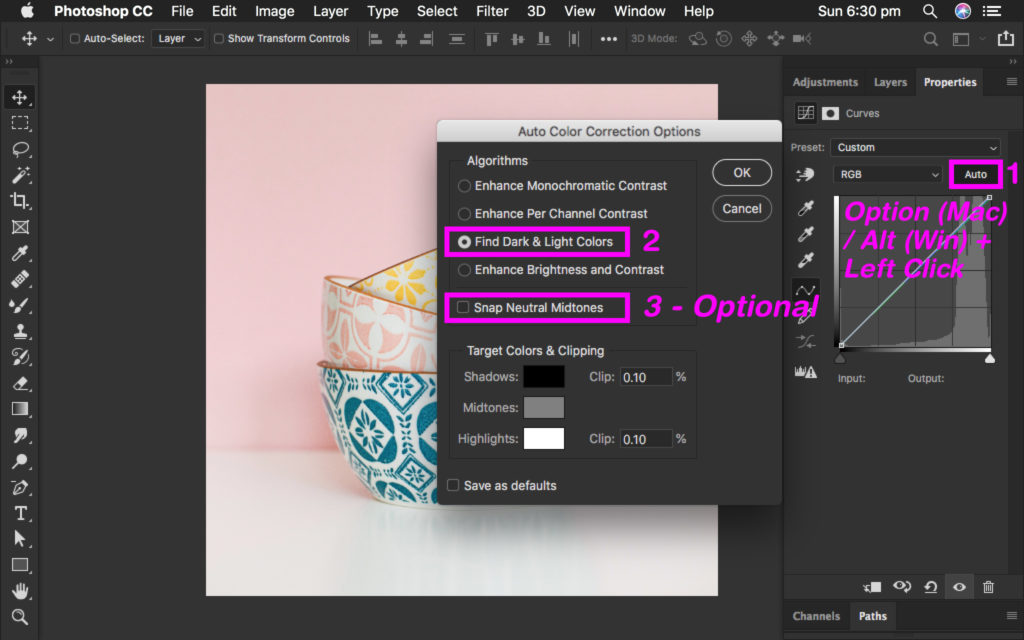
- If you prefer this method, create your curves adjustment layer
- Open up Properties
- Then OPTION + Click (Mac) or ALT + Click (Windows) on the ‘Auto’ Button.
- Follow the steps as outlined above.
3. Pick the correct Image Type & Compression
What image type should I use?
In most cases, JPEGs will be the best format for photographic images, while PNGs or GIFs (or better yet SVGs) will be your best choice for Logos.
YOU MAY ALSO LIKE
Want to dive deeper into image types? Check out our blog What are Vector and Raster Files?
Insider Pro Tip
If this all feels like too much work, then our Showit Template Emporium Website Templates are for you! Simply upload a large-sized image, and it will take care of the rest for you.
What export settings should I use?
File Type
Jpeg Medium quality should do in most cases – (see the final section for a comparison of the JPEG quality settings).
Colour Profile (if available in your photo editing app)
Select sRGB under Color Profile if your photo editor has that option — sRGB is the internet standard and will help make your image appear as you see it in your Photo Editing software.
Size
And under size, you can enter the width or height dimensions of how you want your image to appear.
Remember to account for Retina devices – so you will want your width to be 1.5 to 2 times the width of the container that your image will appear in – So if your website template has a container for an image that is 300px wide you should make your image 450-600px wide.
Pixels per inch/dots per inch
Everything uploaded to websites should be 72 dots per inch (dpi).
Higher resolutions like 300 dpi are for print and not needed for online use.
But wouldn’t uploading a higher dots per-inch image be better?
Website images are affected by the overall dimensions rather than the dots per inch resolution.
That is why you increase the dimensions of your retina-ready images to 1.5x or 2x rather than increase the resolution.
The website then squashes these extra dimensions down to fit the smaller space of the image container box, thereby increasing the image quality and resolution.
Photos App
Don’t have Photoshop? To improve your website images, Mac users can export images at specific sizes via the Photos App.
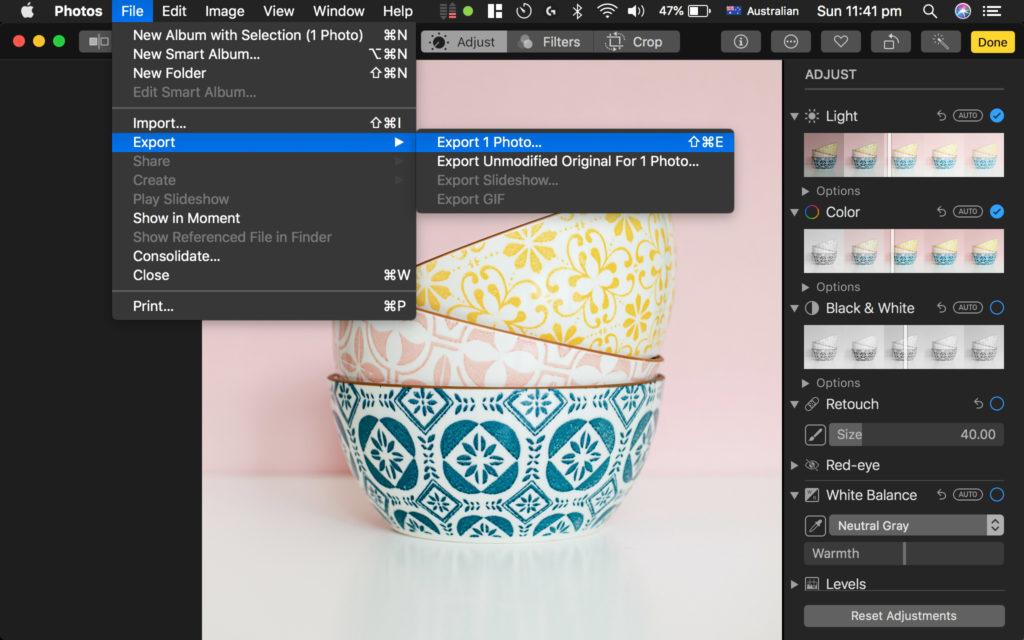
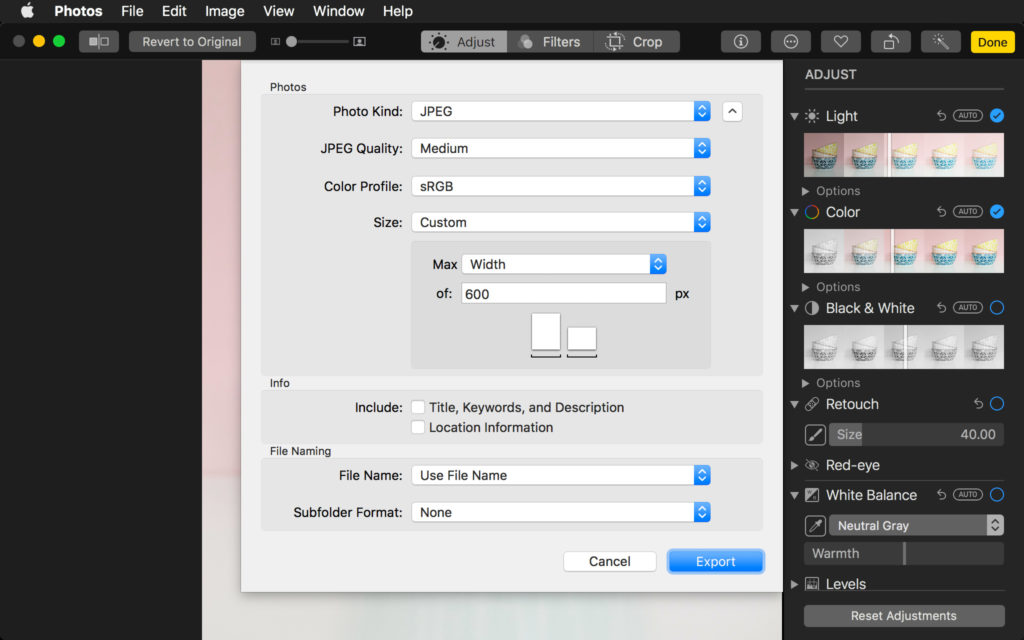
- Jpeg Medium quality should do in most cases.
- Select sRGB under Color Profile.
- And under size, you can enter the width or height dimensions of how you want your image to appear.
- Remember to account for Retina devices, you want your width to be 1.5 to 2 times the width of the container that your image will appear in.
Free Online Image Optimizers
If you want a simple drag-and-drop solution to optimizing your images, you can use the “Tiny range” of online image optimizers.
Use an online image compressor such as Tiny JPG.
Or for PNG images like logos use Tiny PNG.

Bonus Insider Pro Tip
Tom’s Guide to Exporting JPEGS from Photoshop
To improve your website images, use Higher quality JPEGs = better quality images online.
But, doing this will mean your website speed will suffer. So let’s look at three ways we can help with website speed.
Most cases
50% quality is a good middle ground.
The JPEG artefacts you sometimes see are gone (Artifacts = Blocky or coloured edges around high contrast areas), and the file size is a good middle ground.
Lowest File size
If you need to reduce file size for image loading, drop it down to 35-45%. But you will get JPEG artefacts (blocky edges) on high-contrast images.
Image quality
If you need the best possible image quality but within what is still acceptable for page load speed – then upping your JPEG Quality to 70-75% is a good option.
Phone apps for editing photos
If you like to shoot and edit photos directly on your phone, then the applications below provide great editing capabilities.
Darkroom – Apple iOS
Polarr – Android, iOS and Online website.
You Did it!
Well, that’s a wrap on Part 2 – From Blurry to Brilliant – The top 4 ways to improve your website images today! Now you know all the ways (including our insider pro tips) on making the images on your website shine. Which method will you use? Let us know.
In the meantime, follow us on Pinterest for more helpful guides like this.
Where to Now?
- Missed Part 1 Picture Perfect Website Images of this series? Check it out here.
- Constantly searching for Mockups? Our Ultimate Resource Guide will help.
- Should you use Pink as your Branding Colour? Find out here.
Use your Picture Perfect Images in your Branding
Get our FREE GUIDE – Create your Brand Style Guide.
Does your Visual Branding look consistent? If it isn’t, your customers don’t know what to expect from you. Think of this as your business blueprint. We’ll guide you through all the stages to help make your brand look (and feel) legitimate and one your customers can trust.
Like the Blog Post?
PIN IT FOR LATER. And for more helpful tips follow us on PINTEREST.

Search
Create & launch your website in a
few simple steps
FREE GUIDE
While you’re here,
grab our FREE
‘Do’s & Don’ts of what to add to your website’ Guide.
‘Do’s & Don’ts of what to add to your website’ Guide.
When you sign up, we’ll send you
emails with additional helpful content.
About Lavinia & Tom
Hi, we're so glad you found us.
We love helping creatives like you finally have the website you’ve always wanted.
Blog Categories
Follow us