grab our FREE
‘Do’s & Don’ts of what to add to your website’ Guide.
‘Do’s & Don’ts of what to add to your website’ Guide.
emails with additional helpful content.
Hi, we're so glad you found us.
We love helping creatives like you finally have the website you’ve always wanted.
few simple steps
Follow us
Countdown to Launching your Showit Website
Firstly, to launch your website, you will need to link your domain name to your Showit site. We’ll show you exactly how and don’t worry the team at Showit will do all the techy set-up for you. All you have to do is answer a few questions. Are you ready to begin the Countdown to Launching your Showit Website?
By following our simple 10-step process below, you’ll go from wondering how to set up a Showit blog (on either the basic or advanced subscription) to hitting the PUBLISH button and watching your website go live for the world to see!
Before we start – missed a part of our Showit Series? Catch up below.
- 1. How to Create a Showit Subscription
- 2. How to Import Your Showit Template
- 3. How to Update Text in Showit
- 4. How to Import & Update your images in Showit
- 5. How to Update Images in Galleries & Canvas Views inside Showit
- 6a. How to Update Master Fonts in Showit – Site Styles Part 1
- 6b. How to Update Master Colours in Showit – Site Styles Part 2
- 7. How to Update Site Canvases in Showit
- 8a. How to add my Instagram Feed to a Showit Website – Links Part 1
- 8b. How to Link to Email Addresses in Showit – Links Part 2
- 9. How to Link to your Social Media Accounts in Showit – Links Part 3
- 10. How Blogging works with Showit
- 11. How to get your Showit Website Ready for Launch
- 12. Countdown to Launching your Showit Website (this is the blog you’re reading)
- BONUS – After your 14-day free Showit trial – use our affiliate link to get your first paid month for free!

Before we begin the Countdown
At this stage, you should have purchased a domain name. (e.g. elegantpapercraft.com). Following the steps below, we will show you when you are required to enter details on the domain name you purchased.
If you have not purchased a domain name yet, follow Step 3 in our blog How to get your Showit Website Ready for Launch. Then return here, and we can get started.
Already have a website and are swapping it for Showit?
It’s best if you perform a backup of your entire site before replacing it
with your Showit site.
Although you may never want to go back to your old site, you may find one
day that you need certain text or a link from it that you had forgotten to record.
Your current web host, web developer or platform like Squarespace is
most likely creating backups of your site already.
Step 1
Countdown to launching your Showit Website
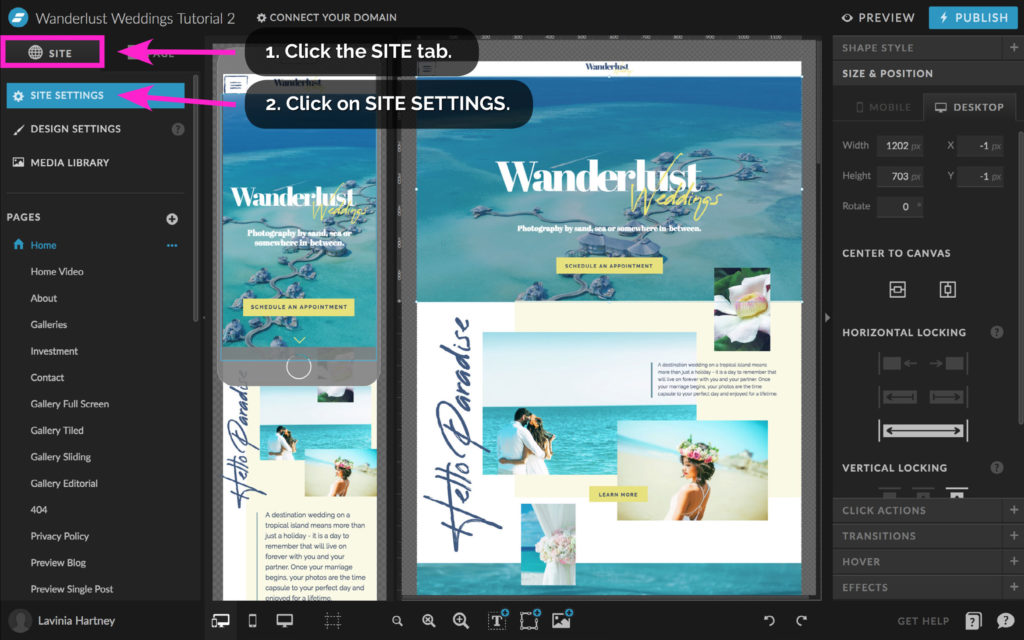
By answering a few questions, the Showit team will have the information they need to set up your website for launch.
Let’s get started!
- Click the SITE tab.
- Click the SITE SETTINGS.
Step 2
Countdown to launching your Showit Website
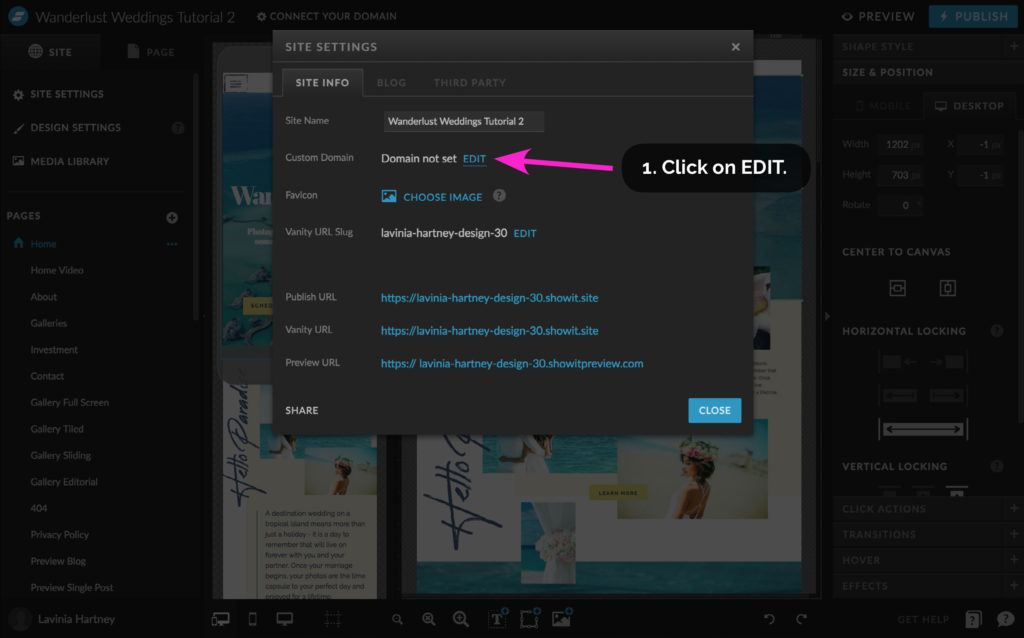
- Click on EDIT, next to Custom Domain.
Step 3
Countdown to launching your Showit Website
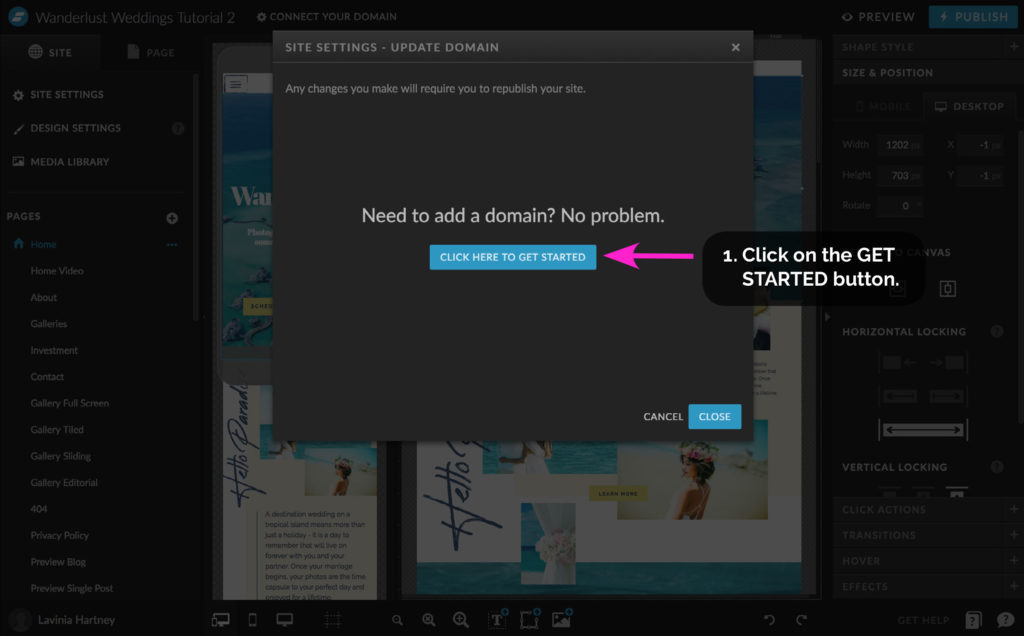
- Click the GET STARTED button to begin.
Step 4
Countdown to launching your Showit Website
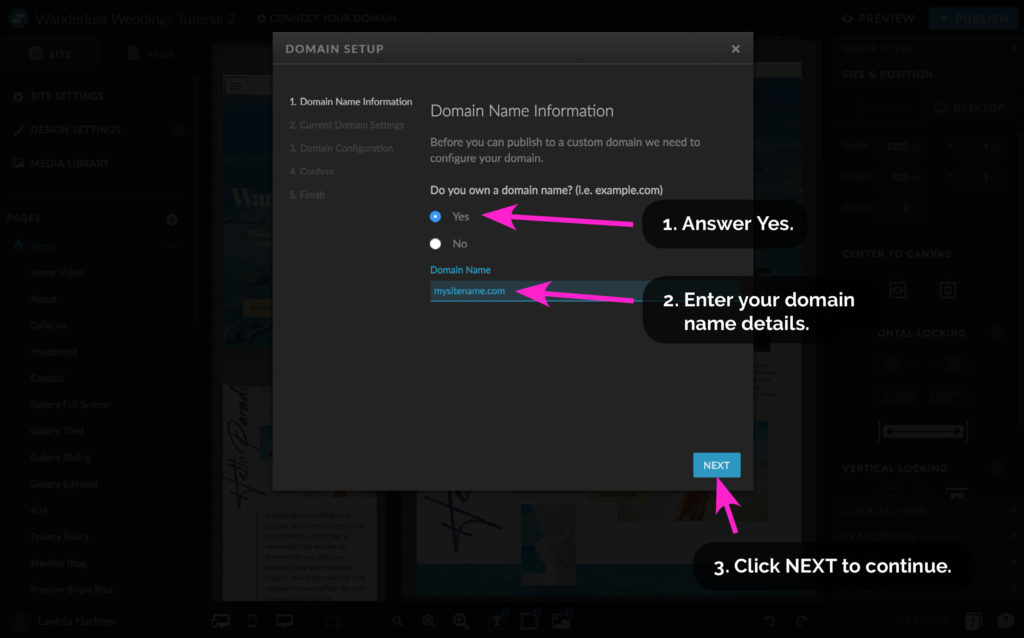
Domain Name Information
• Showit will now ask you questions about the domain name you purchased.
• Don’t worry if you don’t know all the answers
There is a place at the end of the setup where you can leave your phone number and a message if you are unclear about what something meant.
- Answer Yes to the first question. ‘Do you own a Domain name?’
- Enter the domain name you registered in this field.
- Click the NEXT button to continue.
Step 5
Countdown to launching your Showit Website
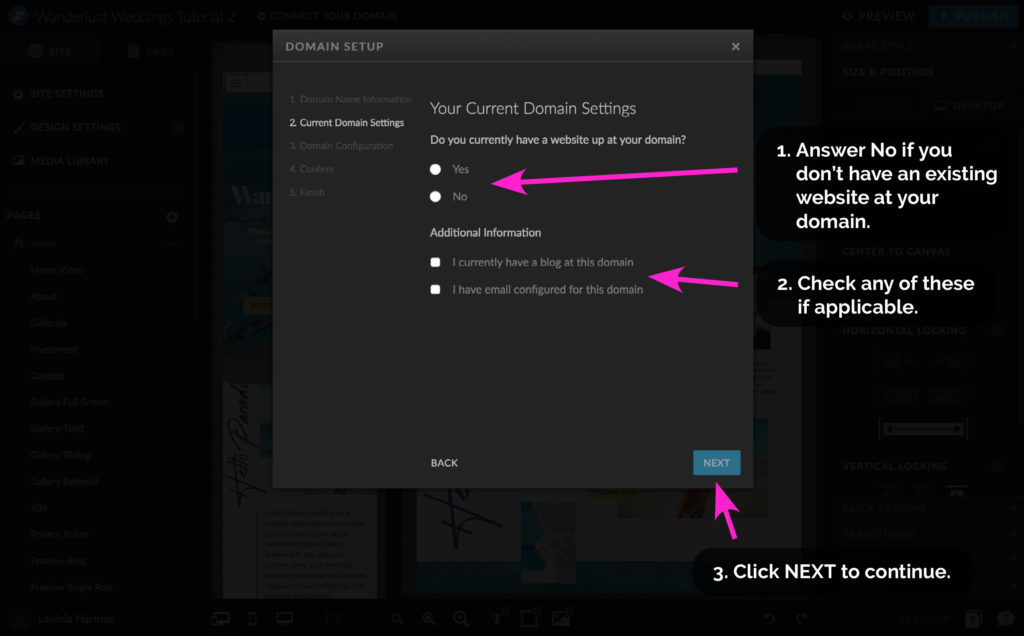
Current Domain Setting
- If you don’t have an existing website at your domain address, answer No. Otherwise, select Yes and then answer the additional questions.
- Select any of the statements in this section if they apply to your situation. In this case, you should leave ‘I currently have a blog at this domain’ unchecked, as you are setting one up.
- If you are unsure of any questions, mark these down and ask the Showit team in the comments box at the end of the setup.
- Click the NEXT button to continue.
Step 6
Countdown to launching your Showit Website
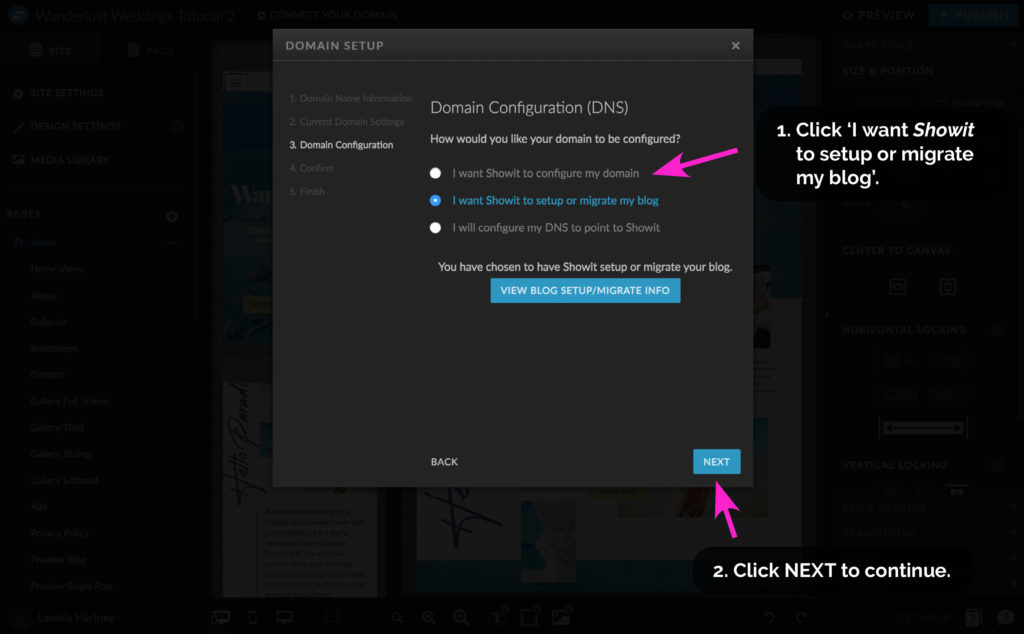
Domain Setup Part 1
- In the 1st question, select ‘I want Showit to set up or migrate my
blog’. - Click NEXT.
- On the screen following this, Click DONE to exit the setup wizard.
Step 7
Countdown to launching your Showit Website
Domain Setup Part 2
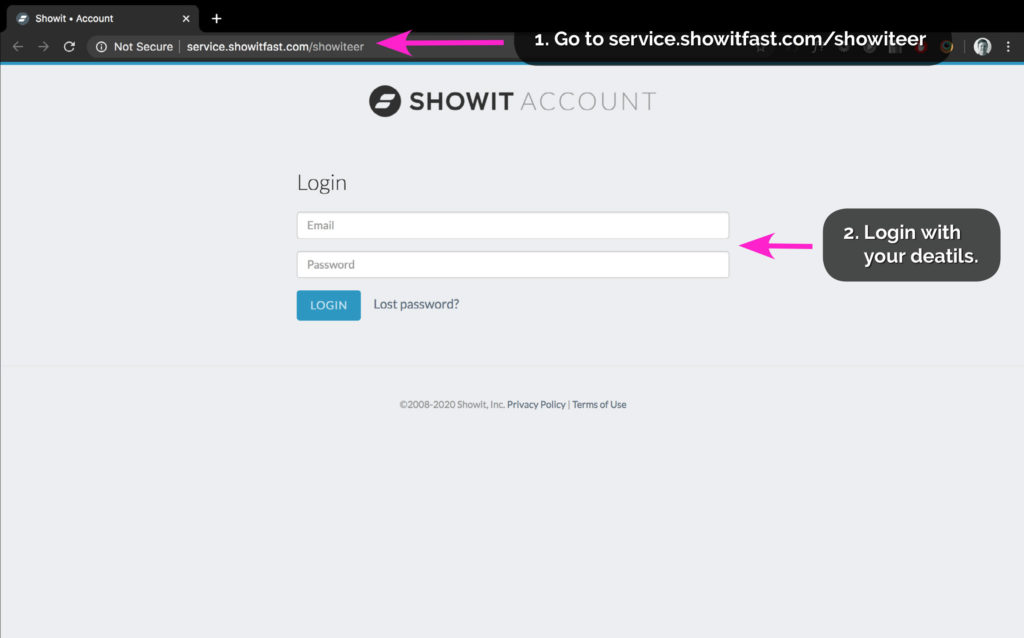
Next, we’ll go to your Showit account page.
(This is outside of the Showit Website building platform).
To access your account, open a new browser window.
1. Click here
2. Login with your email and password.
Step 8
Countdown to launching your Showit Website
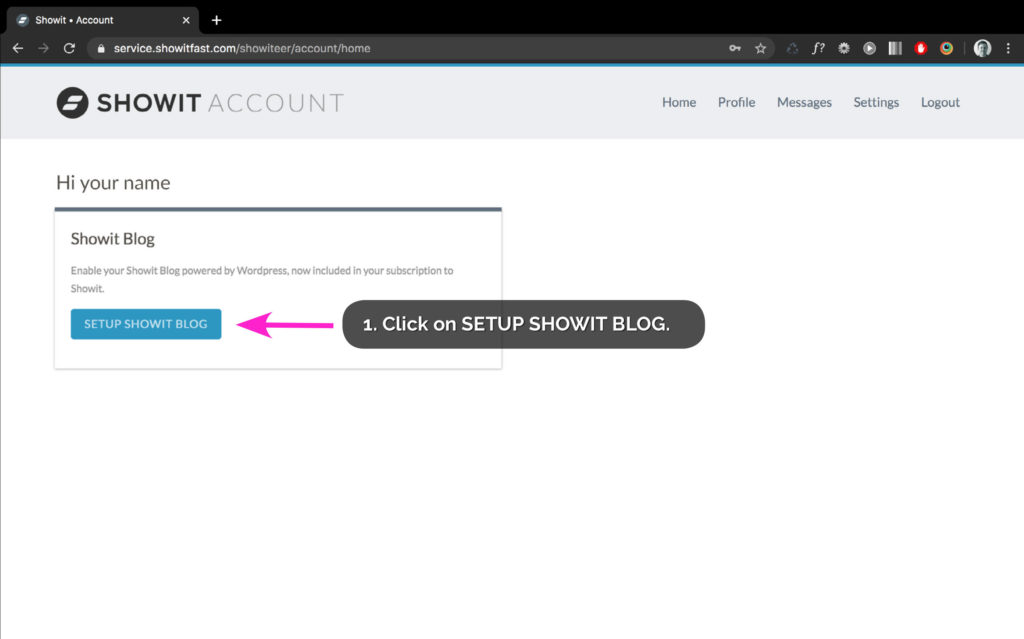
Once you’ve logged into your account, you’ll see a screen similar
to the one above.
- Click on SETUP SHOWIT BLOG.
Step 9
Countdown to launching your Showit Website
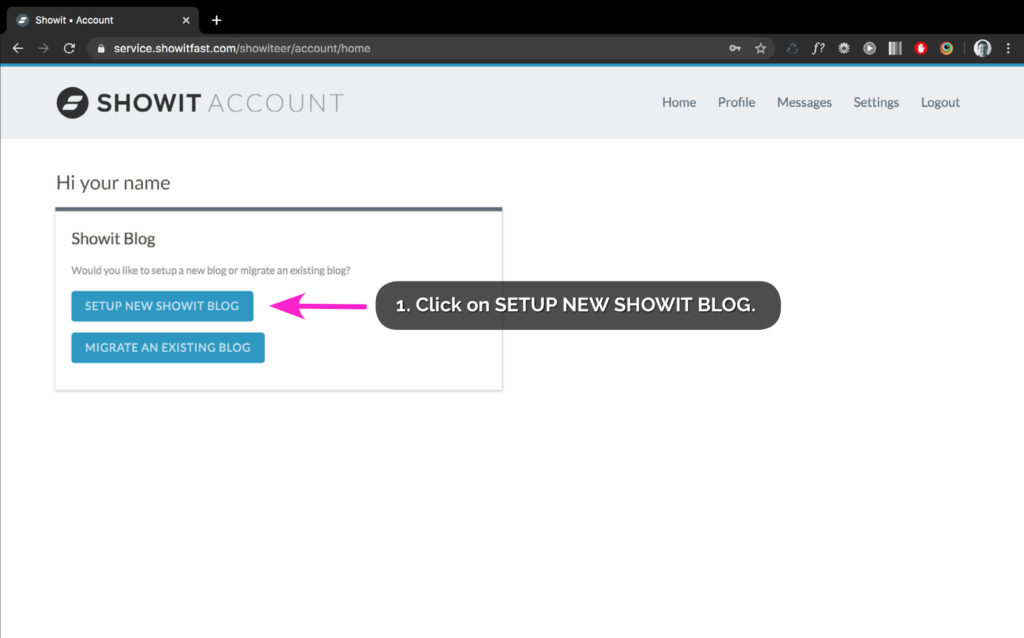
You are now on the second part of the Showit Blog setup
(Like the screen above).
- Click on SETUP NEW SHOWIT BLOG.
Step 10
Countdown to launching your Showit Website
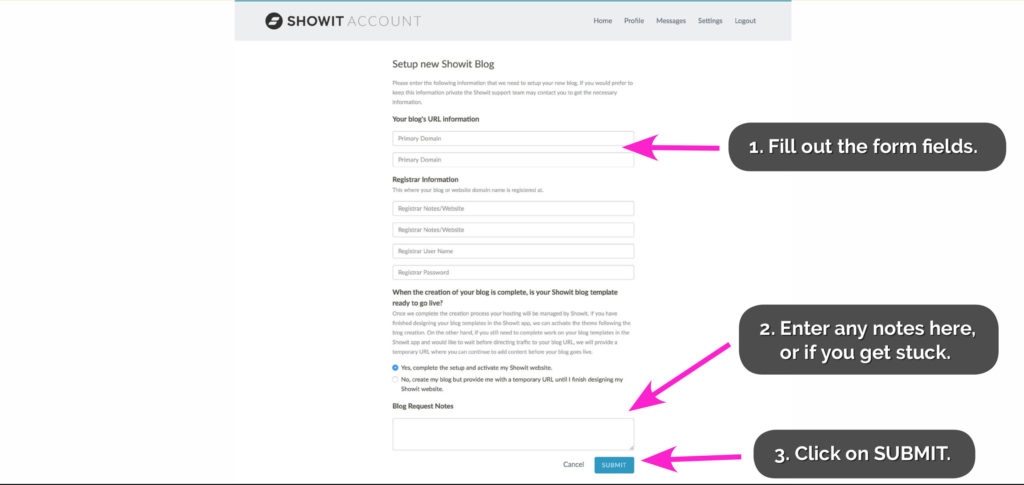
Final Step – Form
- At the final part of the process, you will need to fill out a form.
The Showit team need this information to set up the techy stuff for you.
The form will ask for your:
• Registrar Information.
This is where you registered your Domain name. It will be a company such
as Google Domains, Godaddy, BlueHost, etc.
• Login details to the Registrar.
Alternatively, you can have Showit contact you if you don’t want to enter logins on the form. Use the Notes field to do this.
2. Blog Request Notes
If anything is unclear, you have a question or need help, fill in this section.
Add your contact details, so the Showit team can contact you.
3. Once you have filled out the form, click the SUBMIT button.
What Happens Next?
Now you can sit back and relax!
The Showit team will handle all the techy setups, including:
– Linking your Showit site to your domain.
– Giving you a new WordPress blog that perfectly matches your website design.
– When the process is complete, you will get an email from the Showit Team.
Visit here for estimated turnaround times.
You Did it!
You have finished linking your domain to your Showit website design. Now your website is about to be live for the world to see!
After your 14-day free Showit trial – get an additional paid month for free!
Ready to start creating your website with Showit? Hit the button below and get your first subscription month for free.
Full disclosure, this is our affiliate link. So if you join Showit, you’ll be supporting us which helps us produce more content like this, at no additional cost to you.
Where to now?
Congratulations! You have completed our entire How-to Showit Series.
Missed a part? Catch up on previous blogs below.
- 1. How to Create a Showit Subscription
- 2. How to Import Your Showit Template
- 3. How to Update Text in Showit
- 4. How to Import & Update your images in Showit
- 5. How to Update Images in Galleries & Canvas Views inside Showit
- 6a. How to Update Master Fonts in Showit – Site Styles Part 1
- 6b. How to Update Master Colours in Showit – Site Styles Part 2
- 7. How to Update Site Canvases in Showit
- 8a. How to add my Instagram Feed to a Showit Website – Links Part 1
- 8b. How to Link to Email Addresses in Showit – Links Part 2
- 9. How to Link to your Social Media Accounts in Showit – Links Part 3
- 10. How Blogging works with Showit
- 11. How to get your Showit Website Ready for Launch
- 12. Countdown to Launching your Showit Website (this is the blog you’re reading)
- BONUS – After your 14-day free Showit trial – use our affiliate link to get your first paid month for free!
Like this Blog Post?
PIN IT FOR LATER. And for more helpful tips follow us on PINTEREST.

Search
Create & launch your website in a
few simple steps
FREE GUIDE
While you’re here,
grab our FREE
‘Do’s & Don’ts of what to add to your website’ Guide.
‘Do’s & Don’ts of what to add to your website’ Guide.
When you sign up, we’ll send you
emails with additional helpful content.
About Lavinia & Tom
Hi, we're so glad you found us.
We love helping creatives like you finally have the website you’ve always wanted.
Blog Categories
Follow us
