grab our FREE
‘Do’s & Don’ts of what to add to your website’ Guide.
‘Do’s & Don’ts of what to add to your website’ Guide.
emails with additional helpful content.
Hi, we're so glad you found us.
We love helping creatives like you finally have the website you’ve always wanted.
few simple steps
Follow us
How to add my Instagram Feed to a Showit Website
In this week’s Showit Tutorial, we’re talking all about how to update social media and website links. But, because there is so much to cover, we’ve broken it up into three parts. This one focuses on Instagram.
Wait, want to learn more? Check out our entire – How-to Use Showit Series below.
- 1. How to Create a Showit Subscription
- 2. How to Import Your Showit Template
- 3. How to Update Text in Showit
- 4. How to Import & Update your images in Showit
- 5. How to Update Images in Galleries & Canvas Views inside Showit
- 6a. How to Update Master Fonts in Showit – Site Styles Part 1
- 6b. How to Update Master Colours in Showit – Site Styles Part 2
- 7. How to Update Site Canvases in Showit
- 8a. How to add my Instagram Feed – (this is the blog you’re reading)
- 8b. How to Link to Email Addresses in Showit – Links Part 2
- 9. How to Link to your Social Media Accounts in Showit – Links Part 3
- 10. How Blogging works with Showit
- 11. How to get your Showit Website Ready for Launch
- 12. Countdown to Launching your Showit Website
- BONUS – After your 14-day free Showit trial – use our affiliate link to get your first paid month for free!

The Instagram Feed on Showit
To run an Instagram feed on your website, you’ll need a Widget.
Wait! What’s a Widget?
Think of a Widget as a little program that does a specific task.
In this case, the Widget provides an easy way to pull in your Instagram photos and display them on your website.
As your Instagram updates, this can help you to gain more followers, increase your social media presence and have fresh website content.
We’ll guide you through every step of the process, from the sign up to how to paste in the code generated. And don’t worry! You won’t be doing any coding yourself. All you’ll need to do is cut and paste some code into the widget.
Step 1
How to add my Instagram Feed to a Showit Website

• The Instagram Widget is found at the bottom of the website pages (just above the footer).
Step 2
How to add my Instagram Feed to a Showit Website
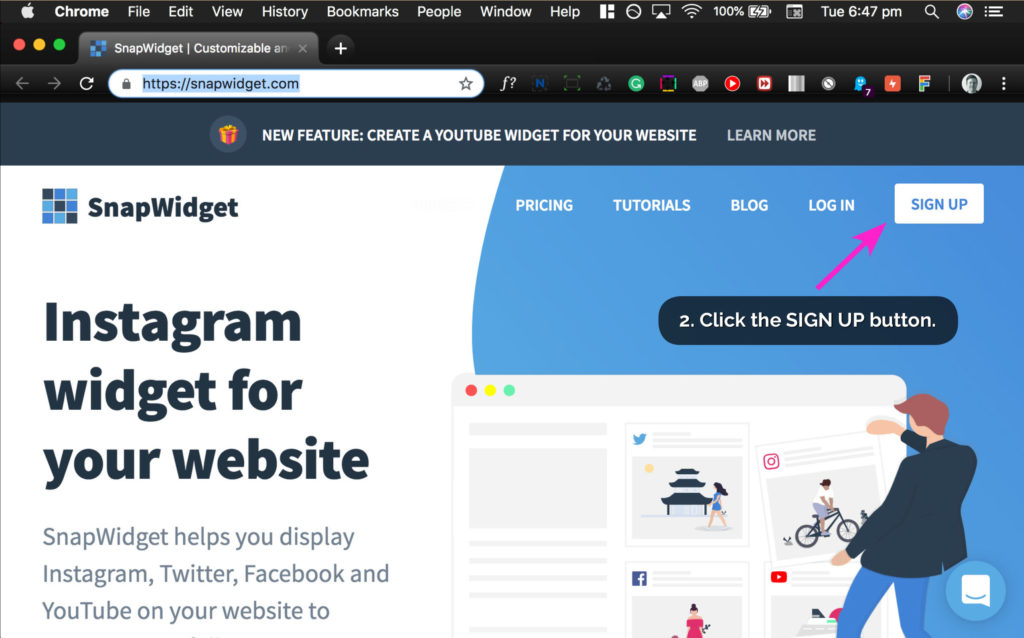
• For our Instagram Widget, we use Snapwidget.
• The first step is to get you signed up with a free account.
1. Go over to Snapwidget
2. Click the SIGN UP button.
Step 3
How to add my Instagram Feed to a Showit Website
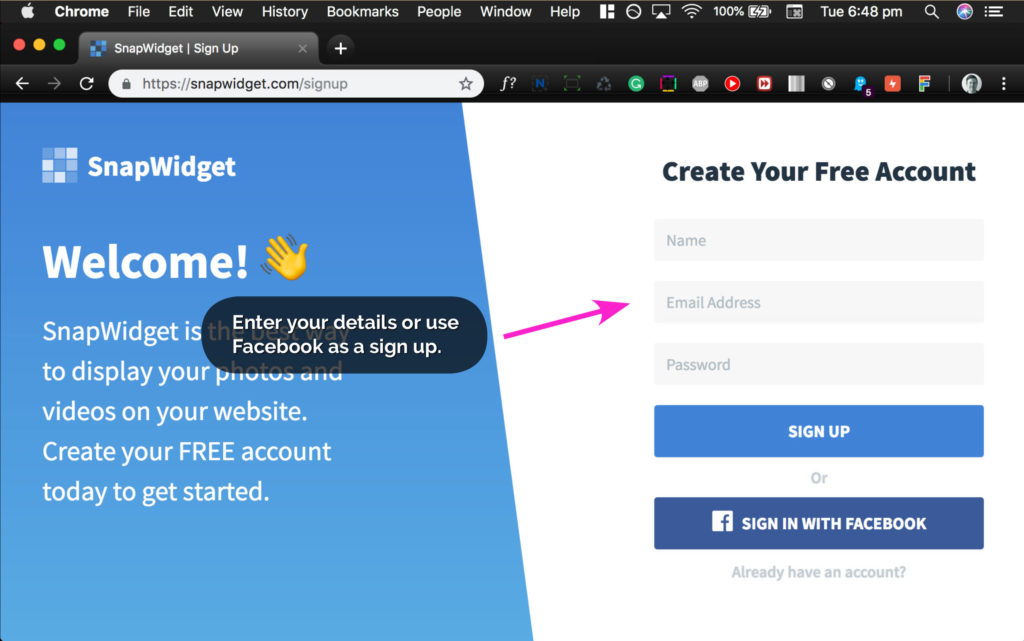
• Enter your name, email address and password or sign up with your
Facebook account.
Step 4
How to add my Instagram Feed to a Showit Website
• You may need to confirm your email address to proceed further.
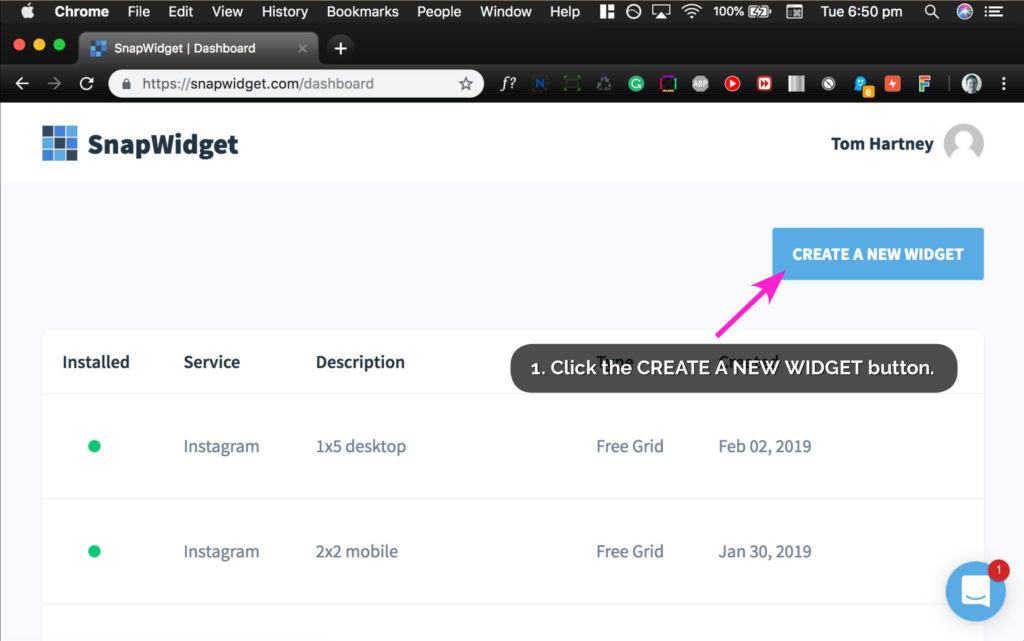
• Once you are signed in, you will be at the Snapwidget Dashboard as shown above.
In our example above, we already have 2 Instagram Widgets created.
One is for Mobile and the other for Desktop. We’re going to create a mobile layout (2×2 grid).
- Click on the CREATE A NEW WIDGET button.
Step 5
How to add my Instagram Feed to a Showit Website
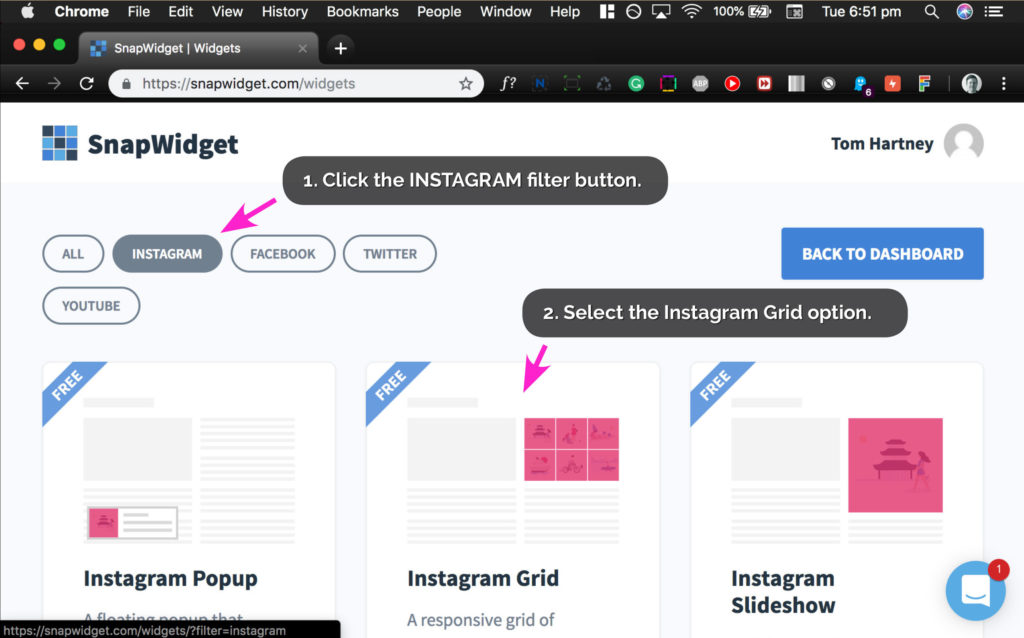
• The Snapwidget site allows you to create Widgets for most social media platforms.
• We’re only interested in Instagram.
- Click the Instagram filter button to only show Instagram Widgets on the screen.
- Select the Instagram Grid by clicking on it.
Step 6
How to add my Instagram Feed to a Showit Website
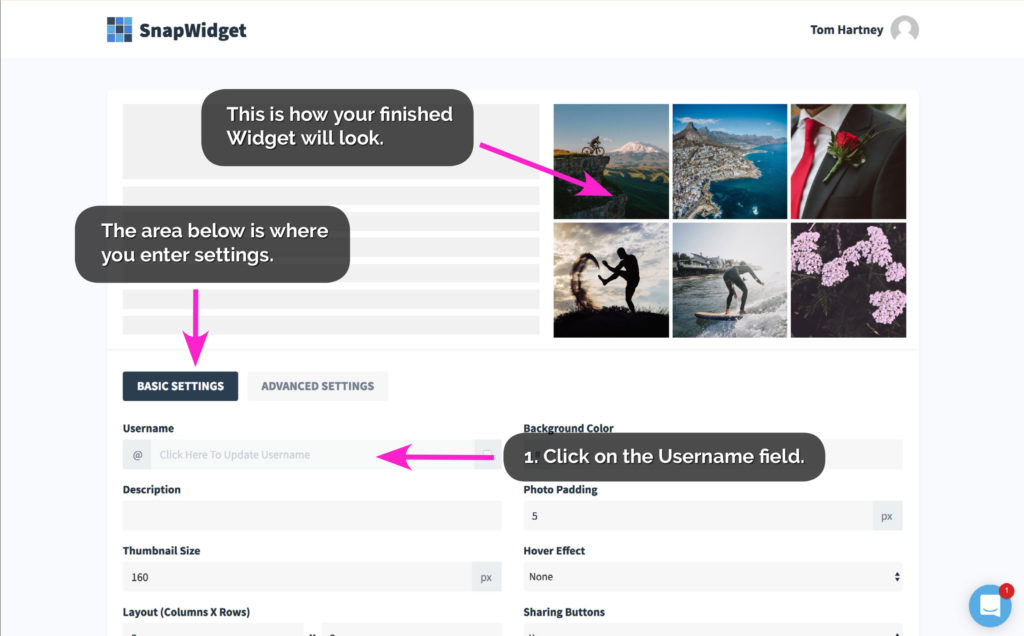
• You’re now on a screen where you construct your own Instagram Widget, giving it features such as how many columns and rows of photos you want. You’ll just be copying our settings for this.
• The top of the page shows how your finished widget will look. As you adjust the settings, you can update this view.
• The first thing to do is to link this Widget to your Instagram account.
- Click on the Username field.
Step 7
How to add my Instagram Feed to a Showit Website
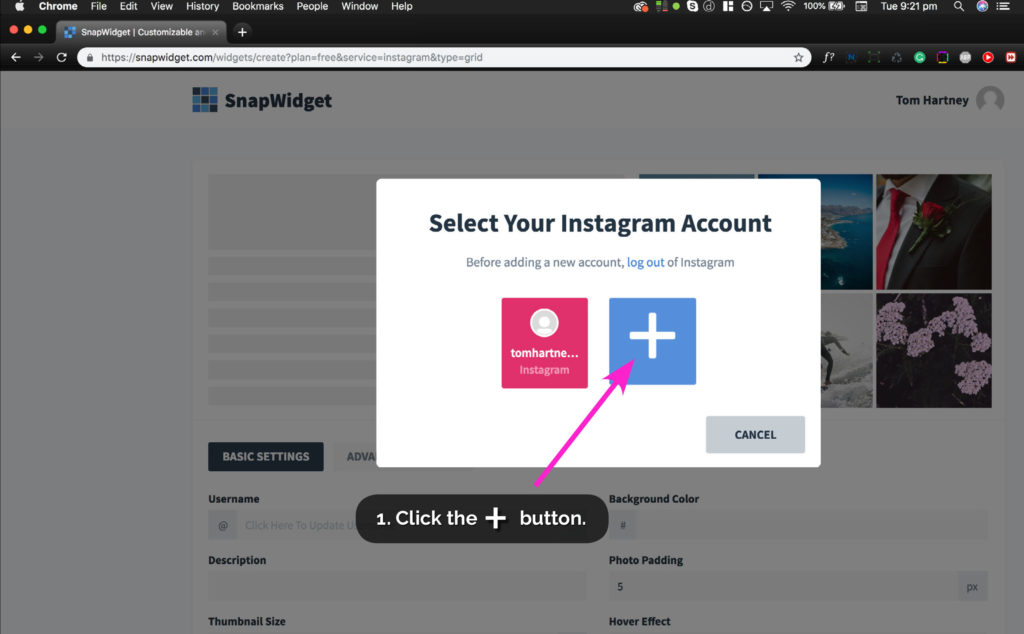
• A Pop-up window will appear.
- Click the Blue ‘+’ button to add a new Instagram account.
• You only have to do this once – for all future Widgets you create, you can click on the red button.
The example above shows our pre-linked Instagram account.
Step 8
How to add my Instagram Feed to a Showit Website
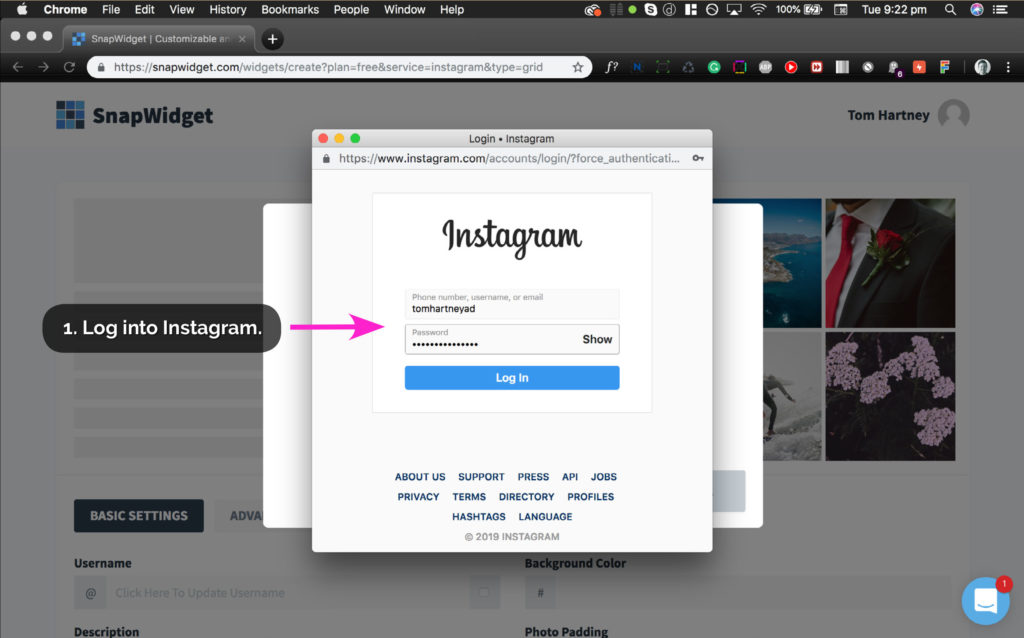
• Another pop-up will appear.
• Log into your Instagram account to be linked to the Widget.
Step 9
How to add my Instagram Feed to a Showit Website
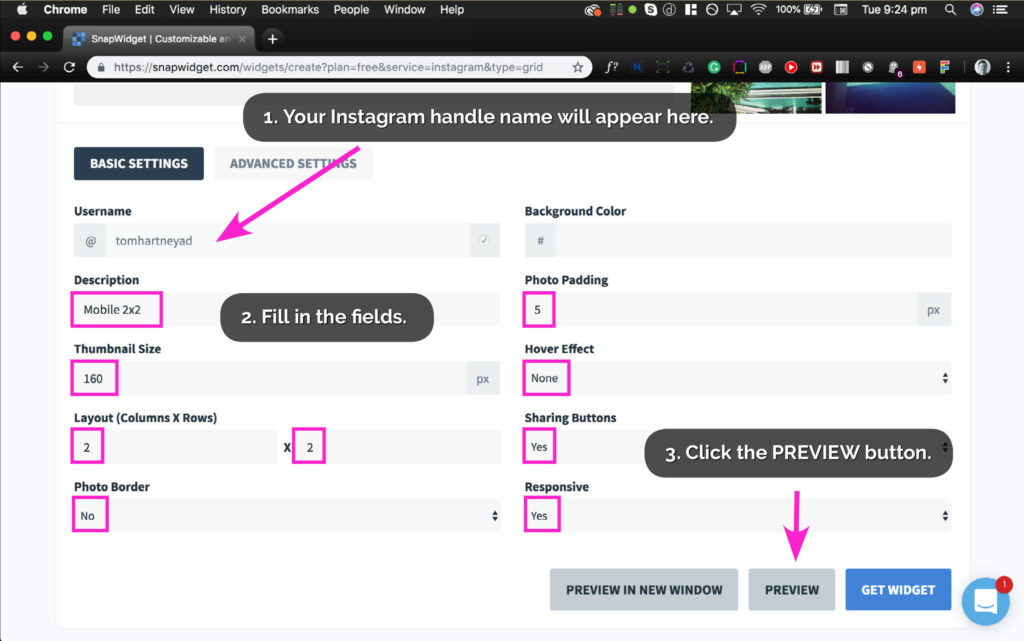
• You may need to scroll down the page to get to the Widget Creation fields.
- The Username field will now have your Instagram handle name in it.
- All you have to do is to fill out the fields as we have done above.
We have marked these fields with a magenta border. - Press the PREVIEW button.
Step 10
How to add my Instagram Feed to a Showit Website
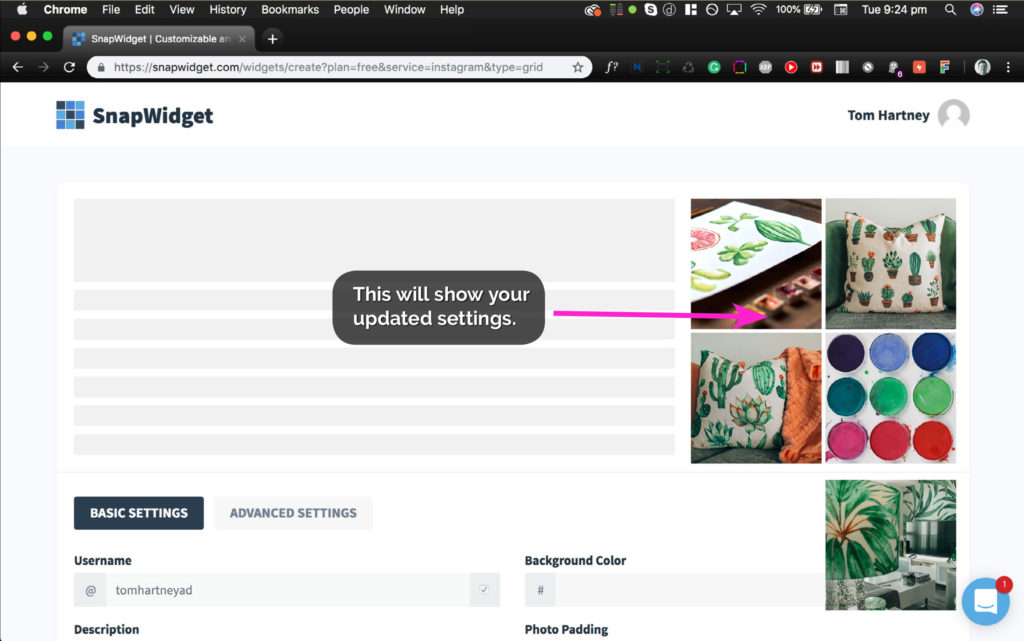
• Scroll to the top of the page to see the updated view.
• You should see a 2×2 Grid of your Instagram images. We are going to use this as our Mobile Widget.
Step 11
How to add my Instagram Feed to a Showit Website
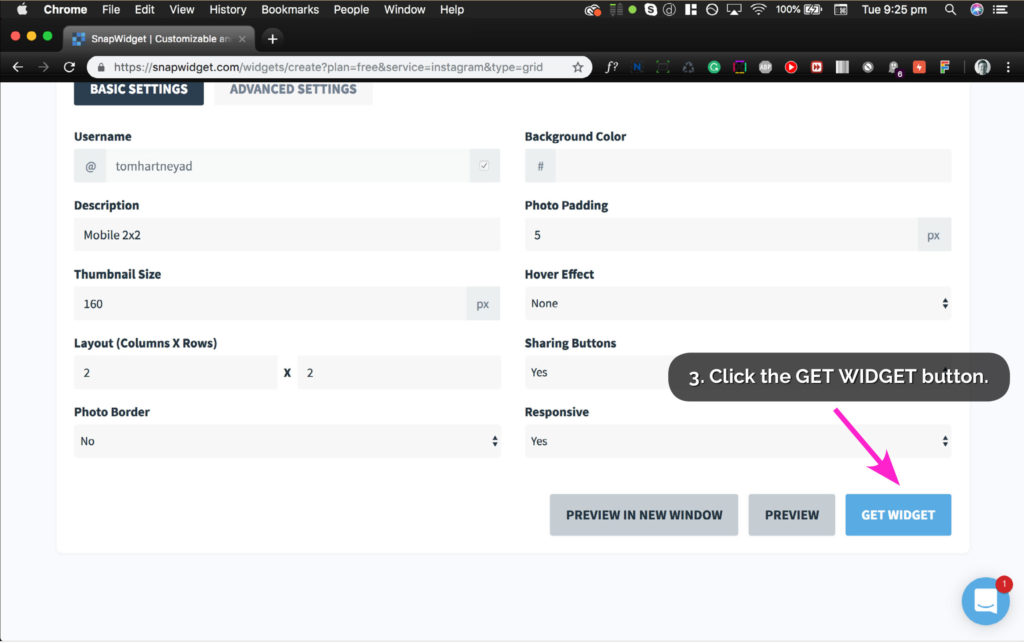
• Scroll back down to the bottom of the page so you can see the buttons again.
- Click on the GET WIDGET button.
Step 12
How to add my Instagram Feed to a Showit Website
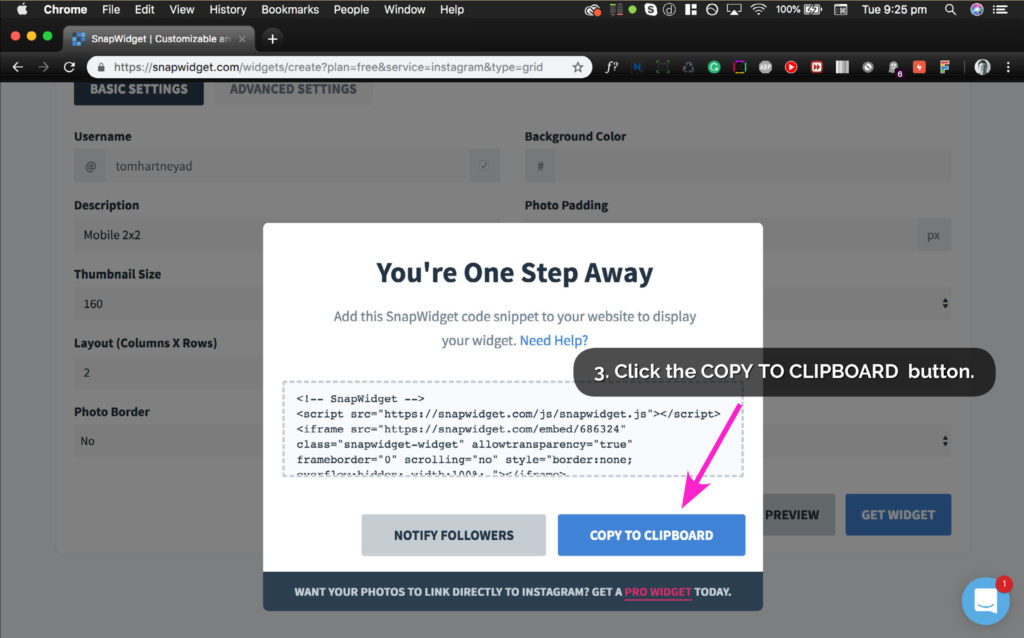
• A pop-up will appear as above.
- Click on the COPY TO CLIPBOARD button.
• This will copy the generated code the website has created for your Instagram feed and layout.
Step 13
How to add my Instagram Feed to a Showit Website
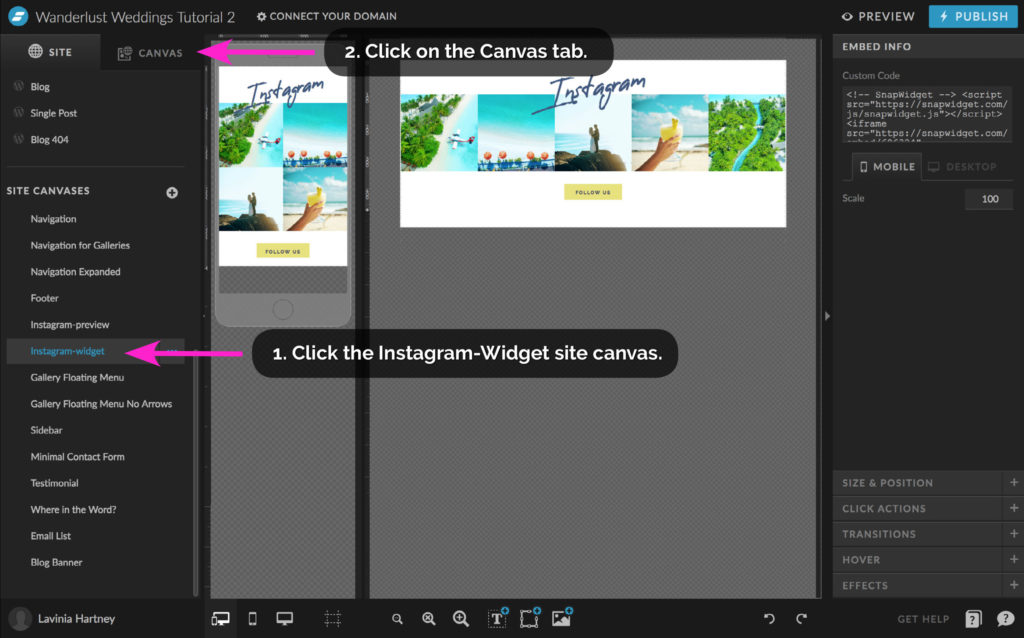
• Return to Showit.
- Click on the Instagram Widget site canvas.
- Click on the CANVAS tab.
Step 14
How to add my Instagram Feed to a Showit Website
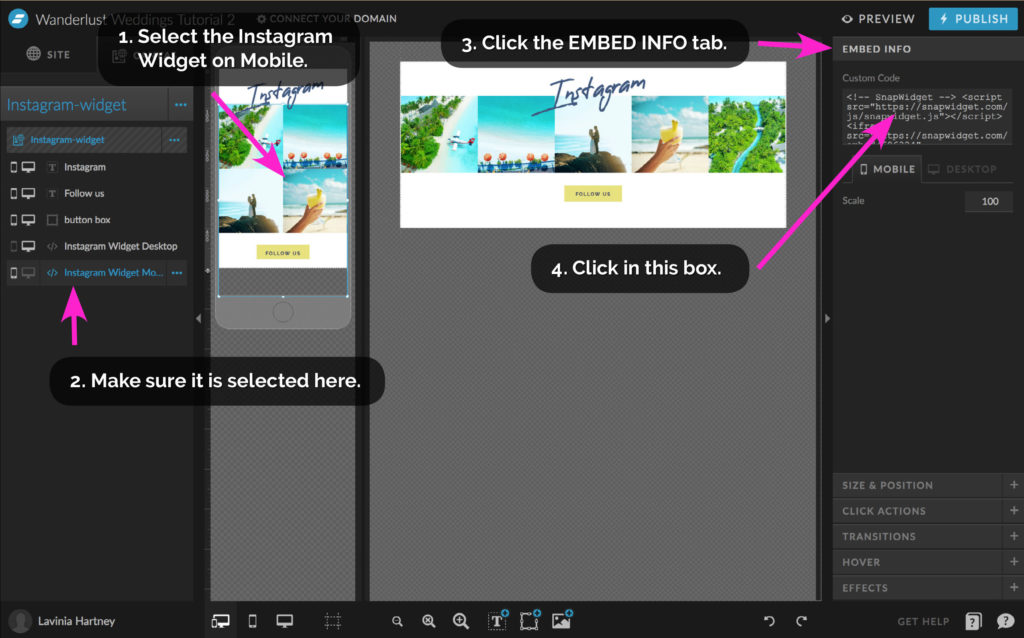
- Click on the Instagram Widget on the Mobile view.
- Make sure you have it selected by checking that the text is highlighted in the canvas tab.
- Click on the EMBED INFO tab.
- Next, click on the Custom Code box.
Step 15
How to add my Instagram Feed to a Showit Website
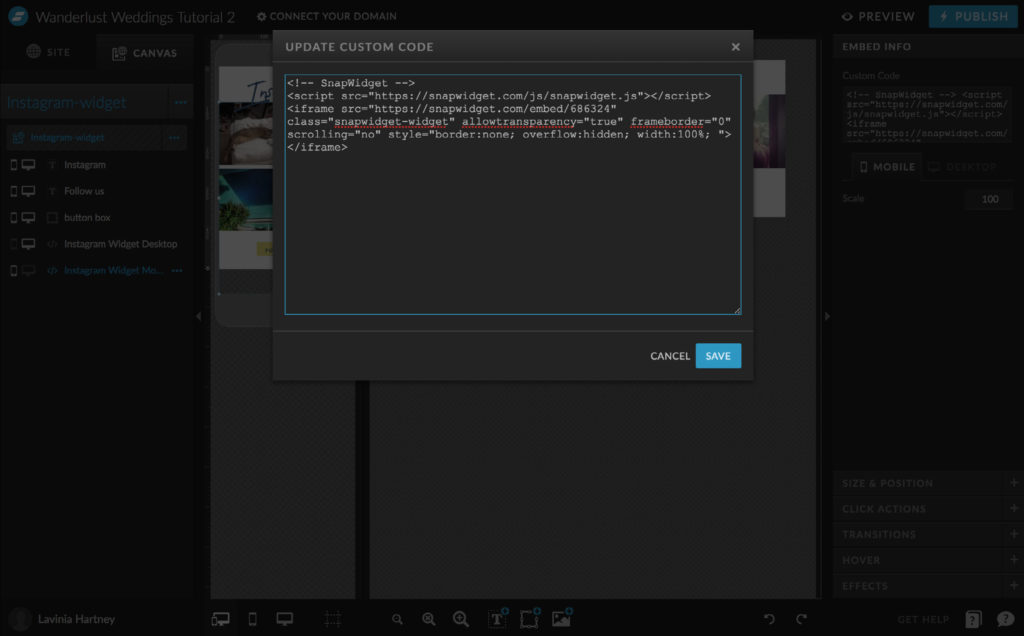
• A pop-up will appear with code from the existing Instagram widget.
(This is linking to our Instagram account).
• We now need to update this code so it will link to your Instagram account.
Step 16
How to add my Instagram Feed to a Showit Website
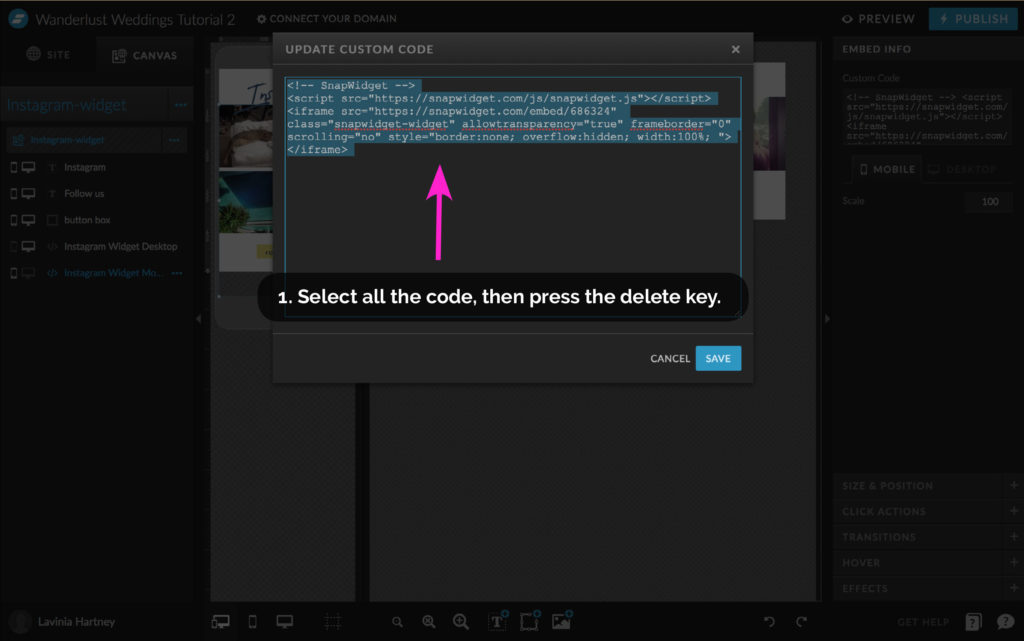
- Select all the code by clicking your mouse button at the start or end of
the code then dragging the mouse until all the code is highlighted blue. - Press the [DELETE] key on your keyboard.
Step 17
How to add my Instagram Feed to a Showit Website
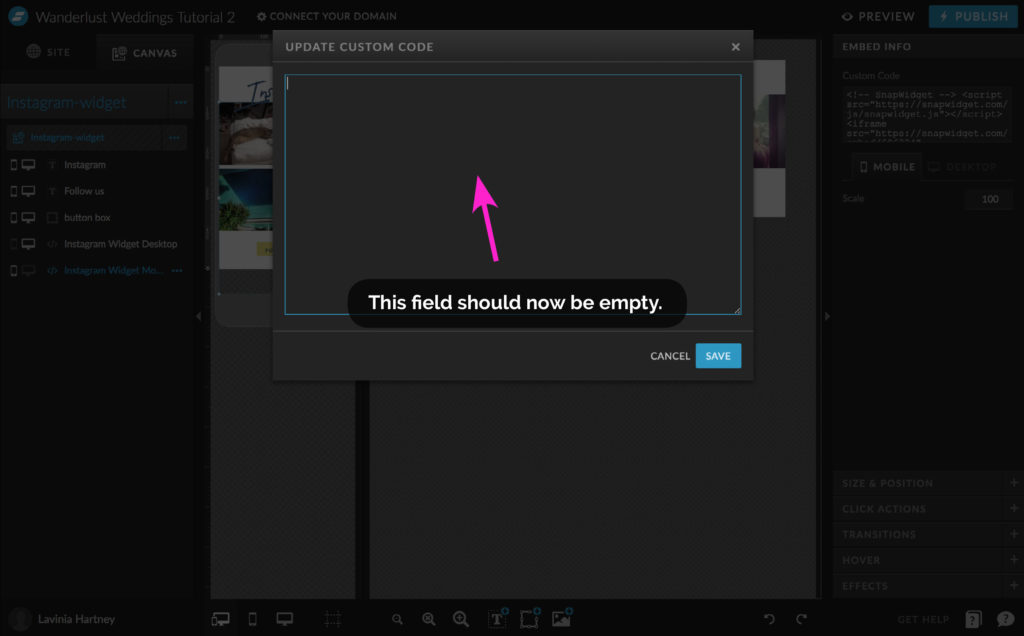
• You should now have an empty field to paste in your Instagram code.
Step 18
How to add my Instagram Feed to a Showit Website
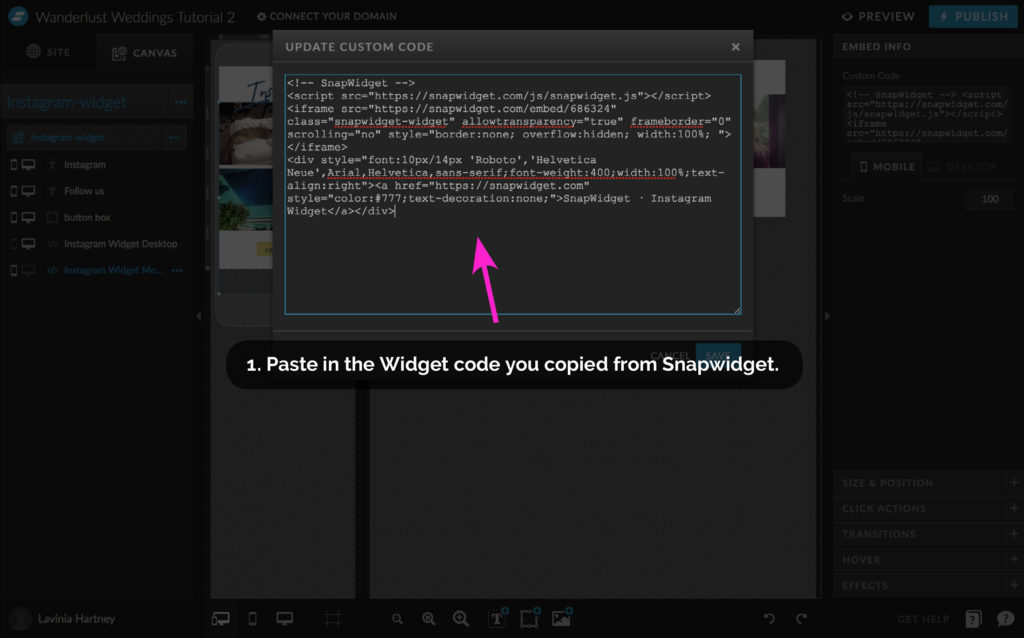
- Paste in your code by using the method below.
a. Right-Click your mouse and select Paste from the menu.
or
b. Press [COMMAND] + V on a Mac Computer or
Press [CONTROL] + V on a Windows Computer.
Step 19
How to add my Instagram Feed to a Showit Website
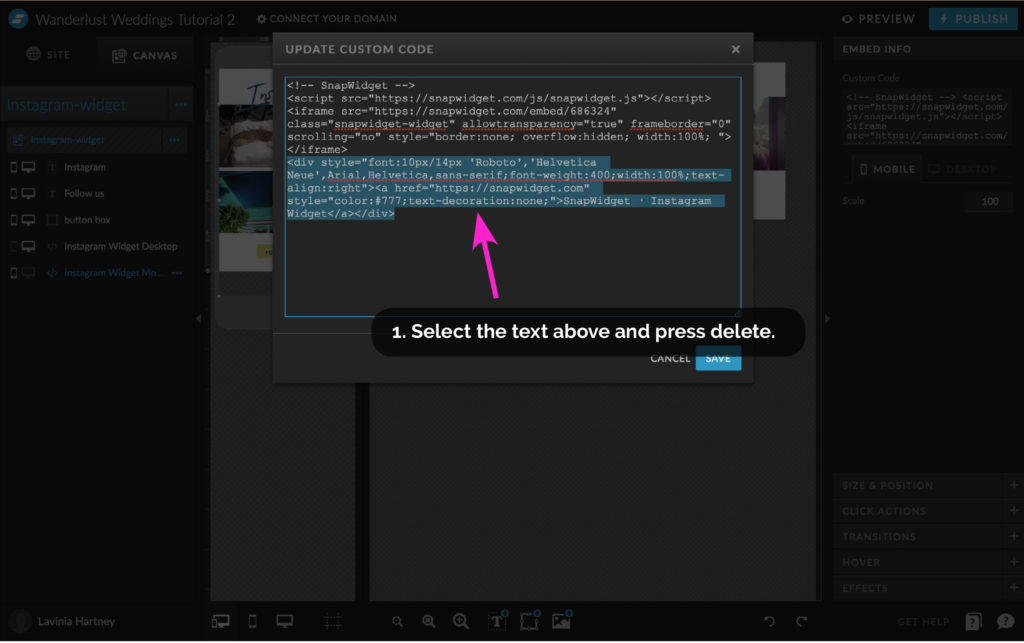
Our last step is deleting the code.
- Select the text as highlighted in the image above.
Start with the line
<div style =”font:10px/14 Roboto, Helvetica …
down to the very end of the code as highlighted in the image. - Once you have this selected, hit the [DELETE] key on your keyboard.
Step 20
How to add my Instagram Feed to a Showit Website
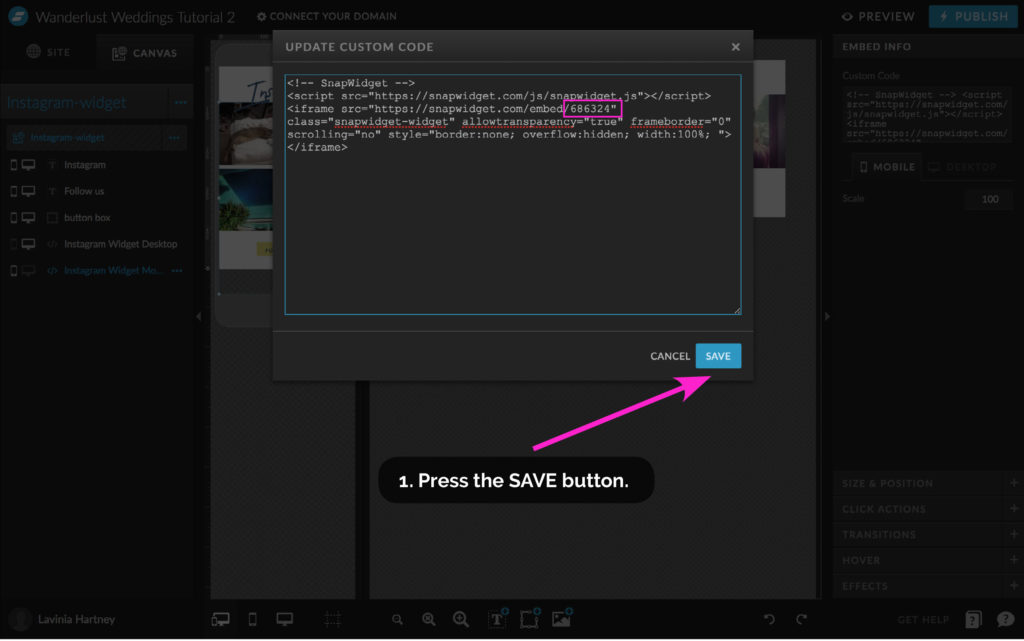
• Your code will look similar to the above image.*
- Press the SAVE button to confirm your changes.
Insider Tip:
*The only difference between your code and the one in the image
above will be the number that appears marked in the pink box.
Step 21
How to add my Instagram Feed to a Showit Website
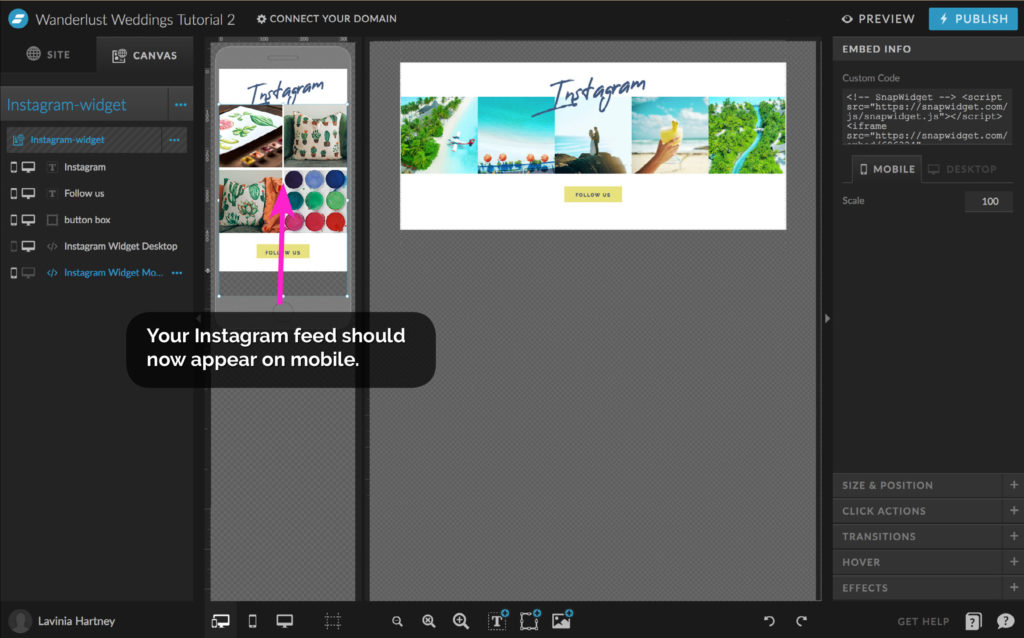
You Did it!
• You have successfully updated the Widget to show your Instagram feed of images.
Insider Tip:
To repeat this process for the Desktop Widget, the steps are exactly the same except you’ll be creating a 1-row x 5 column (1×5) layout, instead of a 2×2 layout.
Want More Help?
When you purchase a Template Emporium design we include a Step-by-Step template training series, that covers how to update both the mobile and desktop Instagram feed and so much more! All as downloadable Guides. Check it out here!
Your Action Steps:
- Sign up for a free account with SnapWidget
- Click on create a New Widget
- Pick the Instagram button and start with a Mobile 2×2 grid
- Construct your Widget and link it to your Instagram account
- Follow our steps above on how to use SnapWidget’s generated code
- Repeat the steps to create a Desktop 1×5 grid
- Congratulate Yourself! Your widget is updated & now shows your feed
After your 14-day free Showit trial – get an additional paid month for free!
Ready to start creating your website with Showit? Hit the button below and get your first subscription month for free.
Full disclosure, this is our affiliate link. So if you join Showit, you’ll be supporting us which helps us produce more content like this, at no additional cost to you.
Where to now?
The next link you’ll need to know is How to Link to Email Addresses in Showit – We Show You Here!
Like this Blog Post?
PIN IT FOR LATER. And for more helpful tips follow us on PINTEREST.

Search
Create & launch your website in a
few simple steps
FREE GUIDE
While you’re here,
grab our FREE
‘Do’s & Don’ts of what to add to your website’ Guide.
‘Do’s & Don’ts of what to add to your website’ Guide.
When you sign up, we’ll send you
emails with additional helpful content.
About Lavinia & Tom
Hi, we're so glad you found us.
We love helping creatives like you finally have the website you’ve always wanted.
Blog Categories
Follow us
